- 1 Key Takeaways
- 2 1. Role of This Logic
- 3 2. Basic Concept
- 4 3. Common Design Patterns
- 5 4. Implementation Method
- 6 5. Sample Code
- 7 6. Comparison by Pattern
- 8 7. Situations Where Malfunctions Are Likely
- 9 8. Items to Check in Backtesting
- 10 9. Items to Check in Forward Testing
- 11 10. Notes for Live Trading
- 12 11. Improvements and Alternatives
- 13 12. Summary
- 14 FAQ
- 14.1 Q1. What is the overfitting problem in trading?
- 14.2 Q2. What is the basic way to avoid over-optimization in an MQL5 EA?
- 14.3 Q3. Is CopyBuffer related to over-optimization control?
- 14.4 Q4. Should I choose the setting with the highest profit in optimization?
- 14.5 Q5. What is the difference between backtesting and forward testing?
- 14.6 Q6. What tends to happen when an over-optimized EA is used live?
- 14.7 Q7. Can lot sizing also cause over-optimization?
Key Takeaways
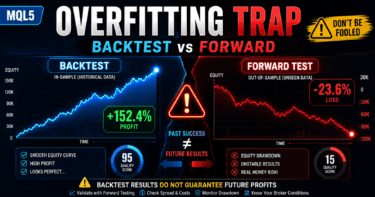
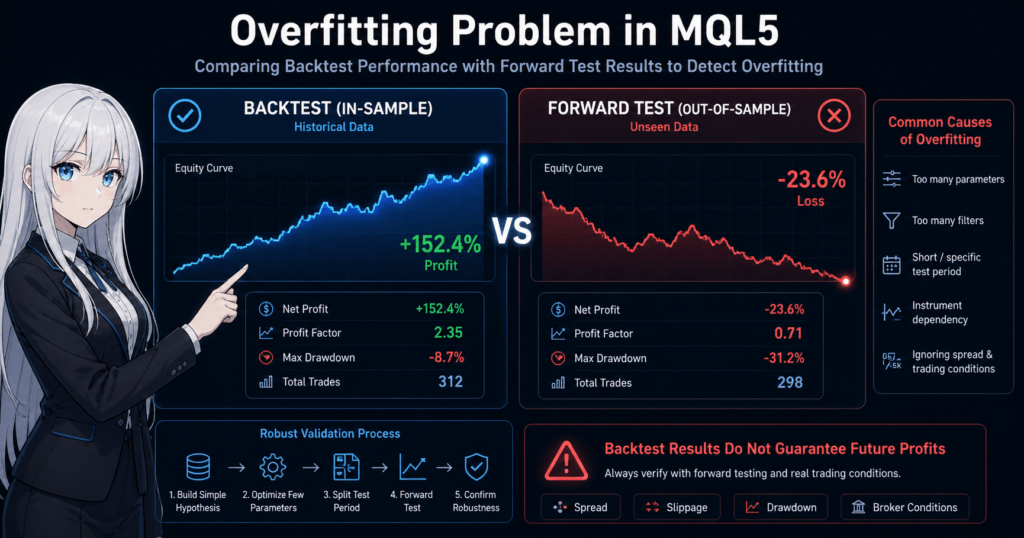
In trading, the overfitting problem means that a trading logic tuned too closely to backtest results becomes difficult to reproduce in forward testing or live trading.
For MQL5 EAs, you need to review parameters, filters, test periods, symbol dependency, and spread conditions separately.
To avoid over-optimization, keep the logic simple, split the validation period, and check behavior through forward testing.
Backtest results do not guarantee future profits, so before live use you must review execution conditions, spreads, drawdown, and broker specifications.
1. Role of This Logic
[Conclusion]
The role of over-optimization control is not to make an EA’s backtest performance look better. It is to find conditions that are less likely to break down in forward testing.
In an MQL5 EA, separating trading signals, filters, lot sizing, and exit conditions makes it easier to identify which part affects performance.
[Definition]
Over-optimization is a state where logic is fitted too closely to historical data for a specific period or symbol, causing lower reproducibility in unknown market conditions.
In EA design, separate conditions in the following flow.
- Market recognition
- Filter judgment
- Signal judgment
- Risk check
- Pre-order check
- Order submission
- Post-execution management
- Exit and stop judgment
This separation makes it easier to confirm whether the optimization result comes from the signal, the filter, or lot management.
1.1 Why Over-Optimization Becomes a Problem
An over-optimized EA may show a smooth equity curve on historical data, but it can suddenly stop working well when market conditions change.
This happens because the logic is fitted to random price movements that existed only during the test period, not to essential market behavior.
1.2 Areas to Watch in an MQL5 EA
In an MQL5 EA, indicator handles, CopyBuffer, OnTick, order processing, and position management work together.
When checking for over-optimization, review not only the trading logic but also data acquisition, execution conditions, spreads, and account type differences.
2. Basic Concept
[Conclusion]
The basic way to avoid over-optimization is to build a trading hypothesis that can be explained with a small number of conditions, then split the test period and check reproducibility.
As the number of parameters increases, backtest performance becomes easier to improve, but the EA may become weaker in unknown markets.
When designing an EA, first make sure you can explain why the entry is made under those conditions.
Even when using moving averages, ATR, ADX, breakouts, or similar tools, separate the role of each condition.
- Conditions that identify trend direction
- Conditions that identify volatility
- Conditions that identify entry timing
- Conditions that decide stop-loss and take-profit widths
- Conditions that stop trading
An EA with many conditions that cannot be explained becomes difficult to analyze during validation.
2.1 Keep the Number of Parameters Low
The more parameters you have, the more freedom the EA has to fit historical data.
For example, if you finely optimize the moving average period, ATR period, ADX period, stop-loss width, take-profit width, trading hours, and weekday conditions, the number of combinations grows rapidly.
For beginner to intermediate EA development, limiting the main parameters to about two to four at first makes test results easier to read.
2.2 Look at Ranges, Not Only the Best Value
To avoid over-optimization, do not look only at one best value. Check whether performance remains stable around that value.
For example, if a moving average period works well only at 20 and suddenly worsens at 19 or 21, the logic may be highly dependent on that period.
3. Common Design Patterns
[Conclusion]
A design that is less likely to overfit combines simple signals, clear filters, and a fixed validation procedure.
Before adding complex conditions, you need to confirm whether the basic logic works across multiple periods.
Common design patterns are as follows.
| Method | Pros | Cons | Best Used For |
|---|---|---|---|
| Simple moving average filter | Easy to implement | Prone to false signals in ranging markets | Initial validation |
| Volatility control with ATR | Easy to include market movement as a condition | Cannot determine trade direction | Designing trade avoidance conditions |
| Higher-timeframe filter | Easy to align with the larger direction | Trade count tends to decrease | Trend-following EAs |
| Split-period testing | Easy to check reproducibility | Validation takes more time | Pre-live validation |
| Parameter range review | Helps avoid accidental best values | Requires clear evaluation criteria | Post-optimization checks |
3.1 Separate Signals and Filters
A signal is the trigger for entry.
A filter is a condition that judges whether the market is suitable for trading.
If these two are mixed, it becomes hard to see which condition is affecting performance.
In an EA, implementing them as separate functions makes validation easier.
3.2 Check the Number of Trades
An EA with an extremely low number of trades may look profitable only because of a small number of winning trades.
You need to review the trade count, losing streaks, profit-loss ratio, and maximum drawdown together.
4. Implementation Method
[Conclusion]
In MQL5, the structure should create indicator handles in OnInit, use CopyBuffer in OnTick to get values, and then judge conditions.
Writing an EA as if indicator values can be obtained directly creates an unnatural structure for MQL5.
When using moving averages and ATR, the basic structure is as follows.
- Create iMA and iATR handles in OnInit
- Check that each handle is not INVALID_HANDLE
- Use CopyBuffer in OnTick to get values
- Decide whether to use the closed bar instead of the latest bar
- Separate signal, filter, and risk checks
- Check spread and lot limits before placing an order
4.1 Why Use a Closed Bar
The value of the latest bar changes with each tick.
Using a closed bar makes it easier to align judgment timing between backtesting and forward testing.
When treating an array as a time series with CopyBuffer, use ArraySetAsSeries.
In general, the first element of the array is treated as the latest bar, and the next element is treated as the previous closed bar.
4.2 Separate Pre-Order Checks
In MQL5 order processing, use MqlTradeRequest, MqlTradeResult, and, when needed, MqlTradeCheckResult.
For live trading, it is preferable to design the EA so that OrderCheck verifies margin and trading conditions before OrderSend.
Items to check include minimum lot, maximum lot, lot step, spread, stop level, freeze level, and tradable hours.
Because netting and hedging accounts have different assumptions for position management, EA behavior may also change.
5. Sample Code
[Conclusion]
The following code is a validation sample that separates the moving average filter and ATR filter to help avoid over-optimization.
This code is an implementation example. Before live use, you must validate it against the symbol, timeframe, spread, and execution conditions.
#property strict

input int    InpFastMAPeriod = 20;
input int    InpSlowMAPeriod = 50;
input int    InpATRPeriod    = 14;
input double InpMinATR       = 0.0005;
input double InpLots         = 0.10;

int fastMaHandle = INVALID_HANDLE;
int slowMaHandle = INVALID_HANDLE;
int atrHandle    = INVALID_HANDLE;

const int SHIFT_CLOSED_BAR = 1;

int OnInit()
{
   fastMaHandle = iMA(_Symbol, _Period, InpFastMAPeriod, 0, MODE_SMA, PRICE_CLOSE);
   slowMaHandle = iMA(_Symbol, _Period, InpSlowMAPeriod, 0, MODE_SMA, PRICE_CLOSE);
   atrHandle    = iATR(_Symbol, _Period, InpATRPeriod);

   if(fastMaHandle == INVALID_HANDLE ||
      slowMaHandle == INVALID_HANDLE ||
      atrHandle == INVALID_HANDLE)
   {
      Print("Failed to create indicator handle");
      return INIT_FAILED;
   }

   return INIT_SUCCEEDED;
}

void OnDeinit(const int reason)
{
   if(fastMaHandle != INVALID_HANDLE)
      IndicatorRelease(fastMaHandle);

   if(slowMaHandle != INVALID_HANDLE)
      IndicatorRelease(slowMaHandle);

   if(atrHandle != INVALID_HANDLE)
      IndicatorRelease(atrHandle);
}

void OnTick()
{
   if(BarsCalculated(fastMaHandle) < 3 ||
      BarsCalculated(slowMaHandle) < 3 ||
      BarsCalculated(atrHandle) < 3)
   {
      return;
   }

   double fastMa[];
   double slowMa[];
   double atr[];

   ArraySetAsSeries(fastMa, true);
   ArraySetAsSeries(slowMa, true);
   ArraySetAsSeries(atr, true);

   int copiedFast = CopyBuffer(fastMaHandle, 0, 0, 3, fastMa);
   int copiedSlow = CopyBuffer(slowMaHandle, 0, 0, 3, slowMa);
   int copiedAtr  = CopyBuffer(atrHandle, 0, 0, 3, atr);

   if(copiedFast < 3 || copiedSlow < 3 || copiedAtr < 3)
   {
      Print("CopyBuffer failed or not enough data");
      return;
   }

   bool trendUp = fastMa[SHIFT_CLOSED_BAR] > slowMa[SHIFT_CLOSED_BAR];
   bool enoughVolatility = atr[SHIFT_CLOSED_BAR] >= InpMinATR;

   if(!trendUp || !enoughVolatility)
      return;

   if(PositionSelect(_Symbol))
      return;

   if(!IsLotAllowed(InpLots))
      return;

   SendBuyOrder(InpLots);
}

bool IsLotAllowed(double lots)
{
   double minLot  = SymbolInfoDouble(_Symbol, SYMBOL_VOLUME_MIN);
   double maxLot  = SymbolInfoDouble(_Symbol, SYMBOL_VOLUME_MAX);
   double stepLot = SymbolInfoDouble(_Symbol, SYMBOL_VOLUME_STEP);

   if(lots < minLot || lots > maxLot)
   {
      Print("Lot size is outside symbol limits");
      return false;
   }

   double steps = MathRound((lots - minLot) / stepLot);
   double normalizedLots = minLot + steps * stepLot;

   if(MathAbs(lots - normalizedLots) > 0.0000001)
   {
      Print("Lot size does not match volume step");
      return false;
   }

   return true;
}

void SendBuyOrder(double lots)
{
   MqlTradeRequest request;
   MqlTradeResult result;
   MqlTradeCheckResult check;

   ZeroMemory(request);
   ZeroMemory(result);
   ZeroMemory(check);

   request.action   = TRADE_ACTION_DEAL;
   request.symbol   = _Symbol;
   request.volume   = lots;
   request.type     = ORDER_TYPE_BUY;
   request.price    = SymbolInfoDouble(_Symbol, SYMBOL_ASK);
   request.deviation = 20;
   request.type_filling = ORDER_FILLING_FOK;

   if(!OrderCheck(request, check))
   {
      Print("OrderCheck failed: ", check.comment);
      return;
   }

   if(!OrderSend(request, result))
   {
      Print("OrderSend failed: ", result.retcode);
      return;
   }

   Print("Buy order sent. retcode=", result.retcode);
}
5.1 How to Read the Code
In this sample, buy conditions are allowed only when the moving averages meet the upward trend condition and ATR is at or above the minimum value.
Because signal judgment and volatility judgment are separated, it is easier to confirm which one affected performance during optimization.
5.2 Processing to Add Before Live Use
For live trading, consider not only fixed lots but also balance-proportional sizing, risk-percentage sizing, and volatility adjustment using ATR.
For lot sizing, you need to check account balance, equity, stop-loss width, tick value, tick size, minimum lot, maximum lot, and lot step.
6. Comparison by Pattern
[Conclusion]
For over-optimization control, you need to compare the optimization method itself.
Optimization over a single period is simple, but split-period testing and forward testing are important for checks that are closer to live trading.
| Validation Method | Pros | Cons | Best Used For | Over-Optimization Risk |
|---|---|---|---|---|
| Single-period backtest | Can be checked quickly | Easy to miss period dependency | Initial check | High |
| Optimization test | Easy to find parameter candidates | Easy to fit too closely to conditions | Candidate selection | High |
| Split-period testing | Easy to check reproducibility | Requires more validation work | Pre-live validation | Medium |
| Walk-forward-style review | Useful for viewing unknown periods | Design can become complex | Intermediate validation | Medium |
| Demo account forward test | Easy to observe execution and spreads | May differ from a live account | Pre-live validation | Lower |
6.1 How to Read Optimization Results
In optimization, choosing only the single point with the highest profit is risky.
Check whether maximum drawdown, trade count, and profit-loss ratio remain stable around nearby parameter values.
6.2 How to Split the Test Period
The validation period becomes easier to read when split into development, confirmation, and unknown periods.
Create conditions in the development period, narrow down candidates in the confirmation period, and check reproducibility in the unknown period.
7. Situations Where Malfunctions Are Likely
[Conclusion]
An over-optimized EA is more likely to malfunction when market conditions, spreads, or execution conditions change.
Be especially careful with logic that has a low number of trades or depends on very narrow time conditions.
Common situations where malfunctions are likely include the following.
- Ranging markets where trend judgment frequently reverses
- Time periods when spreads widen
- Low-liquidity time periods
- Sharp price moves during economic news releases
- Conditions where parameters have been narrowed too much
- Validation results with an extremely low number of trades
7.1 Impact of Spread Widening
When spreads widen, the cost at entry increases.
The smaller the profit target of the EA, the more vulnerable it becomes to wider spreads.
7.2 Impact of Execution Differences
Even if orders are executed as expected in a backtest, live trading may involve execution delays or slippage.
In environments with large execution differences, short-term trading EA performance can fluctuate more easily.
8. Items to Check in Backtesting
[Conclusion]
In backtesting, check not only total profit and loss but also maximum drawdown, trade count, losing streaks, and period dependency.
Even if the test is profitable, you need to examine reproducibility carefully when results depend on a small number of trades or only one specific period.
Check the following items.
- Total profit and loss
- Maximum drawdown
- Win rate
- Profit-loss ratio
- Trade count
- Losing streaks
- Spread conditions
- Period dependency
- Parameter dependency
- Symbol dependency
8.1 Check Maximum Drawdown
Maximum drawdown shows the depth of decline in the equity curve.
The higher the leverage, the more easily the same logic can produce a larger drawdown, so you need to define the acceptable range in advance.
8.2 Check Parameter Dependency
An EA whose performance changes sharply after a small parameter change may be over-optimized.
Check whether performance remains stable across multiple nearby values.
9. Items to Check in Forward Testing
[Conclusion]
In forward testing, check execution differences, spread widening, trade frequency, and stability in a VPS environment, which are harder to see in a backtest.
If the gap between backtest and forward test results is large, you need to review the EA conditions and execution environment.
Check the following items.
- Execution differences
- Behavior when spreads widen
- Trade frequency
- Drawdown
- Deviation from backtest results
- Broker differences
- Stability in a VPS environment
- Differences between demo and live accounts
9.1 Why Check on a Demo Account
On a demo account, you can confirm whether the EA starts as expected, obtains indicator values, and proceeds through order processing.
However, execution conditions may differ between demo and live accounts.
9.2 Why Results Break Down in Forward Testing
Forward results can break down because of overfitting to historical data, different spread conditions, execution differences, and different symbol specifications.
To separate the causes, leave log output and make it possible to check condition values at the time a signal occurs.
10. Notes for Live Trading
[Conclusion]
In live trading, you need to check not only over-optimization but also broker specifications, account type, execution method, spreads, margin, and lot restrictions.
Because backtest results do not guarantee future profits, pre-live validation and ongoing monitoring are necessary.
Before live trading, check the following items.
- Tradable hours
- Minimum lot, maximum lot, and lot step
- Margin conditions
- Stop level
- Freeze level
- Times when spreads widen
- Execution method
- Netting account or hedging account
- VPS operating status
- Stop conditions when errors occur
10.1 Differences Between Account Types
In a netting account, positions for the same symbol are consolidated.
In a hedging account, multiple positions may be held for the same symbol.
Because the assumptions for position management differ, EA design must also match the account type.
10.2 Add Risk Controls
An EA becomes easier to manage when it includes maximum drawdown, losing streak limits, daily loss limits, and trading stop conditions.
Risk control is not a feature for increasing profit. It is a design element for limiting unexpected loss expansion.
11. Improvements and Alternatives
[Conclusion]
To reduce over-optimization, reduce the number of parameters, separate the roles of the logic, and validate under multiple conditions.
Before adding complex filters, confirm reproducibility with simple conditions.
Possible improvements include the following.
- Reduce the number of parameters
- Look at stable ranges instead of only the best value
- Split the validation period
- Check different symbols and timeframes
- Use stricter spread conditions
- Compare fixed lots with risk-percentage sizing
- Record condition values in log output
- Run a forward test before live trading
11.1 Alternatives for Lot Sizing
Fixed lot sizing is easy to implement, but it does not adapt well to changes in account size.
With balance-proportional sizing or risk-percentage sizing, it becomes easier to calculate lots from the stop-loss width and acceptable loss.
| Method | Pros | Cons | Best Used For |
|---|---|---|---|
| Fixed lot | Easy to implement | Weak against account size changes | Initial validation |
| Balance-proportional | Easy to adjust based on funds | Hard to reflect stop-loss width | Long-term validation |
| Risk-percentage based | Easy to manage loss tolerance | Requires tick value checks | Pre-live design |
| Volatility adjustment | Easy to adapt to market movement | May become highly dependent on ATR | Symbols with large price ranges |
11.2 Improve Log Output
In EA validation, the reason an entry did not happen is also important.
If you log the moving average condition, ATR condition, spread condition, current position state, and OrderCheck result, it becomes easier to identify the cause.
12. Summary
[Conclusion]
The overfitting problem in trading is an important issue that cannot be avoided when validating an MQL5 EA.
Do not judge only by historical data performance. Combine role separation, split-period testing, parameter range review, and forward testing.
In MQL5, the basic design is to create handles in OnInit, use CopyBuffer in OnTick for judgment, and separate OrderCheck from OrderSend in order processing.
Separating trading logic, filters, lot sizing, pre-order checks, and position management makes it easier to identify the causes of over-optimization.
Backtest results do not guarantee future profits.
In live trading, you must check spreads, execution differences, broker specifications, account type, and acceptable drawdown, then confirm reproducibility through forward testing.
FAQ
Q1. What is the overfitting problem in trading?
The overfitting problem in trading means that a trading logic fitted too closely to historical data becomes difficult to reproduce in unknown market conditions. For MQL5 EAs, you need to check not only optimization results but also forward test behavior.
Q2. What is the basic way to avoid over-optimization in an MQL5 EA?
The basic approach is to keep the number of parameters low, separate the roles of the logic, and split the validation period. You should also check the stability of nearby parameter values, not only the single best result.
Q3. Is CopyBuffer related to over-optimization control?
CopyBuffer is important because it retrieves indicator values correctly in MQL5. If data retrieval fails or the latest bar is handled incorrectly, backtest and forward test judgments can become misaligned.
Q4. Should I choose the setting with the highest profit in optimization?
No. Choosing only the highest-profit setting may mean the EA is fitted too closely to historical data. Check maximum drawdown, trade count, profit-loss ratio, and stability around nearby parameters.
Q5. What is the difference between backtesting and forward testing?
Backtesting validates an EA using historical data. Forward testing checks execution differences, spreads, trade frequency, and drawdown in an environment closer to live trading.
Q6. What tends to happen when an over-optimized EA is used live?
An over-optimized EA tends to break down when market conditions or spread conditions change. Before live trading, you need to check the symbol, timeframe, broker specifications, and account type.
Q7. Can lot sizing also cause over-optimization?
Yes. Lot sizing can also contribute to over-optimization. Compare fixed lots, balance-proportional sizing, risk-percentage sizing, and volatility adjustment while checking maximum drawdown and margin conditions.