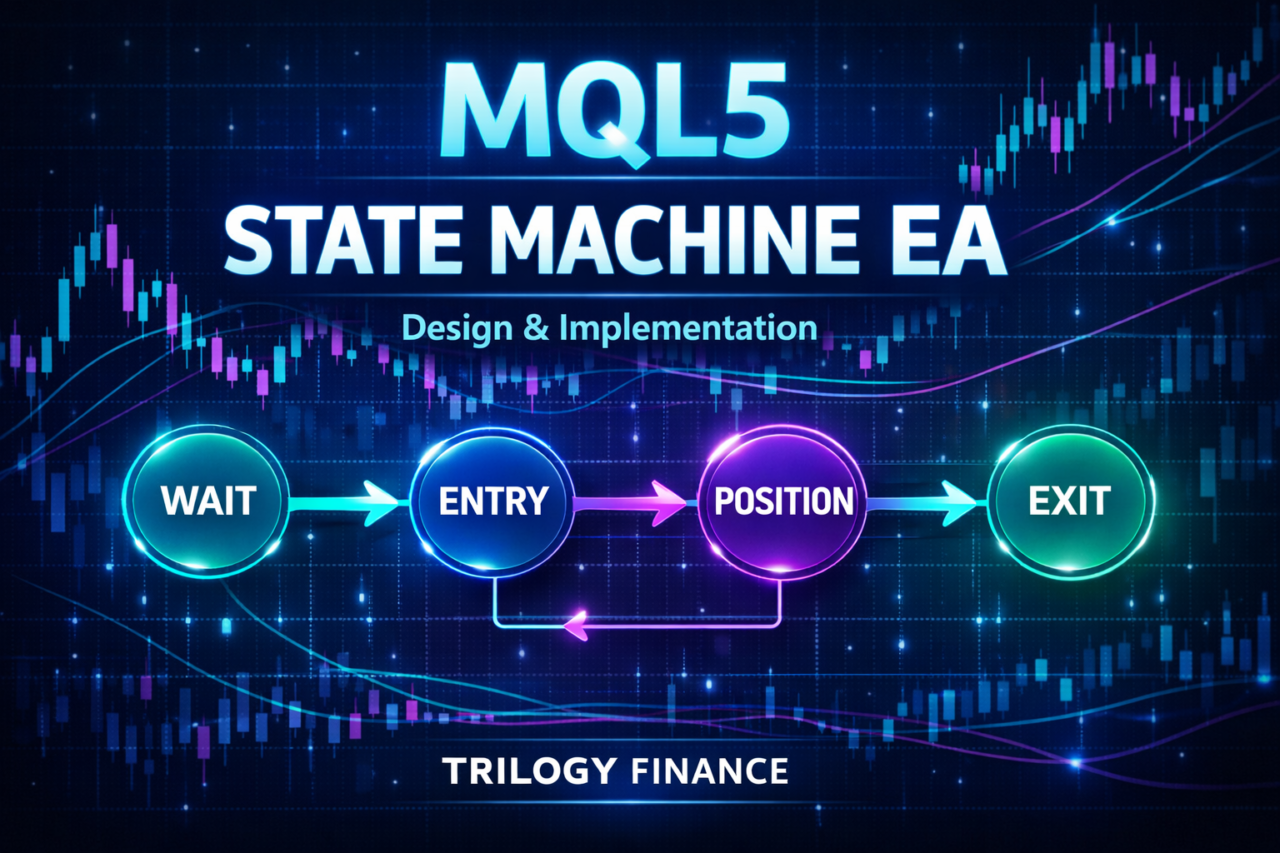

- 1 1. What Is a State Machine EA in MQL5?
- 2 2. Why a State Machine EA Is Needed
- 3 3. How to Build a State Machine EA in MQL5
- 4 4. How a State Machine EA Works
- 5 5. Comparison With Other EA Design Methods
- 6 6. Common Mistakes and Cautions
- 7 7. Practical Use Cases
- 8 8. Advanced State Machine Design
- 9 9. FAQ
- 9.1 9.1 What Is a State Machine EA?
- 9.2 9.2 Can Beginners Use It?
- 9.3 9.3 How Is It Different From an If-Based EA?
- 9.4 9.4 Does Performance Become Slower?
- 9.5 9.5 At What Scale Is It Needed?
- 9.6 9.6 Can It Be Used in MT4, or MQL4?
- 9.7 9.7 Does It Really Reduce Bugs?
- 9.8 9.8 How Should Execution Errors, or Order Failures, Be Handled?
- 10 10. Summary
1. What Is a State Machine EA in MQL5?
Conclusion:
A state machine EA is a design method that manages trading logic by separating processing by state and switching states when defined conditions are met.
Its main advantage is that even complex EAs can keep reproducibility and readability.
1.1 Basic Concept of a State Machine
Conclusion:
A state machine organizes branching logic by explicitly managing “which state the EA is in now.”
Definition:
A state machine is a design model that controls system behavior through states and transitions.
In an MQL5 EA, you can split the logic into states such as the following.
- Waiting state, waiting for entry conditions
- Entry state, executing an order
- Position-holding state
- Exit state
A traditional EA often uses many if statements inside OnTick to branch processing.
if(condition_A){
   // Entry
}

if(condition_B){
   // Exit
}
This structure is simple, but as the number of conditions grows, the following problems appear.
- Conditions conflict because multiple conditions become true at the same time
- The result depends on processing order
- The logic becomes difficult to follow
In a state machine, processing is limited by state.
switch(state){
   case WAIT:
      // Waiting for entry
      break;

   case ENTRY:
      // Order processing
      break;

   case POSITION:
      // Position management logic
      break;

   case EXIT:
      // Exit processing
      break;
}
This design makes it clear what the EA should do right now.
1.2 Role in an MQL5 EA
Conclusion:
A state machine is used to separate the EA’s decision logic from execution processing so the trading flow can remain stable.
An EA is made of three main elements.
- Signals, meaning buy or sell decisions
- Execution, such as orders through OrderSend
- Management, including position and risk management
Using a state machine allows each element to be separated as a state.
Example:
- WAIT: waiting for a signal
- ENTRY: executing OrderSend
- POSITION: holding a position while monitoring slippage and spread
- EXIT: closing the position
The most important point is to separate execution, meaning order processing, into its own responsibility.
Reasons:
- You can handle execution failures such as off quotes or no prices
- You can avoid placing orders when the spread widens
- You can add retry logic
Common mistakes beginners make:
- Writing signal logic and order execution together
- Calling OrderSend repeatedly
- Ignoring the current position state
With a state machine, one state has one responsibility, which helps prevent these issues.
1.3 Key Terms for Beginners
Conclusion:
You can implement a basic state machine if you understand three terms: state, transition, and trigger.
- state
The current phase of the EA, such as waiting or holding a position - transition
The condition that switches the state, such as price reaching a level, time, or an indicator condition - event or trigger
The factor that causes a transition, such as OnTick, a spread change, or an execution result
Specific example:
- state: WAIT
- event: price crosses above a moving average
- transition: WAIT → ENTRY
In practical EA development, the following terms are also important.
- spread: the trading cost between bid and ask
- slippage: execution price deviation
- execution: order processing, such as OrderSend
Common misunderstandings:
- “State equals condition” is incorrect
A state means where the EA is now; a condition decides where it goes next. - “More states are always better” is incorrect
Too many states can make the design more complicated.
Basic design rules:
- Keep the number of states minimal
- Make transition conditions clear
- Limit each state to one main responsibility
2. Why a State Machine EA Is Needed
Conclusion:
A state machine is a structure for keeping a complex EA controllable.
Once conditional branches increase, a traditional if-statement design can lose reproducibility and stability.
2.1 Problems With Traditional EA Design
Conclusion:
An if-based EA works for small logic, but it can break down easily when conditions increase.
A typical EA is often written like this.
if(entry_condition){
   OrderSend(...);
}

if(exit_condition){
   PositionClose(...);
}
It may look fine at first, but practical use often creates the following problems.
- Conditions conflict because they become true at the same time
- Execution depends on order, so the condition written earlier takes priority
- The current state is unclear, making it hard to know whether the EA holds a position
The more serious issue is loss of reproducibility.
Example:
- In a test, the EA moved from entry to exit in the expected order
- In live operation, the exit condition was already true first
This kind of condition-order dependency creates gaps between backtesting and live trading.
Common beginner mistakes:
- Calling OrderSend without checking existing positions
- Placing multiple orders on the same tick
- Ignoring spread
As a result, the EA can produce unnecessary entries, unintended exits, and execution errors such as off quotes or no prices.
2.2 Benefits of Introducing a State Machine
Conclusion:
A state machine is useful because it fixes the processing order and helps guarantee reproducible logic.
Main benefits:
- Logic is separated by state
- Condition conflicts are avoided
- Debugging becomes easier
For example, you can apply rules such as “only entries are handled in the WAIT state” and “only exits are handled in the POSITION state.”
This prevents unnecessary OrderSend calls, makes position management clear, and localizes the impact of slippage and spread.
Important points:
- Different states run different processing
- Multiple processes do not run at the same time
This directly improves EA stability.
It also helps with validation.
- You can test logic by unit or state
- You can identify where a bug occurs more easily
- Results are more likely to match forward testing
2.3 Relationship to Trading in Practice
Conclusion:
A state machine is a design for separating trade decisions from order execution.
Trading in an EA follows this flow.
- A signal occurs, meaning an entry condition is met
- Order processing runs through OrderSend
- Execution occurs
- The position is managed
- The position is closed
In a traditional EA, these steps are often mixed together.
Problems:
- Processing after execution failure is unclear
- Slippage-related deviation is not handled
- Orders may be placed incorrectly when the spread widens
A state machine separates these concerns.
Example:
- WAIT → signal monitoring
- ENTRY → execute only OrderSend
- POSITION → position management
- EXIT → closing the position
This design allows retries after order failure, controlled behavior when the market is closed, and branching based on execution results.
Important cautions:
- Do not leave state transition conditions vague
- Always check the execution result, success or failure
- Add a spread filter before ENTRY
Common mistakes:
- Continuing condition checks inside the ENTRY state
- Forgetting to update the state
- Leaving error transitions undefined
3. How to Build a State Machine EA in MQL5
Conclusion:
A state machine EA in MQL5 can be implemented by defining states with enum and controlling them with switch inside OnTick.
Even a minimal structure can become a practical EA.
3.1 Implementation Steps
Conclusion:
The following four steps create stable state management.
Steps:
- Define states with enum
- Store the current state in a variable
- Use switch inside OnTick
- Update the state when conditions are met
Step 1: Define the States
enum State {
   WAIT,       // Waiting for entry
   ENTRY,      // Order processing
   POSITION,   // Holding a position
   EXIT        // Exit processing
};
Key points:
- Name states based on their roles
- Start with about four or five states, because too many states are risky
Step 2: Manage the Current State
State current_state = WAIT;
Cautions:
- Always define the initial state
- Manage it as a global variable so it is retained across OnTick calls
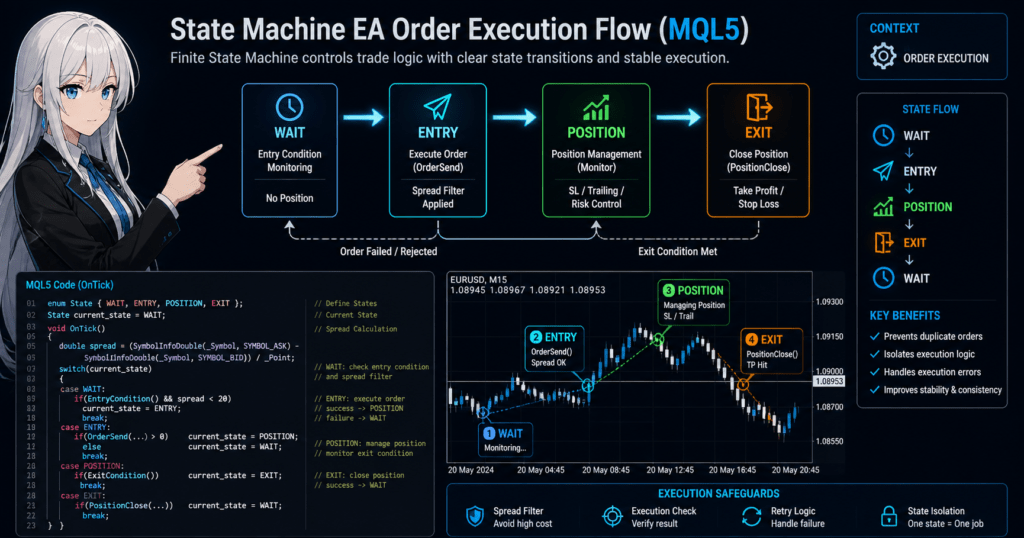
Step 3: Control It in OnTick
void OnTick()
{
   switch(current_state)
   {
      case WAIT:
         // Check entry conditions
         break;

      case ENTRY:
         // Order processing
         break;

      case POSITION:
         // Position management
         break;

      case EXIT:
         // Exit processing
         break;
   }
}
Important points:
- Limit one state to one process
- Do not mix processing from other states
Step 4: Implement State Transitions
if(entry_condition){
   current_state = ENTRY;
}
if(order_success){
   current_state = POSITION;
}
if(exit_condition){
   current_state = EXIT;
}
if(no_position){
   current_state = WAIT;
}
Key points:
- Make it clear when the state changes
- Keep each transition condition focused and explicit
3.2 Sample Code, Minimal Structure
Conclusion:
The following code is a minimal working form of a state machine EA.
enum State {
   WAIT,
   ENTRY,
   POSITION,
   EXIT
};

State current_state = WAIT;

void OnTick()
{
   double spread = (SymbolInfoDouble(_Symbol, SYMBOL_ASK) - SymbolInfoDouble(_Symbol, SYMBOL_BID)) / _Point;

   switch(current_state)
   {
      case WAIT:
         if(entry_condition && spread < 20) // spread filter
         {
            current_state = ENTRY;
         }
         break;

      case ENTRY:
         if(OrderSend(...) > 0) // order success
         {
            current_state = POSITION;
         }
         else
         {
            current_state = WAIT; // return on failure
         }
         break;

      case POSITION:
         if(exit_condition)
         {
            current_state = EXIT;
         }
         break;

      case EXIT:
         if(PositionClose(...))
         {
            current_state = WAIT;
         }
         break;
   }
}
Practical points:
- Add spread control before ENTRY
- Transition based on the execution result
- Define where the EA returns when an error occurs
3.3 Example State Transition Design
Conclusion:
State transitions can directly represent the actual trading flow.
Basic flow:
WAIT → ENTRY → POSITION → EXIT → WAIT
Filters Used in Practice
Before entry:
- Spread check to avoid high costs
- Time filter, such as London or New York sessions
- News-event avoidance
While holding a position:
- Check slippage impact
- Trailing stop
- DD, or drawdown, monitoring
At exit:
- Take profit and stop loss
- Abnormal termination such as market closed
Common Mistakes
- Forgetting to update the state
This can cause an infinite loop or stalled processing. - Calling OrderSend repeatedly in ENTRY
This can create duplicate orders. - Rechecking entry conditions in POSITION
This breaks the logic flow. - Ignoring execution failure
This can fail in live operation.
Design Tips
- Write only what should happen now
- Think about the next state
- Always write exception handling for failures
4. How a State Machine EA Works
Conclusion:
A state machine EA keeps only one active state at a time and changes state only when an event occurs.
This structure keeps processing consistent and reproducible, which is why complex EAs can operate more reliably.
4.1 Basic Structure of a State Transition Model
Conclusion:
A state machine is a finite state machine, or FSM, and only one state exists at any time.
Basic structure:
- State = current phase
- Transition = condition that switches the state
- Input = price, time, indicator, or another input
Important principles:
- The EA is not in multiple states at the same time
- Processing is fixed for each state
- A transition occurs only when the condition is met
Concept:
WAIT → ENTRY → POSITION → EXIT → WAIT
This structure fixes processing order, prevents unintended branches, and makes the logic flow clear.
4.2 Relationship With Event-Driven Processing
Conclusion:
An MQL5 EA runs as event-driven logic, and OnTick becomes the trigger.
The EA runs in this flow.
- A tick, or price update, occurs
- OnTick is called
- Processing for the current state runs
- The state transitions if the condition is met
In other words:
- OnTick = event occurrence
- Condition check = transition trigger
Example:
void OnTick()
{
   switch(current_state)
   {
      case WAIT:
         if(price_meets_condition)
            current_state = ENTRY;
         break;
   }
}
The important point is that events occur continuously, but transitions happen only when conditions are met.
This design prevents unnecessary processing, can reduce CPU load, and helps prevent logic malfunction.
4.3 Separation From Trade Processing
Conclusion:
A state machine EA improves live stability by separating decision logic from order execution.
Traditional problems:
- OrderSend is called immediately when a signal appears
- Processing after execution failure is unclear
- Slippage and spread are not considered
A state machine separates responsibilities.
| State | Role |
|---|---|
| WAIT | Signal monitoring |
| ENTRY | OrderSend, order processing |
| POSITION | Position management |
| EXIT | Closing the position |
This allows controls such as execution failure → retry or return to WAIT, spread widening → suppress transition to ENTRY, and market closed → keep the current state.
Specific Example of Execution Separation
case ENTRY:
   if(spread < 20)
   {
      if(OrderSend(...) > 0)
         current_state = POSITION;
      else
         current_state = WAIT;
   }
   break;
Key points:
- Check spread before sending the order
- Branch the state based on the execution result
- Always process both success and failure
Common Design Mistakes
- Running execution in WAIT
This breaks the meaning of the state. - Calling OrderSend in POSITION
This can cause duplicate orders. - Leaving error transitions undefined
This can freeze or stall the state.
Why This Structure Is Stable
The reason is simple.
- Processing is limited by state
- Processing order is fixed
- Exception handling can be defined explicitly
As a result, reproducibility improves, debugging becomes easier, and the EA is less likely to fail in live operation.
5. Comparison With Other EA Design Methods
Conclusion:
Small EAs may be fine with if statements, but when conditions increase, a state machine is more suitable. If you need more extensibility, modular design is also useful.
The important point is to choose the design method based on the purpose.
5.1 Design Methods to Compare
Conclusion:
The three methods to compare are if-based EAs, state machine EAs, and modular EAs.
Characteristics:
- If-based EA
The simplest method, built only with conditional branches. - State machine EA
A structured design that manages processing by state. - Modular EA, or modular design
A design that separates functions to improve reuse.
5.2 Comparison by Structure, Performance, and Practical Use
Conclusion:
A state machine is a control structure, while modular design is a composition structure. Their roles are different.
The comparison can be organized by viewpoint.
Readability, or Ease of Understanding the Code
- If statements
Readability quickly worsens as conditions increase, often creating deep nesting. - State machine
Stable because logic is separated by state. - Modular design
High readability because logic is separated by file or module.
Reproducibility, or Matching Backtests and Live Trading
- If statements
Results can drift because of condition-order dependency. - State machine
High reproducibility because order is fixed by transitions. - Modular design
Depends on the design and is not guaranteed by itself.
Extensibility, or Ease of Adding Logic
- If statements
Can break down each time more logic is added. - State machine
Can support additions by adding or adjusting states. - Modular design
Very high because features can be added as components.
Debugging, or Ease of Finding Bugs
- If statements
It is hard to identify where the logic is broken. - State machine
The flow can be traced by state. - Modular design
Problems can be traced by module.
Compatibility With Execution, or Order Processing
- If statements
Execution is easy to mix with other logic, which can cause problems. - State machine
Execution can be separated in the ENTRY state, which is ideal. - Modular design
Execution can be separated, but it depends on the design.
5.3 Practical Comparison Summary
Conclusion:
The most reasonable approach is to choose based on scale and complexity.
Decision criteria:
- Small scale, with two or three conditions
If statements are enough. - Medium scale, with more conditions or filters
A state machine is usually best. - Large scale, with multiple strategies or symbols
Use a state machine plus modular design.
Best Practical Structure
The most common successful pattern is:
- Control: state machine
- Features: module separation
Example:
- state: WAIT / ENTRY / POSITION / EXIT
- modules:
- Signal generation
- Spread filter
- Execution management
- Risk management, such as lot and DD
Common Misunderstandings
- “Modular design alone is enough”
Without state control, the logic can still break down. - “State machines are only for large EAs”
They start becoming useful at medium scale. - “If statements can do the same thing”
They can, but reproducibility tends to decline.
Core Idea
- State machine = control over the time sequence
- Modular design = separation of structure
These two approaches are complementary, not competing.
6. Common Mistakes and Cautions
Conclusion:
Failures in state machine EAs are concentrated in vague state design and transition management mistakes.
Too many states, unclear transition conditions, and unhandled execution exceptions can cause serious live-trading problems.
6.1 Too Many States
Conclusion:
If you do not keep states minimal, readability and maintainability can become worse.
Common example:
WAIT, ENTRY_READY, ENTRY_WAIT, ENTRY_EXEC,
POSITION_HOLD, POSITION_CHECK, EXIT_READY, EXIT_EXEC
Problems:
- State meanings overlap
- Transition patterns explode
- Bugs become difficult to locate
Solutions:
- Limit one state to one responsibility
- Merge similar states
Recommended structure:
WAIT → ENTRY → POSITION → EXIT
Additional notes:
- Handle small branches with if statements inside a state
- Organize the logic before adding more states
6.2 Vague Transition Conditions
Conclusion:
Transition conditions should be limited to clear conditions, or conflicts and malfunction can occur.
Bad example:
if(condition_A || condition_B){
   current_state = ENTRY;
}
Problems:
- You cannot tell which condition caused the transition
- The EA may transition at an unintended time
Improved example:
if(condition_A){
   current_state = ENTRY;
}
Or:
if(condition_A){
   reason = SIGNAL_A;
   current_state = ENTRY;
}
Practical points:
- Make transition conditions loggable
- Separate spread, slippage, and time conditions
6.3 Missing or Frozen State Transitions
Conclusion:
If the state is not updated, the EA stops in that state, creating an infinite loop or repeated processing.
Typical example:
case ENTRY:
   if(OrderSend(...) > 0){
      // State update is missing
   }
   break;
Result:
- The EA stays fixed in ENTRY
- OrderSend runs on every tick
- Duplicate orders and account damage can occur
Solution:
if(OrderSend(...) > 0){
   current_state = POSITION;
} else {
   current_state = WAIT;
}
Checkpoints:
- Does every branch decide the next state?
- Is there a transition for failure?
6.4 Mishandling Execution, or Order Processing
Conclusion:
Execution must always branch by success or failure, or live operation can break down.
Common errors:
- off quotes
- no prices
- market closed
- requote
Bad example:
OrderSend(...);
current_state = POSITION;
Problems:
- The order may not actually have been accepted
- Only the state moves forward
Correct example:
int result = OrderSend(...);

if(result > 0){
   current_state = POSITION;
} else {
   current_state = WAIT;
}
Practical points:
- Always check the execution result
- Limit the number of retries
- Do not transition when spread is abnormal
6.5 Live Trading Risks
Conclusion:
A state machine is not enough if market-condition risks such as spread, slippage, and liquidity are ignored.
Elements to watch:
- Sudden spread widening during news events
- Increased slippage from execution delays
- Execution rejection due to low liquidity
Solutions:
- Add a spread filter before ENTRY
- Return to WAIT when execution fails
- Use time filters, such as London and New York sessions
Example:
if(spread < 20 && time_condition_ok){
   current_state = ENTRY;
}
6.6 Summary of Common Design Mistakes
Conclusion:
If you follow the following three rules, you can prevent most critical bugs.
Important rules:
- Keep states minimal
- Make transition conditions clear
- Always branch based on execution results
Additional notes:
- Use Print logs to confirm the current state
- Run forward validation, not only backtesting
7. Practical Use Cases
Conclusion:
A state machine EA is most effective for strategies that process multiple conditions step by step.
It is especially useful when entry, holding, and exit control are important.
7.1 Suitable Strategies
Conclusion:
The more a strategy has many conditions or changing states, the more useful a state machine becomes.
Typical examples:
- Trend following
Step-by-step control from entry to trailing stop to exit. - Breakout
Range monitoring, breakout confirmation, entry, and profit taking. - Multiple-filter strategy
Sequential checks of spread, time, and indicator conditions.
Example: Trend Following
State structure:
WAIT → ENTRY → POSITION → EXIT
Processing:
- WAIT: monitor moving average cross
- ENTRY: execute OrderSend
- POSITION: trailing stop
- EXIT: close the position
Key points:
- Each phase has a clear responsibility
- The logic has high reproducibility
Example: Filter-Based EA
Break down entry conditions:
- spread < allowed value
- time window OK, such as London or New York sessions
- indicator condition is met
A state machine can turn these checks into a staged flow.
Example:
WAIT (condition monitoring)
 → ENTRY (execution)
 → POSITION (management)
Benefits:
- Unnecessary calculations can be reduced
- Condition priority becomes clear
7.2 Cases Where It Is Not Suitable
Conclusion:
For simple logic or very short-term strategies, the benefit of a state machine may be limited.
Cases where it may not fit:
- Simple EAs with only one or two conditions
- One-shot entry strategies with immediate exit
- Very short-term scalping
Reasons:
- State management overhead increases
- Execution delay and slippage impact can matter more
- The design cost may be larger than the benefit
Alternatives:
- Simple if-based design
- Lightweight logic that prioritizes speed
7.3 Practical Live-Operation Design Example
Conclusion:
In live operation, combining states, risk management, and filters is essential.
Basic Structure
WAIT
 → ENTRY
 → POSITION
 → EXIT
Adding Risk Management
- Lot size control for money management
- Maximum position count limit
- Drawdown, or DD, control
Example:
if(DD_exceeds_threshold){
   current_state = WAIT;
}
Filter Design, Important in Practice
Always add these before ENTRY:
- Spread filter
Avoid abnormal trading costs. - Time filter
Avoid low-liquidity periods. - News-event avoidance
Avoid sudden volatility risk.
Example:
if(spread < 20 && time_condition_ok){
   current_state = ENTRY;
}
Execution Control
- Confirm OrderSend success
- Retry on failure or return to WAIT
- Set an acceptable slippage range
Important Practical Points
- The decision not to enter is often the most important decision
- Use states to implement trade avoidance
- Design around the uncertainty of execution
7.4 Successful Practical Pattern
Conclusion:
Successful EAs usually control the flow with states and protect execution with filters.
Typical structure:
- State management: state machine
- Signal: indicator or price action
- Filters: spread, time, and news events
- Execution: safe processing
- Risk management: lot and DD
Common Mistakes
- No filters
This can fail in live operation. - States exist but their responsibilities are vague
This does not add value. - Execution is underestimated
Execution errors occur frequently.
Practical Conclusion
- Use states to control the flow
- Use filters to reduce risk
- Use execution handling to maintain order quality
An EA becomes stable only when these three parts work together.
8. Advanced State Machine Design
Conclusion:
At a practical level, you can handle complex strategies by combining single-state control with multi-state management, substates, and module integration.
This is where the design becomes more differentiated.
8.1 Multi-State Management for Multiple Positions
Conclusion:
When handling multiple positions or multiple symbols, a design with only one state becomes insufficient. You need to manage states individually.
Problems with a single state:
- Multiple positions cannot be distinguished
- Control cannot be separated by currency pair
- Simultaneous trading can break down
Solutions:
- Keep a state for each symbol
- Keep a state for each position
Example, symbol level:
struct TradeState {
   string symbol;
   State state;
};

TradeState states[];
Key points:
- Manage EURUSD and USDJPY separately
- Multiple states can exist at the same time
Where It Is Used in Practice
- Multi-currency EAs
- Portfolio trading
- Hedging strategies
Cautions
- The number of states can grow quickly
- Memory use and processing load can increase
- Synchronization mistakes become more likely
Solutions:
- Make the management unit clear, such as symbol or position
- Remove unnecessary states
8.2 Substate Design, or Hierarchical States
Conclusion:
Breaking one state into smaller internal states can organize complex logic.
Example:
Break down the ENTRY state:
ENTRY
 ├─ CHECK (condition check)
 ├─ EXECUTE (OrderSend)
 └─ VERIFY (execution confirmation)
Code example:
enum EntryState {
   CHECK,
   EXECUTE,
   VERIFY
};

EntryState entry_state = CHECK;
Benefits:
- Execution can be controlled in detail
- Slippage and spread handling becomes more flexible
- Debugging becomes easier
Common Uses
- Order retry control
- Switching between limit and market orders
- Handling execution errors
Cautions
- Too much depth makes the design complicated
- Beginners usually only need one layer
8.3 Integration With Modular Design
Conclusion:
The strongest practical structure is a combination of a state machine for control and modules for features.
Role separation:
- State machine
Controls the processing flow, meaning when to do what. - Modules
Implement the features, meaning how each process works.
Structure Example
State Machine
 ├─ Signal Module (signal generation)
 ├─ Filter Module (spread / time)
 ├─ Execution Module (OrderSend)
 └─ Risk Module (lot / DD)
Code concept:
case WAIT:
   if(CheckSignal() && CheckFilter())
      current_state = ENTRY;
   break;

case ENTRY:
   if(ExecuteOrder())
      current_state = POSITION;
   break;
Benefits
- High reusability
- Easier testing
- Easier logic changes
Practical Points
- Keep each module single-purpose
- Do not write raw strategy logic directly in the state block
- Always place execution in a dedicated function
8.4 Cautions in Advanced Design
Conclusion:
As the design becomes more advanced, design debt becomes easier to create. Keeping the design simple is the most important rule.
Common mistakes:
- Overengineering with states, substates, and modules
- Complex dependencies
- Difficult bug tracking
Solutions:
- Complete the EA first with a single-state structure
- Split the design only when needed
- Always output logs
Practical Decision Guide
- Small scale: single-state structure
- Medium scale: state plus filters
- Large scale: state plus modules
Core Principle
- Use states to control the flow
- Use modules to separate processing
This separation helps create an EA that can be maintained for the long term.
9. FAQ
Conclusion:
A state machine EA is a design that controls logic by state, and beginners can introduce it step by step.
This section summarizes common questions about implementation and operation.
9.1 What Is a State Machine EA?
Conclusion:
It is a design method that manages trading logic with states and state transitions.
- Processing is limited by state
- The EA moves to the next state when a condition is met
This keeps complex EAs reproducible.
9.2 Can Beginners Use It?
Conclusion:
Yes. Starting with four simple states, WAIT / ENTRY / POSITION / EXIT, is enough for a beginner implementation.
Key points:
- Start with a minimal structure
- Add filters such as spread and time gradually
- Do not begin with an advanced design
9.3 How Is It Different From an If-Based EA?
Conclusion:
An if-based EA branches by condition, while a state machine controls processing by state.
Differences:
- If statements: processing is easy to mix together
- State machine: processing is separated by state
As a result, a state machine usually has higher reproducibility and is easier to debug.
9.4 Does Performance Become Slower?
Conclusion:
For ordinary EAs, the performance impact is usually minimal. In many cases, the EA becomes more stable because unnecessary processing is reduced.
Reasons:
- Unnecessary condition checks decrease
- Processing is limited by state
Caution:
- Very short-term scalping may be affected because slippage and execution speed matter more
9.5 At What Scale Is It Needed?
Conclusion:
You should consider a state machine once conditional branches begin to increase.
Guideline:
- Two or three conditions → usually unnecessary
- Four or five or more conditions → recommended
- Filters included → almost essential
9.6 Can It Be Used in MT4, or MQL4?
Conclusion:
Yes. The same design can also be used in MQL4.
Differences:
- The language specifications differ somewhat
- However, the state management structure is the same
9.7 Does It Really Reduce Bugs?
Conclusion:
Yes. Because processing is separated by state, the possible range of a bug becomes narrower.
Effects:
- Cause identification becomes easier
- Reproducibility becomes higher
- Fixes can be localized
9.8 How Should Execution Errors, or Order Failures, Be Handled?
Conclusion:
In the ENTRY state, always branch between success and failure, and return to WAIT on failure.
Example:
if(OrderSend(...) > 0){
   current_state = POSITION;
} else {
   current_state = WAIT;
}
Important:
- Design execution with the assumption that it can fail
- Check spread and slippage before execution
10. Summary
Conclusion:
A state machine EA is a design that secures reproducibility and stability by controlling trades through states.
For medium-sized and larger EAs, it is practically a core architecture.
10.1 Key Points of This Article
Conclusion:
The three most important points are below.
- Separate processing by state
- Make transition conditions clear
- Always branch based on execution results
Additional notes:
- Follow the rule of one state, one responsibility
- Keep states minimal
- Always define exception handling for failures
10.2 Practical Decision Criteria
Conclusion:
The most reasonable approach is to decide based on the EA’s scale and complexity.
Decision criteria:
- Small scale, simple logic
If statements are enough. - Medium scale, multiple conditions or filters
A state machine is recommended. - Large scale, multiple strategies or symbols
Use a state machine plus modular design.
10.3 Best Structure for Live Operation
Conclusion:
Stable EAs separate state management, filters, and execution.
Recommended structure:
- State management: state machine
- Signal: indicator or price action
- Filters: spread, time, and news events
- Execution: OrderSend management
- Risk management: lot and drawdown, or DD
Important:
- The decision not to enter is often the most valuable decision
- Design around execution uncertainty
10.4 Practical Introduction Steps
Conclusion:
The following steps minimize implementation risk.
Steps:
- 1. Implement WAIT / ENTRY / POSITION / EXIT
- 2. Add a simple entry condition
- 3. Add execution success checking
- 4. Add a spread filter
- 5. Add a time filter
- 6. Add risk management, such as lot and DD
Key points:
- Do not build everything at once
- Expand the EA step by step
- Always run backtesting and forward validation
10.5 Final Conclusion
Conclusion:
A state machine is a core technique for protecting EA reproducibility.
- It keeps logic consistent
- It reduces accidents in live operation
- It minimizes gaps between validation results and live trading
As a result, the EA moves closer to the structure of a testable EA, which is more practical and easier to improve. This does not guarantee profit; it means the EA is easier to validate, compare, and operate responsibly.