

- 1 1. What Is an MQL5 Multi-Symbol EA?
- 2 2. Implementation Steps for a Multi-Symbol EA
- 3 3. Why a Multi-Symbol EA Is Needed
- 4 4. Comparison with a Single-Symbol EA
- 5 5. Common Mistakes and Cautions
- 6 6. Practical Use Cases
- 7 7. Performance Optimization Points
- 8 8. Frequently Asked Questions
- 8.1 8.1 Q&A
- 8.2 Q1. Does a multi-symbol EA run on one chart?
- 8.3 Q2. Can it be backtested accurately?
- 8.4 Q3. Can I implement it with OnTick only?
- 8.5 Q4. How should spread be managed?
- 8.6 Q5. How should lot size be decided?
- 8.7 Q6. Will a multi-symbol EA become heavy?
- 8.8 Q7. Can beginners develop one?
- 8.9 Q8. How is it different from placing the same EA on multiple charts?
- 8.10 Q9. Do differences in execution conditions matter?
- 8.11 Q10. What is the most important point in live operation?
- 9 9. Practical Operating Guidelines
1. What Is an MQL5 Multi-Symbol EA?
1.1 Definition
Conclusion:
A multi-symbol EA is a system that monitors and trades multiple currency pairs, or symbols, at the same time from one EA. Unlike a single-currency EA, it makes diversified trading possible.
Definition:
An MQL5 multi-symbol EA is an Expert Advisor that handles several symbols, such as EURUSD and USDJPY, inside one program and manages data retrieval, signal checks, and order execution with OrderSend in one workflow.
A standard EA usually works only on the currency pair shown on the chart where it is attached. A multi-symbol EA, however, handles several currency pairs at the same time, so it has the following characteristics.
- It can monitor multiple markets with one EA.
- It is less likely to miss trading opportunities on each currency pair.
- It supports risk diversification.
A common beginner misunderstanding is thinking that “placing the same EA on multiple charts” is multi-symbol trading. It is not. That is only a duplicated single-symbol EA setup.
A multi-symbol EA is designed to control multiple symbols from one instance.
1.2 Basic Concept
Conclusion:
Because the standard EA structure in MQL5 assumes one symbol, converting it to a multi-symbol EA requires expanding both data retrieval and processing structure.
The first point to understand is the MQL5 event model.
OnTick(): fires only for the symbol on the current chart.- It is not called by ticks from other symbols.
For example, if you attach an EA to an EURUSD chart:
- EURUSD price update:
OnTickruns. - USDJPY price update: nothing happens.
Because of this limitation, a multi-symbol EA needs the following design steps.
- Use
CopyRates()to retrieve price data for other symbols. - Use
SymbolInfoDouble()to retrieve the spread and prices. - Use loop processing to handle multiple symbols one by one.
Conceptually, the structure looks like this.
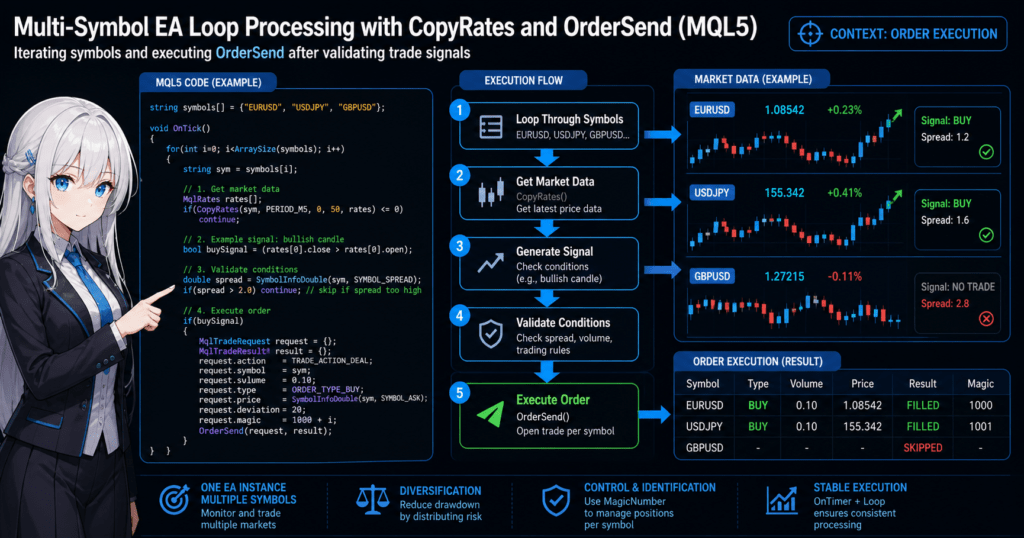
string symbols[] = {"EURUSD", "USDJPY"};

for(int i=0; i<ArraySize(symbols); i++)
{
    string sym = symbols[i];

    // Retrieve data
    MqlRates rates[];
    CopyRates(sym, PERIOD_M5, 0, 100, rates);

    // Trading logic
    // Condition check -> OrderSend
}
In this way, processing symbols in a loop becomes the basic design.
Important cautions:
- Data retrieval may fail if you do not use
SymbolSelect. CopyRatesmay fail when data has not been loaded yet.- Spread and slippage differ by symbol.
1.3 Common Use Cases
Conclusion:
Multi-symbol EAs are used in practical trading operations that aim for diversification, correlation-based trading, and maximizing market opportunities.
The three main use cases are below.
1. Portfolio Management
By handling several currencies at the same time, a trader can aim to stabilize returns.
- EURUSD only: opportunity loss occurs when no trend appears.
- Multiple currencies: a trend may appear somewhere.
As a result, it becomes easier to reduce fluctuations in expected value.
2. Correlation Trading
This approach uses relationships between currency pairs.
Examples:
- EURUSD and GBPUSD often have high correlation.
- USDJPY may sometimes move with inverse correlation.
Using these relationships makes strategies such as the following possible.
- Simultaneous entries
- Hedging
- Arbitrage
3. Distributed Signal Trading
This pattern applies the same logic to multiple currency pairs.
- Apply an RSI strategy to several currency pairs.
- Adjust volatility with an ATR filter.
- Control trades with spread conditions.
In this case, the benefit is that the logic is reproducible and easy to test.
Common Misunderstandings and Cautions
- Multiple charts do not automatically mean multi-symbol operation.
- Complete multi-symbol processing is difficult with
OnTickalone. - Risk can increase sharply if lot management is not separated.
- Execution conditions differ by currency pair.
2. Implementation Steps for a Multi-Symbol EA
2.1 Overall Implementation Flow
Conclusion:
A multi-symbol EA is built in four steps: symbol array, data retrieval, logic application, and order processing.
The overall flow is as follows.
- Define target symbols, such as EURUSD and USDJPY.
- Retrieve data for each symbol with
CopyRatesorCopyBuffer. - Apply trading logic, such as indicators and conditional branching.
- Send an order with
OrderSendwhen conditions are met.
This structure is simple, but the key is to separate every process by symbol.
Differences from a single-symbol EA:
- Do not depend on global variables.
- Keep state for each symbol.
- Complete the logic inside the loop.
2.2 Basic Implementation Steps
Conclusion:
The minimum setup can be built with an array definition, loop processing, data retrieval, and order processing.
The reusable basic procedure is below.
Steps You Can Implement As Is
- Define a symbol array.
- Enable each symbol with
SymbolSelect(). - Retrieve price data with
CopyRates(). - Process each symbol in a loop.
- Run
OrderSend()when conditions are met.
Sample Code
string symbols[] = {"EURUSD", "USDJPY"};

int OnInit()
{
    for(int i=0; i<ArraySize(symbols); i++)
    {
        SymbolSelect(symbols[i], true);
    }
    return(INIT_SUCCEEDED);
}

void OnTick()
{
    for(int i=0; i<ArraySize(symbols); i++)
    {
        string sym = symbols[i];

        MqlRates rates[];
        if(CopyRates(sym, PERIOD_M5, 0, 50, rates) <= 0)
            continue;

        // Simple condition, for example a bullish candle
        if(rates[0].close > rates[0].open)
        {
            Print("Buy signal: ", sym);
            // Move to OrderSend processing
        }
    }
}
Why Use This Structure?
CopyRatesrequires a symbol to be specified.- An EA works on one chart, so manual expansion is required.
- Multiple currency pairs cannot be handled without loop processing.
2.3 Practical Sample Code Structure
Conclusion:
In real use, state management by symbol and order identification with MagicNumber are essential.
Simple code can cause the following problems.
- You cannot tell which symbol a position belongs to.
- Simultaneous orders can conflict.
- Lot management can break down.
Recommended Structure
struct SymbolState
{
    string symbol;
    double lot;
    int magic;
};

SymbolState states[] =
{
    {"EURUSD", 0.1, 1001},
    {"USDJPY", 0.1, 1002}
};
Processing Example
for(int i=0; i<ArraySize(states); i++)
{
    string sym = states[i].symbol;

    // Retrieve data
    MqlRates rates[];
    if(CopyRates(sym, PERIOD_M5, 0, 50, rates) <= 0)
        continue;

    // Signal
    if(rates[0].close > rates[0].open)
    {
        // Order
        // Identify by MagicNumber
    }
}
Key Points
- Identify positions with
MagicNumber. - Separate lots by currency pair.
- Keep the design expandable for future risk control.
2.4 Moving Away from OnTick Dependency
Conclusion:
For a multi-symbol EA, depending only on OnTick is not enough. In practice, combining it with OnTimer is almost essential.
Problems:
OnTickfires for only one symbol.- You cannot depend on update timing from other currency pairs.
- Processing can become unbalanced.
Solution: OnTimer
int OnInit()
{
    EventSetTimer(1); // Every 1 second
    return(INIT_SUCCEEDED);
}

void OnTimer()
{
    for(int i=0; i<ArraySize(symbols); i++)
    {
        string sym = symbols[i];

        // Process all symbols evenly
    }
}
Benefits
- All symbols can be processed on a fixed cycle.
- Tick dependency is removed.
- Backtest reproducibility improves.
Cautions
- If the timer frequency is too high, load increases.
- Watch CPU usage in a VPS environment.
- Calling
CopyRatestoo often is inefficient.
Common Implementation Mistakes
- Forgetting
SymbolSelect: data retrieval fails. - Not checking the return value of
CopyRates: array errors occur. - Not setting
MagicNumber: positions get mixed. - Ignoring spread: execution becomes unfavorable.
- Not setting slippage: orders fail to execute.
3. Why a Multi-Symbol EA Is Needed
3.1 Stabilizing Expected Value
Conclusion:
Handling multiple currency pairs reduces bias in profit opportunities and helps control swings in expected value.
The biggest weakness of a single-currency EA is that when that currency does not move, the EA has little or nothing to do.
Example:
- EURUSD is ranging: almost no trade opportunities.
- USDJPY is trending: opportunities exist.
In this situation, a single-currency EA moves toward a state where expected value is close to zero.
With a multi-symbol EA:
- Multiple currency pairs are monitored at the same time.
- A signal may appear on one of them.
- Trading opportunities are less likely to be missed.
As a result, the structure produces:
- More stable trade frequency
- A larger sample size
- Better testing accuracy and reproducibility
Important point:
- Expected value = win rate x average profit – loss rate x average loss
- A small sample size causes unstable results.
- Multi-symbol design helps increase the sample size.
3.2 Reducing Drawdown
Conclusion:
By using non-correlation between currencies, you can avoid concentration of simultaneous losses, or drawdown.
A single-currency EA can run into these problems.
- The market moves against the trend: consecutive losses occur.
- The same logic loses in the same way.
- Drawdown expands quickly.
However, with multiple currencies:
- EURUSD may lose.
- USDJPY may win.
- GBPUSD may have no trade.
This creates diversification.
As a result:
- The maximum drawdown can be reduced.
- The equity curve becomes more stable.
- It may become easier to increase lot size, depending on risk limits.
More advanced designs can also:
- Consider the correlation coefficient.
- Limit same-direction positions.
- Control risk at the portfolio level.
Cautions:
- Highly correlated pairs, such as EURUSD and GBPUSD, have weaker diversification effects.
- If simultaneous entries increase, risk can increase instead.
3.3 Maximizing Market Opportunities
Conclusion:
You can maximize trade opportunities by using the different characteristics of each currency pair.
In the FX market, each currency pair has different behavior.
Examples:
- USDJPY: trends tend to appear.
- EURUSD: range-bound movement is common.
- GBPJPY: volatility is high.
A single-currency EA does not work well in a market that does not match its logic.
With a multi-symbol EA:
- Trend-following logic can work on USDJPY.
- Range logic can work on EURUSD.
- Volatility-aware logic can work on GBP pairs.
This naturally creates a better fit between logic and market characteristics.
Result:
- Opportunity loss decreases.
- Profit sources are diversified.
- Stability improves.
Additional Practical Value
Conclusion:
A multi-symbol EA is a way to evolve from a single strategy into a portfolio strategy.
A single EA has:
- One logic
- One market
- One risk source
A multi-symbol EA has:
- Multiple markets
- Multiple opportunities
- Diversified risk
In other words, the operating unit changes from a trade to a portfolio.
Common Misunderstandings
- Adding more currency pairs always makes the EA profitable: incorrect, because results depend on the logic.
- Diversification removes all risk: incorrect, because correlation still exists.
- The same settings work for every currency pair: incorrect, because each pair has different characteristics.
4. Comparison with a Single-Symbol EA
4.1 Overall Comparison
Conclusion:
A multi-symbol EA strengthens opportunity and diversification, while a single-symbol EA emphasizes simplicity and optimization.
The difference is not just implementation. It is a difference in strategy design.
- Multi-symbol: portfolio operation focused on diversification and stability.
- Single-symbol: single-strategy optimization focused on concentration and precision.
If you do not understand this premise, the design can fail.
4.2 Comparison Table for Decision-Making
Conclusion:
Choose based on reproducibility, operational load, and risk tolerance.
| Item | Multi-Symbol EA | Single-Symbol EA |
|---|---|---|
| Profit opportunities | Many, across multiple markets | Limited |
| Number of trades | High | Low |
| Implementation difficulty | High | Low |
| Debugging difficulty | High | Low |
| Risk diversification | Possible | Not possible |
| Drawdown | Easier to diversify | Easier to concentrate |
| Optimization | Complex | Simple |
| Reproducibility | Depends on design | High |
| Execution management | Complex by currency pair | Simple |
Important points:
- A multi-symbol EA can be excellent or unstable depending on design.
- A single-symbol EA is simple, but its limits are easier to see.
4.3 When a Multi-Symbol EA Is Suitable
Conclusion:
It is suitable when stability, diversification, and long-term operation are priorities.
Specific cases:
- You want portfolio operation.
- You want to reduce drawdown.
- You want more trading opportunities.
- You want to run the same logic across multiple currency pairs.
Practical examples:
- Run an RSI strategy on 10 currency pairs.
- Apply a shared ATR volatility filter.
- Control the full system with spread conditions.
It is well suited to strategies that can be expanded horizontally.
4.4 When a Single-Symbol EA Is Suitable
Conclusion:
A single-symbol EA is suitable for precise logic testing and fast development.
Specific cases:
- Logic validation phase
- High-precision entry strategy
- Currency-specific strategy, such as USDJPY only
- Backtest-focused development
Reasons:
- Parameter optimization is easier.
- Debugging is simpler.
- Behavior is more reproducible.
For beginners, it is safer to test with a single-symbol EA first and convert it to multi-symbol later.
4.5 Difference from Other Methods
Conclusion:
A multi-symbol EA is fundamentally different from placing the same EA on multiple charts.
Common alternative method:
Method A: Multiple-Chart Operation
- Place the same EA on each chart.
- Each currency pair operates independently.
Benefits:
- No additional implementation is required.
- It is simple.
Drawbacks:
- Lot management is separated.
- Portfolio control is not possible.
- Total risk is hard to see.
Method B: Multi-Symbol EA
- One EA manages the full system.
Benefits:
- Total risk can be managed.
- Simultaneous entries can be controlled.
- Logic stays consistent.
Drawbacks:
- Implementation difficulty is high.
- Bugs can affect a wider area.
4.6 Practical Decision Criteria
Conclusion:
The following criteria make it easier to choose without failing.
- Early development: single-symbol
- After validation: multi-symbol
- Small capital: single-symbol
- Medium to large capital: multi-symbol
The more important design decision is:
- Whether risk management should be unified across the whole EA.
- Whether each currency pair should be handled independently.
Common Mistakes
- Starting development as multi-symbol from the beginning: debugging becomes very difficult.
- Using the same lot for all currency pairs: risk becomes excessive.
- Ignoring spread and execution differences: performance worsens.
- Ignoring slippage: execution prices deviate.
5. Common Mistakes and Cautions
5.1 Data Retrieval Mistakes
Conclusion:
Many multi-symbol EA problems are caused by data not being retrieved or synchronized.
Typical mistakes:
- Not using
SymbolSelect(): data cannot be retrieved. - History data is not loaded:
CopyRates()returns 0. - Timeframes do not match: logic behaves incorrectly.
Countermeasure: Implementation Example
if(!SymbolSelect(sym, true))
{
    Print("SymbolSelect failed: ", sym);
    continue;
}

MqlRates rates[];
int copied = CopyRates(sym, PERIOD_M5, 0, 100, rates);

if(copied <= 0)
{
    Print("CopyRates failed: ", sym);
    continue;
}
Why It Happens
- MT5 loads data lazily for each symbol.
- History data is often insufficient on the first run.
Cautions
- This is especially likely during the first startup in a VPS environment.
- Behavior may differ between backtesting and live operation.
5.2 Insufficient Spread and Slippage Management
Conclusion:
If you ignore spread and slippage, theoretical expected value can break down in live operation.
Typical problems:
- Entries occur while the spread is widening.
- The execution price shifts because of slippage.
- Execution conditions worsen.
Countermeasure: Example
double spread = SymbolInfoDouble(sym, SYMBOL_ASK) - SymbolInfoDouble(sym, SYMBOL_BID);

if(spread > 0.0003) // Example: 3 pips
{
    continue; // Avoid trading
}
Key Points
- Spread differs by currency pair.
- It can expand sharply around economic releases.
- Execution quality depends on the broker.
5.3 Lot Management Breakdown
Conclusion:
When you hold positions in multiple currency pairs at the same time, risk can exceed expectations.
Common mistakes:
- Using the same lot for every currency pair.
- Simultaneous entries cause
not enough money. - Drawdown expands quickly.
Countermeasures
- Adjust lots by currency pair.
- Calculate risk based on account balance.
- Limit the number of simultaneous positions.
Simple Example
double lot = AccountBalance() * 0.01 / 100000; // Example of 1% risk
Why It Matters
- A multi-symbol EA creates hidden leverage.
- If total risk is ignored, failure becomes more likely.
5.4 MagicNumber Collisions
Conclusion:
If you do not separate MagicNumber values, position management can break down.
Typical examples:
- EURUSD and USDJPY use the same
MagicNumber. - Positions cannot be identified.
- Unintended closes occur.
Countermeasure
int magic = 1000 + i; // Separate by symbol
Key Points
- Separate
MagicNumbervalues by symbol. - Separate them by EA as well.
- Distinguish them from manual trades.
5.5 Performance Degradation
Conclusion:
If the processing design is wrong, CPU load increases and the EA becomes unstable.
Causes:
- Processing all symbols on every tick.
- Calling
CopyRatestoo often. - Running unnecessary loops.
Countermeasures
- Reduce processing frequency with
OnTimer. - Cache data.
- Update only when needed.
Example
datetime last_update = 0;

if(TimeCurrent() - last_update < 10)
    return;

last_update = TimeCurrent();
5.6 Other Important Cautions
Conclusion:
Small differences in execution conditions can accumulate and heavily affect results.
Checklist:
- Spread
- Slippage
- Execution type
- Trading session
- Broker differences
Pay special attention to these points:
- Trading hours differ by currency pair.
- Low-liquidity periods are unfavorable.
- VPS latency can increase execution price deviation.
Summary of Common Mistakes
- Data is not retrieved: the EA stops.
- Spread is ignored: entries become unfavorable.
- Lots are too large: the account can fail.
MagicNumberis unmanaged: positions become confused.- Load is too high: the EA stops.
6. Practical Use Cases
6.1 Portfolio EA
Conclusion:
The core use of a multi-symbol EA is portfolio operation that integrates multiple currency pairs and multiple strategies.
In a single EA, one strategy usually means one profit source. In a portfolio EA, one EA can integrate:
- Multiple currency pairs, such as EURUSD, USDJPY, and GBPUSD.
- Multiple logic types, such as trend, range, and breakout.
- Shared risk management.
Practical Configuration Example
- EURUSD: range strategy
- USDJPY: trend following
- GBPJPY: volatility strategy
This can create:
- A return structure that is less dependent on one market condition.
- Diversified drawdown.
- A more stable equity curve.
Why It Works
- Markets are not always in the same condition.
- The effective period of a strategy changes over time.
- Without diversification, a strategy can temporarily stop working.
Cautions
- Ignoring correlation between strategies can have the opposite effect.
- If simultaneous positions increase too much, risk increases.
6.2 Filter EA for Overall Control
Conclusion:
A key strength of a multi-symbol EA is that it can apply a “do not trade” decision to the whole system.
With single EAs:
- Each EA makes independent decisions.
- Total risk conditions are hard to see.
With a multi-symbol EA:
- All positions can be tracked.
- The whole system can be stopped based on conditions.
- Common rules can be applied.
Common Filters
- Abnormal spread filter
- News avoidance filter
- Volatility control with ATR
- Maximum position count limit
Implementation Image
if(total_positions >= 5)
{
    return; // Stop new entries
}
if(spread > max_spread)
{
    continue; // Skip the matching symbol
}
Why It Matters
- A design that avoids losses is more important than only seeking winning logic.
- Abnormal market conditions can be avoided.
- Reproducibility improves.
6.3 Correlation Trading and Arbitrage Strategies
Conclusion:
A multi-symbol EA is suitable for advanced strategies that use relationships between currency pairs.
Common examples:
Correlation Trading
- Same-direction movement between EURUSD and GBPUSD
- Inverse correlation with USDJPY
Applications:
- Simultaneous entries
- One-sided entries
- Hedged position construction
Arbitrage
- Price differences between currency pairs
- Temporary market distortions
Examples:
- The relationship between EURUSD and USDCHF
- Misalignment in cross-currency pairs
Benefits
- An edge that cannot be obtained from single-symbol logic alone.
- A strategy based on market structure.
- A theoretical basis for the trade idea.
Cautions
- Implementation difficulty is high.
- Execution speed is important.
- Slippage has a large effect.
6.4 Distributed Signal Operation
Conclusion:
Applying the same logic to multiple currency pairs enables simple and powerful operation.
Examples:
- Apply RSI mean reversion to 10 currency pairs.
- Run an MA cross strategy across multiple currency pairs.
- Unify filters with ATR.
Benefits
- Implementation is simple.
- Testing is easy.
- Reproducibility is high.
Why It Works
- Signal timing differs by market.
- Results are diversified even with the same logic.
- Trading opportunities increase.
Cautions
- Do not ignore differences in currency characteristics.
- Spread differences affect results.
- Simultaneous entries can increase.
Practical Decision Points
Conclusion:
A multi-symbol EA should be evaluated as an operating design, not just as a standalone strategy.
Important metrics:
- Total maximum drawdown
- Profit and loss by currency pair
- Number of simultaneous positions
- Risk concentration
The following perspectives are also important.
- Think at the portfolio level, not only at the trade level.
- Judge by expected value and variance, not only by win rate.
- Evaluate execution quality as part of the system.
Common Misuse
- Carelessly diversifying with the same logic everywhere: weak effect.
- Adding currency pairs without risk management: failure risk.
- No filters: losses expand in unfavorable markets.
7. Performance Optimization Points
7.1 Optimizing the Number of Processes
Conclusion:
For a multi-symbol EA, the most important design goal is reducing the number of processes. Processing every tick is inefficient and causes load and instability.
Typical problems:
- Processing all symbols on every tick.
- Calling
CopyRatesevery time. - Running unnecessary logic calculations.
This causes:
- Higher CPU usage
- VPS latency
- Lower execution quality, including execution delay and increased slippage
Countermeasure: Throttled Processing
datetime last_exec = 0;

void OnTick()
{
    if(TimeCurrent() - last_exec < 5)
        return;

    last_exec = TimeCurrent();

    // Main processing
}
Why It Works
- Ticks are irregular and frequent.
- Logic often does not need to run on every tick.
- Processing only when needed is more efficient.
7.2 OnTimer-Based Design
Conclusion:
For a multi-symbol EA, centering the design on OnTimer greatly improves processing stability and reproducibility.
Implementation Example
int OnInit()
{
    EventSetTimer(1); // 1-second cycle
    return(INIT_SUCCEEDED);
}

void OnTimer()
{
    for(int i=0; i<ArraySize(symbols); i++)
    {
        string sym = symbols[i];

        // Symbol processing
    }
}
Benefits
- All symbols are processed evenly.
- Tick dependency is removed.
- The gap between backtesting and live operation is reduced.
Cautions
- If the timer interval is too short, load increases.
- If it is too long, signals are delayed.
7.3 Data Cache Strategy
Conclusion:
Reducing calls to CopyRates and CopyBuffer can greatly improve performance.
Problem
- Calling
CopyRatesevery time creates high load. - The same data is retrieved repeatedly.
Countermeasure: Cache
static MqlRates rates_cache[];

if(ArraySize(rates_cache) == 0)
{
    CopyRates(sym, PERIOD_M5, 0, 100, rates_cache);
}
Or:
if(new_bar_detected)
{
    CopyRates(sym, PERIOD_M5, 0, 100, rates);
}
Why It Matters
- Data retrieval is one of the most expensive operations.
- Network and disk access may occur.
7.4 Optimization with New-Bar Detection
Conclusion:
The most efficient design is to run the logic only when a new bar is confirmed.
Implementation Example
datetime last_time = 0;

MqlRates rates[];
CopyRates(sym, PERIOD_M5, 0, 2, rates);

if(rates[0].time != last_time)
{
    last_time = rates[0].time;

    // Process only on a new bar
}
Benefits
- Unnecessary recalculation is removed.
- Signal stability improves.
- Noise is reduced.
Cautions
- It may not suit scalping.
- The design becomes timeframe-dependent.
7.5 Memory Management and Array Design
Conclusion:
If array usage is not optimized, memory consumption and processing speed are affected.
Common Problems
- Recreating arrays every time.
- Overusing
ArrayResize. - Holding unnecessary data.
Countermeasures
- Use static arrays.
- Manage data with the minimum required size.
- Use
ArraySetAsSeriesproperly.
Example
ArraySetAsSeries(rates, true);
Why It Matters
- An EA runs for long periods.
- Memory leaks can be fatal.
7.6 Optimization Points for Live Operation
Conclusion:
In live operation, processing speed directly affects profitability.
Checklist:
- CPU usage, especially VPS monitoring
- Tick processing delay
- Execution speed
- Slippage frequency
Especially important:
- High load leads to execution delay and unfavorable prices.
- Insufficient VPS performance can stop the EA.
Common Optimization Mistakes
- Processing every tick: unnecessary load.
- Overusing
CopyRates: a bottleneck. - Excessive timer frequency: CPU saturation.
- No cache: inefficient processing.
8. Frequently Asked Questions
8.1 Q&A
Conclusion:
Multi-symbol EAs have many points where developers can struggle during implementation, testing, and operation. Understanding them in advance helps prevent major losses and development delays.
Q1. Does a multi-symbol EA run on one chart?
A. Yes, it can control multiple currency pairs from one chart.
However, data for other symbols must be explicitly retrieved with CopyRates or SymbolInfo.
Q2. Can it be backtested accurately?
A. There are limitations.
The standard MT5 backtest is basically designed around a single symbol, so reproducibility may decrease with a multi-symbol EA.
For accurate evaluation, combining it with forward testing is recommended.
Q3. Can I implement it with OnTick only?
A. It is possible, but not recommended.OnTick depends on one symbol, so it cannot process all currency pairs evenly.
A design that combines it with OnTimer is common.
Q4. How should spread be managed?
A. Retrieve it for each symbol and control it with conditional logic.
A practical design is to get it with SymbolInfoDouble() and avoid trading when it exceeds the threshold.
Q5. How should lot size be decided?
A. Lot size should be calculated on a risk basis for each currency pair.
If you use the same lot for all pairs, risk can become excessive when positions are opened at the same time.
Q6. Will a multi-symbol EA become heavy?
A. It depends heavily on the design.
Processing every tick and overusing CopyRates cause high load.
Optimization with OnTimer, caching, and new-bar detection is important.
Q7. Can beginners develop one?
A. It requires understanding the basic EA structure, such as OnTick and OrderSend.
It is safer to validate a single-symbol EA first and convert it to multi-symbol later.
Q8. How is it different from placing the same EA on multiple charts?
A. The biggest difference is centralized risk management.
A multi-symbol EA can manage all positions together, while multiple-chart operation cannot.
Q9. Do differences in execution conditions matter?
A. Yes, they matter a lot.
Liquidity, spread, and slippage differ by currency pair, so the same logic can produce different results.
Q10. What is the most important point in live operation?
A. The most important point is managing total risk.
You need to control drawdown and lots across the whole portfolio, not only by individual trade.
9. Practical Operating Guidelines
9.1 Practical Flow from Introduction to Operation
Conclusion:
A multi-symbol EA should not be completed all at once. Expanding it step by step helps avoid failure.
Recommended flow:
- Validate the logic with a single-symbol EA.
- Optimize parameters.
- Convert to a minimum multi-symbol setup.
- Add risk management, including lot and simultaneous position control.
- Run forward tests.
- Operate live on a VPS.
Why This Order?
- If you make it multi-symbol immediately, identifying causes becomes difficult.
- You cannot separate logic problems from implementation problems.
- Reproducibility cannot be secured.
9.2 Design Principles for Risk Management
Conclusion:
In a multi-symbol EA, risk is managed at the portfolio level, not only at the trade level.
Important ideas:
- Watch total risk, not only one position.
- Limit the number of simultaneous positions.
- Allocate risk by currency pair.
Example Practical Rules
- 1% risk per trade
- Maximum of 5 simultaneous positions
- Limit same-direction positions
Implementation Image
if(total_positions >= max_positions)
{
    return; // Entry limit
}
Why It Matters
- Risk becomes harder to see after multi-symbol expansion.
- Unlimited positions greatly increase failure risk.
9.3 Testing and Evaluation Points
Conclusion:
A multi-symbol EA must be evaluated with multiple metrics, not just one indicator.
Important metrics:
- Maximum drawdown
- Profit factor
- Profit and loss by currency pair
- Number of simultaneous positions
- Spread impact
Especially Important Perspectives
- Are profit sources diversified by currency pair?
- Is the EA overly dependent on one currency pair?
- Is execution quality maintained?
Common Errors
- Looking only at total profit.
- Underestimating drawdown.
- Overdepending on a specific currency pair.
9.4 Live Operation Checklist
Conclusion:
Stable operation requires pre-launch checks and ongoing monitoring.
Pre-Launch Checklist
- Are all symbols enabled?
- Has the data been loaded?
- Is the spread normal?
During-Operation Checklist
- Execution delay
- Slippage conditions
- VPS CPU usage
Periodic Checklist
- Drawdown trend
- Performance by currency pair
- Whether lot sizes remain appropriate
9.5 Long-Term Operation Strategy
Conclusion:
A multi-symbol EA must be designed on the assumption that markets change.
Important points:
- Strategies deteriorate as markets become more efficient.
- Currency characteristics change.
- Spreads and execution conditions also change.
Countermeasures
- Review parameters regularly.
- Remove underperforming currency pairs.
- Add new currency pairs when justified by testing.
9.6 The Most Important Core Idea
Conclusion:
The core of a multi-symbol EA is reproducible diversified operation.
Key summary:
- The strength of an EA is reproducibility: the same trades under the same conditions.
- Multi-symbol design extends that reproducibility across multiple markets.
In short, the essence is to reproduce the same logic steadily across multiple markets.
Common Final-Stage Failures
- Only making the EA multi-symbol while the strategy itself remains weak.
- Increasing risk without real diversification.
- Keeping operating rules vague.
- Going live without enough testing.