- 1 1. What Position Sizing Means in MQL5
- 2 2. Main Position Sizing Methods Implemented in MQL5
- 3 3. How Position Sizing Works, and Why It Works
- 4 4. Comparison by Method: Which Should You Choose?
- 5 5. Implementation Steps in MQL5: How To Build It
- 6 6. Common Mistakes and Cautions
- 6.1 6.1 Invalid volume Error, or Invalid Lot Size
- 6.2 6.2 Insufficient Margin, or Not enough money
- 6.3 6.3 Stop Distance Mistake, or Invalid stops
- 6.4 6.4 Malfunction Caused by Sudden Spread Widening
- 6.5 6.5 Risk Breakdown Caused by Slippage
- 6.6 6.6 Over-Optimization, or Backtest Dependency
- 6.7 6.7 No SL and Unknown Risk
- 7 7. Practical Use Cases
- 8 8. FAQ
- 8.1 8.1 What is the difference between position sizing and lot calculation?
- 8.2 8.2 Which method is recommended for beginners?
- 8.3 8.3 Should I use martingale?
- 8.4 8.4 Why is ATR-linked sizing effective?
- 8.5 8.5 What is the best risk percentage?
- 8.6 8.6 Why do backtest and live trading results differ?
- 8.7 8.7 Can position sizing be used without an SL, or stop loss?
- 8.8 8.8 What should I watch when running multiple EAs?
- 9 9. Summary and Internal Link Ideas
1. What Position Sizing Means in MQL5
Bottom line: Position sizing is the algorithm that decides how many lots to trade in one entry. It is one of the most important parts of an EA because it directly affects drawdown control more than profit itself.
1.1 Definition of Position Sizing
Definition: Position sizing is the rule used to decide the appropriate trade volume, or lot size, based on account equity, stop-loss distance (SL), and market conditions.
It is not just a numeric calculation. It is the strategy design behind how the lot size is chosen.
For example, all of the following are types of position sizing:
- Trading a fixed 0.1 lot every time
- Risking only 1% of the account balance
- Changing the lot size based on volatility, or price movement
In MQL5, the final value is passed to an order as volume, meaning lot size. The logic behind that value is position sizing.
A common beginner mistake is to think that “lot calculation = position sizing.” That is incorrect.
Lot calculation is only the result. Position sizing is the method, or algorithm, used to decide that result.
1.2 Difference From Lot Size Calculation
Bottom line: Lot size calculation is the process that outputs a number. Position sizing is the rule for deciding that number.
The relationship is as follows:
- Position sizing: the strategy, such as trading with 1% risk
- Lot calculation: the implementation, such as calculating 0.13 lots
If you do not understand this difference, the design of an EA, or automated trading system, can break down.
For example, even with the same entry conditions, the results can change greatly depending on the sizing method:
- Fixed lot: stable, but growth is limited
- Risk-based lot: profit can grow as account equity increases
In other words, even when entry accuracy is unchanged, position sizing can greatly change the final profit and loss.
1.3 Why It Matters in Real Trading
Bottom line: Position sizing should be optimized to avoid account ruin, not simply to maximize profit.
Many beginners focus on entry methods, indicators, and signals. In practical EA development, the following factors often have a larger impact:
- The size of drawdown, or account decline
- Durability during losing streaks
- Tolerance for execution quality differences
For example, when spread or slippage occurs, the actual loss may become larger than expected.
If the lot size is too large at that time, the account can decline more than planned.
The especially important points are:
- The larger the lot size, the larger the effect of execution differences
- The equity curve can deteriorate quickly during a losing streak
- Oversized lots can cause account failure in a short period
On the other hand, proper position sizing provides these benefits:
- Drawdown can be controlled
- The gap between forward testing and live trading becomes smaller
- Long-term reproducibility improves
One key caution is that the “lot size that maximizes profit” is not always optimal.
Theoretical optima, such as the Kelly criterion, are often too risky in real trading.
For that reason, a practical design should consider:
- Lower risk, such as 1-2%
- Execution differences
- Broker restrictions, including minimum lot, maximum lot, and order conditions
These elements must be built into the design.
2. Main Position Sizing Methods Implemented in MQL5
Bottom line: The three core position sizing methods used in practice are fixed lot, fixed risk, and volatility-based sizing using ATR. If you understand these three, you can cover most EA design needs.
2.1 Fixed Lot, or the Same Trade Volume Every Time
Bottom line: This is the simplest and most reproducible method, but it is not capital efficient.
This method enters every trade with the same lot size, such as 0.1 lot.
It is often used for backtesting and logic validation.
Implementation example
double lot = 0.1;

MqlTradeRequest request;
request.volume = lot;
Advantages
- Very easy to implement
- Stable test results with high reproducibility
Disadvantages
- The lot size does not increase even if the account grows
- Compounding does not work
Common mistakes
- Using a lot size that is too small in live trading, so profit does not grow
- Fixing the lot size too high, causing excessive drawdown
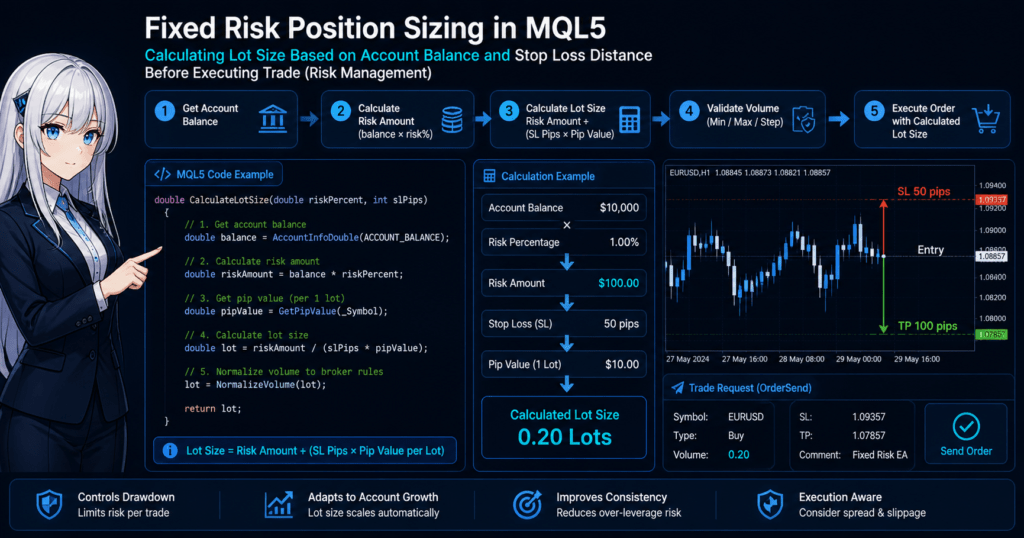
2.2 Fixed Risk, or a Percentage of Account Balance
Bottom line: This is the most practical and recommended method. Risk management and lot size are linked automatically.
This method risks a fixed percentage of the account balance, such as 1%.
The lot size is calculated backward from the stop-loss distance (SL).
Basic logic
- Risk amount = balance x risk %
- Lot size = risk amount / (SL distance x loss per 1 lot)
Implementation example, simplified
double balance = AccountInfoDouble(ACCOUNT_BALANCE);
double riskPercent = 0.01; // 1%
double riskAmount = balance * riskPercent;

double stopLossPips = 50; // assumed value
double pipValue = 10.0;   // depends on the currency pair

double lot = riskAmount / (stopLossPips * pipValue);
Advantages
- Drawdown is easier to control
- The lot size increases as account equity grows, enabling compounding
Disadvantages
- An inappropriate SL setting can break the strategy
- It depends on pip value, currency pair, and account currency
Common mistakes
- Treating pipValue as a fixed value, causing calculation errors
- Ignoring spread and slippage
- Calling OrderSend without a margin check, causing errors
2.3 ATR-Based, or Volatility-Linked Sizing
Bottom line: This method is powerful in live trading because it can adjust the lot size based on market movement.
It uses Average True Range, a volatility indicator, to change the lot size based on how rough the market is.
Concept
- High volatility: reduce the lot size
- Low volatility: increase the lot size
Implementation example
int atrHandle = iATR(_Symbol, PERIOD_CURRENT, 14);
double atr[];
CopyBuffer(atrHandle, 0, 0, 1, atr);

double volatility = atr[0];
double baseLot = 0.1;

double lot = baseLot / volatility;
Advantages
- Can adapt to market conditions
- Reduces risk during sharp price movement
Disadvantages
- The calculation is somewhat more complex
- It depends on the ATR period setting
Common mistakes
- Using the ATR value directly, causing extreme lot sizes
- Ignoring the minimum lot limit, causing an Invalid volume error
2.4 Martingale Type
Bottom line: It can recover losses quickly in the short term, but the long-term risk of failure is extremely high.
This method doubles the lot size after each loss.
Example
- 0.1 -> 0.2 -> 0.4 -> 0.8 …
Advantage
- One winning trade can often recover prior losses
Disadvantages
- Drawdown increases exponentially
- The account can fail because of insufficient margin
Cautions
- Broker maximum lot limits
- Malfunction risk caused by execution delay
2.5 Reverse Martingale, or Anti-Martingale
Bottom line: This method is designed to extend winning trades and works well with trend-following EAs.
It increases the lot size only after a winning trade.
Example
- Win -> 0.1 -> 0.2 -> 0.4
- Loss -> return to the initial lot size
Advantages
- Profit can expand when the EA catches a trend
- Risk after a loss is limited
Disadvantages
- It is unfavorable in ranging markets
- The design assumes winning streaks
2.6 Kelly Criterion, for Advanced Users
Bottom line: It is theoretically optimal, but in practice it often creates excessive risk.
It calculates the optimal lot size from win rate and risk-reward ratio.
Conceptual formula
- f = win rate – (loss rate / risk-reward)
Advantage
- Theoretically maximum growth rate
Disadvantages
- Win rate estimation is difficult
- It can easily lead to over-optimization
Practical use
- It is common to reduce it, such as using half Kelly
3. How Position Sizing Works, and Why It Works
Bottom line: Position sizing is a mechanism that amplifies expectancy while also controlling risk of ruin. Depending on lot design, the same trading method can produce very different results.
3.1 Relationship Between Expectancy and Risk
Bottom line: Lot size amplifies expectancy, but it also amplifies losses, so balanced design is required.
The basic structure of trading can be expressed as follows:
- Expectancy = win rate x average profit – loss rate x average loss
Position sizing affects the scale of average profit and average loss.
For example, even with the same logic:
- 0.1 lot: small wins and small losses
- 1.0 lot: large wins and large losses
In other words, lot size is a multiplier for the result.
The key points are:
- Increasing lot size does not change the win rate
- Increasing lot size causes drawdown to rise sharply
- When the lot size exceeds the appropriate range, the equity curve can collapse
A common misconception is, “If the strategy wins, just raise the lot size.” This is dangerous.
Even with positive expectancy, an oversized lot can deplete the account during a losing streak.
3.2 Relationship With Drawdown
Bottom line: Drawdown increases in proportion to lot size, and oversized lots can create losses that are difficult to recover from.
Drawdown (DD) is the decline from an account equity peak.
If position sizing is inappropriate, these problems occur:
- Sharp account decline during a losing streak
- The profit needed for recovery becomes unrealistic
For example:
- 10% loss: about 11% profit is needed to recover
- 50% loss: 100% profit is needed to recover
This nonlinear structure is important.
In short:
- Larger lot size: deeper DD
- Deeper DD: harder recovery
This is why fixed risk, such as 1-2%, is recommended.
Also note that DD can become larger than expected when the following occur:
- Spread widening
- Slippage
- Execution delay
3.3 Risk of Ruin
Bottom line: The larger the lot size, the faster the risk of ruin increases. Martingale methods are especially dangerous.
Risk of ruin is the probability that the account reaches zero or becomes unable to trade.
By position sizing method, the general tendencies are:
- Fixed lot: stable, but growth is slow
- Fixed risk: easier to reduce risk of ruin
- Martingale: almost certain to fail over time
The important ideas are:
- Losing streaks will occur
- The lot size during a losing streak matters
- Lot control after equity declines is the key
With fixed risk:
- Equity declines -> lot size also declines
This helps reduce risk of ruin.
With martingale:
- Loss -> lot size increases
This causes risk to increase exponentially during a losing streak.
3.4 Relationship With Spread and Slippage
Bottom line: If execution quality is poor, theoretical position sizing does not hold up.
In live trading, the following factors always affect results:
- spread, or the bid-ask price difference
- slippage, or a difference from the requested order price
- execution, meaning fill speed and fill accuracy
They matter because:
- The trade may be filled at a worse price than expected
- The actual loss increases
- The risk calculation becomes inaccurate
When the lot size is large in particular:
- 1 pip of slippage causes a larger loss
- Spread widening puts the trade at a disadvantage from entry
This breaks the theoretical expectancy.
In practice, the following countermeasures are needed:
- Add a spread filter
- Stop trading during major news events
- Stabilize execution with a VPS environment
4. Comparison by Method: Which Should You Choose?
Bottom line: In practice, choosing fixed risk or ATR-linked sizing as the base is usually a strong default. Martingale-type methods should be used only when strict controls are in place.
4.1 Position Sizing Comparison Table
Bottom line: When stability, reproducibility, and execution tolerance matter, fixed risk and ATR-linked sizing are often the best choices.
| Method | Stability | Profitability | Drawdown Tolerance | Execution Tolerance (spread/slippage) | Implementation Difficulty | Recommendation |
|---|---|---|---|---|---|---|
| Fixed lot | High | Low | High | High | Low | For validation |
| Fixed risk | High | Medium | High | Medium | Medium | Excellent |
| ATR-linked | High | Medium | Medium to high | Medium | Medium | Excellent |
| Martingale | Low | High, short term | Low | Low | Low | Limited |
| Reverse martingale | Medium | Medium to high | Medium | Medium | Medium | Good |
| Kelly criterion | Low | High, theoretical | Low | Low | High | Advanced users |
How to read the table
- Fixed lot is for validation and benchmarking
- Fixed risk is the general-purpose standard for live trading
- ATR-linked sizing adapts to volatility
- Martingale-type methods trade recovery speed for risk of ruin
4.2 How Beginners Should Choose
Bottom line: Beginners can start with fixed risk at 1-2% without overcomplicating the design.
Selection flow, if you are unsure:
- Step 1: Start with fixed risk at 1%
- Step 2: Check whether drawdown stays within your acceptable range
- Step 3: Extend to ATR-linked sizing if needed
The reasons are:
- The lot size automatically decreases when equity declines
- Risk of ruin during losing streaks is lower
- Execution differences, such as slippage, are easier to absorb
Common mistakes
- Using a martingale-type method from the beginning
- Setting risk above 5%
- Using fixed risk without an SL, which breaks the calculation
4.3 Selection Criteria in EA Development
Bottom line: Position sizing should be chosen based on the EA’s characteristics and the market environment.
Typical combinations
- Trend-following EA
-> Reverse martingale or fixed risk
Reason: it can extend winning trades - Range EA, or mean-reversion EA
-> Fixed risk
Reason: durability during losing streaks is important - High-volatility market, such as around economic releases
-> ATR-linked sizing
Reason: it adapts automatically to sharp movement - Scalping
-> Fixed lot or low fixed risk
Reason: spread and slippage have a large impact
4.4 Differences From Other Methods and Alternatives
Bottom line: Position sizing should be used together with other risk controls, not by itself.
Main alternatives and complements include:
- Drawdown control, or equity stop
-> Stop the EA at a fixed DD level - Maximum position limit
-> Limit the number of simultaneous positions - Spread filter
-> Do not enter when spread is wide - Order condition control
-> Stop trading when execution quality is poor
The important idea is:
- Position sizing alone is not enough
- Design around “lot size x filters x stop conditions”
5. Implementation Steps in MQL5: How To Build It
Bottom line: Implement the process in this order: calculate risk, calculate lot size, correct for broker limits, check margin, and send the order. If this order is broken, errors such as Invalid volume or Not enough money can occur.
5.1 Basic Reusable Steps
Bottom line: If you implement fixed risk as the base, it is highly reusable and can be extended to ATR-linked sizing.
Steps you can reuse
- Get the account balance
- Set the allowed risk percentage
- Calculate the stop-loss distance (SL) as a price difference
- Get the loss per 1 lot, using tick value
- Calculate the lot size
- Round the lot size to broker limits, including min, max, and step
- Check margin
- Send the order
Code example, fixed risk simplified
double CalcLot(double riskPercent, double stopLossPriceDistance)
{
    double balance = AccountInfoDouble(ACCOUNT_BALANCE);
    double riskAmount = balance * riskPercent;

    double tickValue = SymbolInfoDouble(_Symbol, SYMBOL_TRADE_TICK_VALUE);
    double tickSize  = SymbolInfoDouble(_Symbol, SYMBOL_TRADE_TICK_SIZE);

    // Loss per 1 lot
    double lossPerLot = (stopLossPriceDistance / tickSize) * tickValue;

    if(lossPerLot <= 0.0) return 0.0;

    double lot = riskAmount / lossPerLot;
    return lot;
}
Why this calculation works
- tickValue: profit or loss per tick
- tickSize: price width of one tick
-> This converts “price difference” into “profit or loss”
Common mistakes
- Using a fixed value based on pips, which breaks depending on the currency pair
- Treating SL distance as pips instead of a price difference, causing calculation drift
5.2 Handling Lot Restrictions, the Most Important Step
Bottom line: If the lot size does not match SYMBOL_VOLUME_MIN, SYMBOL_VOLUME_MAX, and SYMBOL_VOLUME_STEP, an Invalid volume error is very likely.
Each broker has lot restrictions.
- Minimum lot, SYMBOL_VOLUME_MIN
- Maximum lot, SYMBOL_VOLUME_MAX
- Lot step, SYMBOL_VOLUME_STEP
Correction code
double NormalizeLot(double lot)
{
    double minLot  = SymbolInfoDouble(_Symbol, SYMBOL_VOLUME_MIN);
    double maxLot  = SymbolInfoDouble(_Symbol, SYMBOL_VOLUME_MAX);
    double stepLot = SymbolInfoDouble(_Symbol, SYMBOL_VOLUME_STEP);

    // Limit the range
    lot = MathMax(minLot, MathMin(maxLot, lot));

    // Round to the step size
    lot = MathFloor(lot / stepLot) * stepLot;

    return NormalizeDouble(lot, 2);
}
Why this is necessary
- Brokers do not accept arbitrary lot sizes
- Example: 0.013 causes an error in an environment that uses 0.01 steps
Common mistakes
- Relying only on NormalizeDouble, causing step-related errors
- Sending an order below minLot, causing order rejection
5.3 Margin Check, Required Before OrderSend
Bottom line: If you do not use OrderCalcMargin, the EA can stop with a Not enough money error.
Even when the lot size is valid, the order cannot be placed if margin is insufficient.
Check code
bool CheckMargin(double lot, ENUM_ORDER_TYPE type)
{
    double price = (type == ORDER_TYPE_BUY)
        ? SymbolInfoDouble(_Symbol, SYMBOL_ASK)
        : SymbolInfoDouble(_Symbol, SYMBOL_BID);

    double margin = 0.0;

    if(!OrderCalcMargin(type, _Symbol, lot, price, margin))
        return false;

    double freeMargin = AccountInfoDouble(ACCOUNT_FREEMARGIN);

    return (freeMargin > margin);
}
Why this is necessary
- It depends on leverage and account conditions
- It also changes with the number of open positions
Common mistakes
- Sending orders based only on lot calculation, causing frequent errors
- Passing in forward testing but failing in live trading
5.4 Integrated Flow Up to OrderSend
Bottom line: Always follow the order: lot calculation, normalization, then margin check.
Integrated example
double rawLot = CalcLot(0.01, stopLossDistance);
double lot    = NormalizeLot(rawLot);

if(lot <= 0.0) return;

if(!CheckMargin(lot, ORDER_TYPE_BUY)) return;

// Order processing, simplified
MqlTradeRequest request;
request.volume = lot;
request.symbol = _Symbol;
request.type   = ORDER_TYPE_BUY;
5.5 Practical Cautions, Including Execution
Bottom line: Even if the lot size is theoretically correct, the result changes depending on the execution environment.
Factors to consider:
- spread
- slippage
- execution speed, including whether a VPS is used
Countermeasures
- Add a spread filter
- Stop trading during economic releases
- Minimize latency with a VPS
Common mistakes
- Designing only for backtesting, then failing in live trading
- Ignoring slippage, causing excessive risk
6. Common Mistakes and Cautions
Bottom line: Position sizing failures usually come from three areas: lot restrictions, margin, and execution. If these are ignored, the EA can fail in live trading even when the theory is correct.
6.1 Invalid volume Error, or Invalid Lot Size
Bottom line: The main cause is failing to handle the lot step, SYMBOL_VOLUME_STEP.
Typical causes
- Sending an uneven lot size such as 0.013
- Using a value below the minimum lot, SYMBOL_VOLUME_MIN
- Exceeding the maximum lot, SYMBOL_VOLUME_MAX
Countermeasures
- Round to the step size using MathFloor
- Clamp the value with min and max
- Do not rely only on NormalizeDouble
Check example
if(lot < SymbolInfoDouble(_Symbol, SYMBOL_VOLUME_MIN)) return;
6.2 Insufficient Margin, or Not enough money
Bottom line: The cause is usually not using OrderCalcMargin or overlooking an increase in simultaneous positions.
Typical causes
- Not considering leverage
- Ignoring margin used by existing positions
- Calculating the lot size and immediately calling OrderSend
Countermeasures
- Pre-check with OrderCalcMargin
- Check free margin, ACCOUNT_FREEMARGIN
- Limit the maximum number of positions
Caution
- Required margin changes by currency pair and broker conditions
6.3 Stop Distance Mistake, or Invalid stops
Bottom line: This happens when the broker’s minimum stop distance, or Stops level, is ignored.
Typical causes
- SL/TP is too close to the current price
- Spread is not considered
Countermeasures
- Check SYMBOL_TRADE_STOPS_LEVEL
- Set SL with spread included
Note
- When the price shifts during execution because of slippage, this error becomes more likely
6.4 Malfunction Caused by Sudden Spread Widening
Bottom line: Unexpected losses can occur during news events or when liquidity drops.
Typical causes
- spread widens to several times its normal level
- The trade starts with a large unrealized loss at entry
Countermeasure
- Add a spread filter
Code example
double spread = SymbolInfoDouble(_Symbol, SYMBOL_ASK) - SymbolInfoDouble(_Symbol, SYMBOL_BID);

if(spread > maxSpread) return;
Why this matters
- The larger the lot size, the more spread impact is amplified
- It can be fatal for scalping systems
6.5 Risk Breakdown Caused by Slippage
Bottom line: Slippage increases losses more as lot size becomes larger.
Typical example
- Expected SL: 50 pips
- Actual result: 55 pips because slippage occurred
-> The risk calculation breaks down.
Countermeasures
- Add a buffer to risk calculation
- Set order conditions, such as deviation
- Use an environment with better execution quality, such as a VPS
6.6 Over-Optimization, or Backtest Dependency
Bottom line: The optimal lot size is not fixed. It changes with the market environment.
Typical causes
- Optimizing too much to historical data
- Creating settings that only win during a specific period
Countermeasures
- Always run forward testing
- Set lot size conservatively
- Use dynamic adjustment such as ATR
6.7 No SL and Unknown Risk
Bottom line: Position sizing does not work without an SL.
Reason
- The amount of risk cannot be calculated
- The loss can become unlimited
Countermeasures
- Always calculate lot size based on an SL
- Force an SL setting without exceptions
7. Practical Use Cases
Bottom line: Position sizing is not something to use by itself. It becomes effective when combined with EA design, forward testing, and portfolio risk management.
7.1 Role in EA Design
Bottom line: Position sizing can affect final results more than the entry logic in some cases.
Many beginners focus on entry accuracy, but in real EA development the structure is:
- Entry: determines the win rate
- Position sizing: determines the shape of profit and loss
Even with the same entry:
- Oversized lots: failure after only a few consecutive losses
- Appropriate lots: long-term stability
This is especially important in EAs because:
- The logic’s edge is limited
- Position sizing can greatly change the result
- Reproducibility, meaning repeatable profit, is the top priority
Practical point
- Design around fixed risk as the base
- Use lot size to protect capital, not to attack aggressively
7.2 Adjustment During Forward Testing
Bottom line: Position sizing should be finalized in forward testing, not only in backtesting.
The reasons are:
- slippage is not fully reproduced
- spread variation is incomplete
- The execution environment is different
Therefore, in forward testing, check:
- Measured drawdown
- Difference from expected risk
- Behavior during losing streaks
Adjustment steps
- Change the risk percentage gradually, such as from 1% to 0.8%
- Fine-tune the ATR coefficient
- Add a maximum lot limit
Common mistakes
- Using backtest results unchanged
- Using a forward test period that is too short
7.3 Multiple EA Operation, or Portfolio Use
Bottom line: When running multiple EAs, total risk management is required.
Even if each EA looks safe by itself:
- EA A: 1% risk
- EA B: 1% risk
- EA C: 1% risk
-> The total risk becomes 3%.
If there is correlation:
- Losses can occur at the same time
- Drawdown can exceed expectations
Practical countermeasures
- Set a total risk cap, such as 2-3%
- Limit simultaneous entries
- Diversify currency pairs
Important point
- Manage position sizing as a whole portfolio, not only by individual EA
7.4 VPS Operation and Execution Impact
Bottom line: If the execution environment is poor, position sizing will not work as designed.
Factors that affect it include:
- Fill speed
- Server distance
- Broker quality
Specifically:
- Increased slippage -> larger losses
- Execution delay -> entry at a worse price
- Spread variation -> risk calculation breaks down
Countermeasures
- Use a VPS close to the server
- Select a broker with good execution quality
- Monitor spread
7.5 Practical Design Template
Bottom line: The following structure can handle almost all practical cases.
Recommended structure
- Base: fixed risk at 1%
- Support: fine-tune with ATR-linked sizing
- Limit: maximum lot limit
- Filter: spread, time, and news
- Safety device: drawdown stop
Simple design philosophy
- Start with a small lot size
- Adjust in forward testing
- Prioritize survival
8. FAQ
Bottom line: Position sizing can be summarized as “how lot size is decided for risk management.” The following answers cover the points that often confuse traders in practice.
8.1 What is the difference between position sizing and lot calculation?
Position sizing is the strategy for deciding the lot size. Lot calculation is the numeric result produced by that strategy. The strategy comes first, and the calculation comes after.
8.2 Which method is recommended for beginners?
Fixed risk at 1-2% is the best starting point. When equity declines, the lot size also decreases automatically, which helps reduce risk of ruin.
8.3 Should I use martingale?
In general, martingale is not recommended. It can recover losses in the short term, but the lot size increases exponentially during losing streaks and the risk of failure becomes extremely high.
8.4 Why is ATR-linked sizing effective?
ATR-linked sizing adjusts the lot size based on volatility, or price movement, so it can reduce risk during sharp market changes. It is more suitable for live trading than fixed lot sizing.
8.5 What is the best risk percentage?
A common practical range is 1-2% per trade. Risk above 3% can cause drawdown to rise quickly and should be handled carefully in live trading.
8.6 Why do backtest and live trading results differ?
The main reason is that spread, slippage, and execution quality are not fully reproduced. In live trading, results often shift in the direction of larger losses.
8.7 Can position sizing be used without an SL, or stop loss?
No. Position sizing is designed around how much the trade can lose, so without an SL the risk calculation cannot be defined.
8.8 What should I watch when running multiple EAs?
Manage total risk, not only individual EA risk. If several EAs lose at the same time, drawdown can become larger than expected.
9. Summary and Internal Link Ideas
Bottom line: Position sizing is not a technique for simply increasing profit. It is a design method for protecting capital while growing it over the long term. In practice, the most stable approach is to start with fixed risk and adjust for volatility and execution conditions.
Key points:
- Lot size is a multiplier for expectancy, and oversized lots can cause failure
- Fixed risk at 1-2% is the most practical and reproducible method
- ATR-linked sizing can adapt to market volatility
- spread, slippage, and execution can break theoretical assumptions
- Lot size should be combined with filters and controls, not used alone
In practice, the following structure is effective:
- Base: fixed risk
- Adjustment: ATR-linked sizing
- Limits: maximum lot and simultaneous positions
- Protection: drawdown control, or equity stop
- Environment: VPS plus execution optimization
Important topics to read next, recommended as internal links:
- Lot size calculation, including formulas and implementation
- Drawdown control, for stabilizing the equity curve
- Equity protection, or forced stop logic
- Risk management, including risk per trade design
By combining these topics, an EA can be designed not only to win in testing, but also to survive in live trading.