- 1 1. What Is EA Architecture in MQL5?
- 2 2. Overall Structure of EA Architecture
- 3 3. Implementation Steps for EA Architecture
- 4 4. Why This Structure Is Necessary
- 5 5. Common EA Design Patterns
- 6 6. Comparison with Other Approaches
- 7 7. Common Failures and Important Notes
- 7.1 7.1 Putting Too Much Logic into OnTick
- 7.2 7.2 Multiple Entries Caused by Missing State Management
- 7.3 7.3 Ignoring Spread and Slippage
- 7.4 7.4 Overtrusting Backtest Results
- 7.5 7.5 Poor Lot Size Management
- 7.6 7.6 Over-Optimizing Conditions
- 7.7 7.7 Ignoring Execution Failure
- 7.8 7.8 Not Enough Logging and Validation
- 7.9 7.9 Summary of Important Points
- 8 8. Practical Use Cases
- 8.1 8.1 Validation EA: Prototype Stage
- 8.2 8.2 Live Operation of a Single EA
- 8.3 8.3 Multiple Currency Pairs and Portfolio Operation
- 8.4 8.4 Advanced Strategies: Grid, Averaging Down, and Multiple Positions
- 8.5 8.5 VPS and Live Environment Points
- 8.6 8.6 Design Priorities in Practice
- 8.7 8.7 Strategy-Level Design Thinking
- 8.8 8.8 Short Summary
- 9 9. FAQ
- 9.1 9.1 Do Beginners Need EA Architecture?
- 9.2 9.2 Is It Okay to Build an EA Only with OnTick?
- 9.3 9.3 Where Should Modularization Start?
- 9.4 9.4 Is a State Machine Required?
- 9.5 9.5 How Much Should Spread Be Considered?
- 9.6 9.6 How Much Does Slippage Matter?
- 9.7 9.7 How Reliable Are Backtest Results?
- 9.8 9.8 Which EA Architecture Is Best?
- 9.9 9.9 Is Fixed Lot Sizing Acceptable?
- 9.10 9.10 What Is the Most Important Element in an EA?
- 10 10. Summary
1. What Is EA Architecture in MQL5?
Conclusion:
EA architecture means how you design and divide automated trading logic into a clear structure.
If you do not understand the design, the EA can suffer from bugs, poor reproducibility, and failure in live operation.
Definition:
EA (Expert Advisor) architecture is the design structure used to split an automated trading program written in MQL5 into functional units such as data retrieval, decision-making, order execution, and management. Its purpose is to improve reproducibility and extensibility.
1.1 Basic Concept of EA Architecture
An EA in MQL5 is not just a place to write trading logic. It works through a structure like this:
- Retrieve market data such as prices and indicators
- Generate signals based on conditions
- Execute orders
- Manage positions and risk
Designing this sequence as an organized structure is EA architecture.
The key points are:
- Separate logic from execution processing
- Make the structure reusable
- Consider live trading conditions such as spread and slippage
Without this design, the following problems are likely to occur:
- All processing is written inside OnTick, and readability collapses
- The EA enters multiple times under the same condition
- It works in backtesting but breaks in live operation
1.2 Basic MQL5 Structure: Event-Driven Model
MQL5 EAs run on an event-driven model.
This means functions are called at specific timings, or events.
The three main events are:
- OnInit: initialization processing, executed once when the EA starts
- OnTick: executed when the price updates, used for the main process
- OnDeinit: cleanup processing when the EA stops
A minimal structure looks like this:
int OnInit()
{
   // Initialization, such as creating indicators
   return(INIT_SUCCEEDED);
}

void OnTick()
{
   // Executed on every tick
   // Signal check -> order processing
}

void OnDeinit(const int reason)
{
   // Cleanup
}
If you do not understand this structure, problems can occur, such as:
- Running unnecessary processing on every tick
- Lower performance
- Incorrect logic behavior
OnTick is called repeatedly, so it is important to keep its processing as small as possible.
1.3 Why EA Architecture Matters
EA architecture matters for three main reasons.
1. Ensuring Reproducibility
The greatest value of an EA is that it performs the same action under the same conditions.
However, if the design is unclear, the following gaps can occur:
- Differences between backtests and forward tests
- Differences caused by execution conditions such as slippage and spread
- Timing-dependent bugs
A structured design can minimize these gaps.
2. Reducing Bugs
When the design is not organized, the following problems occur:
- Conditional branches become complicated
- State management becomes unclear
- Debugging becomes difficult
Beginners especially tend to write everything in one function, which becomes a major cause of failure.
3. Extensibility and Live Trading Readiness
An EA is not finished after the first version is created.
- Adding logic
- Adding filters such as spread and slippage
- Strengthening risk control
Continuous improvement is usually required.
With proper architecture, you can:
- Add features more easily
- Reuse parts in other EAs
- Support portfolio-style operation
Without design, later modification costs increase rapidly.
2. Overall Structure of EA Architecture
Conclusion:
An EA should be built from five elements: data retrieval, signal generation, order execution, risk management, and state management.
Once you can separate these elements, reproducibility, debugging, and extensibility improve greatly.
2.1 List of Basic Components
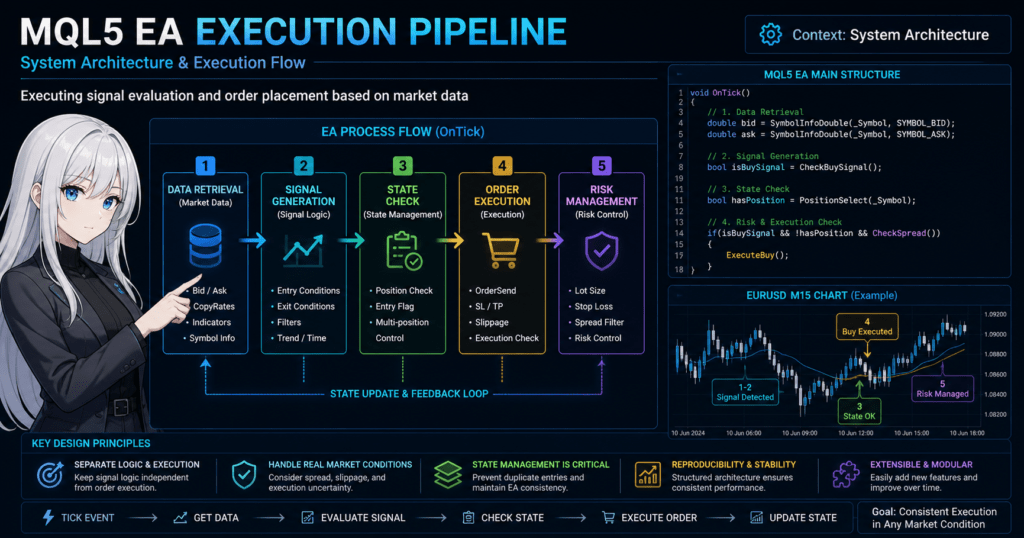
The basic approach is to design an EA by dividing it into the following five components.
1. Data Retrieval (Market Data)
- Prices such as Bid and Ask
- Time series data such as CopyRates
- Indicators such as iMA and iRSI
Role: retrieve the input data needed for decisions
double bid = SymbolInfoDouble(_Symbol, SYMBOL_BID);
Notes:
- Heavy data retrieval on every tick can reduce performance
- Calling CopyBuffer too often can cause delays
2. Signal Generation (Signal Logic)
- Entry conditions
- Exit conditions
- Filters such as time and trend
Role: decide whether to sell, buy, or do nothing
bool isBuy = (ma_fast > ma_slow);
Notes:
- Do not mix logic and order processing
- Limit signals to decisions, not state
3. Order Processing (Execution)
- OrderSend
- Order conditions such as price, lot size, SL, and TP
- Execution timing
Role: actually send orders to the market
MqlTradeRequest request;
MqlTradeResult result;
// request setup -> OrderSend
Important points:
- Consider slippage, or acceptable price deviation
- Handle execution failures such as requote and off quotes
4. Risk Management (Risk Control)
- Lot size
- Stop loss (SL)
- Spread filter
Role: control losses
if(spread > max_spread) return;
Notes:
- Ignoring spread often causes failure in live operation
- A fixed lot size is not enough as risk management
5. State Management
- Whether a position exists
- Entry-completed flags
- Multiple-position management
Role: keep track of the EA’s current state
bool hasPosition = PositionSelect(_Symbol);
Important:
- Without state management, multiple entries can occur
- It is one of the most important components in live operation
2.2 Data Flow
An EA works through the following flow:
- A tick occurs and OnTick is called
- Data is retrieved, such as prices and indicators
- The signal is evaluated
- If conditions are met, an order is executed
- The state is updated
In code, this flow looks like this:
void OnTick()
{
   // 1. Data retrieval
   double bid = SymbolInfoDouble(_Symbol, SYMBOL_BID);

   // 2. Signal generation
   bool isBuySignal = CheckBuySignal();

   // 3. State check
   bool hasPosition = PositionSelect(_Symbol);

   // 4. Order execution
   if(isBuySignal && !hasPosition)
   {
      ExecuteBuy();
   }
}
The most important point is not to break this flow.
2.3 Common Structural Mistakes Beginners Struggle With
The following are typical failure patterns.
1. Writing All Processing Directly in OnTick
- Readability declines
- Bugs are introduced during modifications
2. No State Management
- The EA enters repeatedly under the same conditions
- Positions increase out of control
3. Mixing Data Retrieval and Logic
- The code cannot be reused
- Testing becomes difficult
4. Underestimating Execution
- Slippage is not considered
- Execution failure breaks the logic
2.4 Why This Separation Works
This five-part structure makes the following possible:
- Unit testing of logic
- Localized debugging
- Easier feature additions
- Reuse in other EAs
The especially important point is:
Separate the signal from execution.
Reason:
- A signal is an ideal condition
- Execution is a real-world condition involving spread and slippage
If these two are mixed, backtests and live trading results diverge.
3. Implementation Steps for EA Architecture
Conclusion:
Build an EA in this order: create a template structure, implement each function separately, then add live trading conditions.
Do not aim for perfection from the start. The most reproducible path is a minimal working version first, then improvement.
3.1 Fastest Build Steps: Template
Beginners should implement in this order:
- Create an EA file in MetaEditor
- Initialize in OnInit
- Write minimal logic in OnTick
- Create order functions such as Buy and Sell
- Check the EA in a backtest
The minimal flow is:
int OnInit()
{
   return(INIT_SUCCEEDED);
}

void OnTick()
{
   if(CheckBuySignal())
   {
      ExecuteBuy();
   }
}
The goal here is to make it run first.
Notes:
- It is acceptable to simplify risk management in the early stage
- However, you must add it later
3.2 Implementation Template: Structural Separation
Next, separate the parts that matter for architecture.
Recommended Structure
- CheckSignal for decisions
- ExecuteOrder for orders
- RiskControl for control
bool CheckBuySignal()
{
   // Check only the signal
   return(true);
}

void ExecuteBuy()
{
   // Order processing only
}

void OnTick()
{
   if(CheckBuySignal())
   {
      ExecuteBuy();
   }
}
Important points:
- Never mix decision-making and execution
- Return the signal as true or false
Reason:
- Logic validation becomes easier
- Execution-dependent bugs can be isolated
3.3 Required Improvements for Practical Use
For live operation, add the following.
1. Spread Filter
double spread = (Ask - Bid) / _Point;
if(spread > 20) return;
Reason:
- When spread is wide, orders are executed at unfavorable prices
2. Position Control to Prevent Multiple Entries
if(PositionSelect(_Symbol)) return;
Reason:
- It prevents repeated entries under the same condition
3. Slippage Handling
Set acceptable price deviation when placing an order.
Points:
- Execution does not always behave according to theory
- Slippage always has to be considered
4. Lot Size Management
double lot = 0.1; // Temporary; use risk-based sizing in practice
Notes:
- Fixed lot sizing can create failure risk in long-term operation
- Move toward risk per trade later
3.4 Common Implementation Failures
1. Writing Complex Logic Too Early
This makes debugging impossible.
2. Writing Everything in OnTick
This destroys readability and makes changes difficult.
3. Postponing State Management
This causes multiple entries.
4. Judging Only by Backtests
This can fail in live operation because of execution differences.
3.5 Evolving from Minimal Structure to Live Operation
Step-by-step improvement is best.
Step 1: Minimal
- Signal plus order
Step 2: Intermediate
- Add state management
- Add a spread filter
Step 3: Live Operation
- Risk management
- Execution optimization
- Logic separation
By following this order, you can:
- Avoid unnecessary rebuilding
- Improve validation accuracy
3.6 Difference from Other Approaches
- Beginner approach: writing directly in OnTick is fast in the short term but likely to fail later
- This approach: separated design has a higher initial cost but is more stable long term
4. Why This Structure Is Necessary
Conclusion:
EA architecture is necessary because MQL5 EAs run in an uncertain execution environment that works on every tick.
If logic is not separated, the EA cannot handle price changes, execution differences, and state mismatches, so backtests and live operation can diverge.
4.1 MQL5 EAs Do Not Always Run Under the Same Conditions
An MQL5 EA is processed every time OnTick is called.
However, ticks do not arrive at fixed intervals. They are fewer when the market is quiet and much more frequent during news events or sharp moves.
Because of this behavior, EAs are prone to the following problems:
- The same logic runs at different timings each time
- The price changes right after a condition is checked
- The same condition becomes true many times across consecutive ticks
- The state can shift before and after execution
In other words, an EA is not a static program. It is a program that follows a changing market environment.
For that reason, simply writing “buy when the condition is true” is not enough.
For example, beginners often write code like this:
void OnTick()
{
   if(CheckBuySignal())
   {
      ExecuteBuy();
   }
}
This form itself is not wrong, but it often lacks checks such as:
- Whether a position is already open
- Whether the spread is too wide
- Whether orders can be placed now
- Whether duplicate entries in the same bar are prevented
For practical use, signal checking and execution conditions must be separated.
4.2 Orders Are Not Executed Exactly as Theory Assumes
Even when the EA logic is correct, orders may not be filled as theory assumes.
The main cause is uncertainty around execution.
Typical examples include:
- Spread widening
- Slippage
- Requote
- Execution rejection
- Market close
- Volume condition mismatch
For example, a strategy that worked in a backtest with narrow spread assumptions may fail in live operation because costs increase.
This impact is especially large for short-term trading and scalping-style logic.
Therefore, EA architecture requires this separation:
- Signal: the theoretical trading decision
- Execution: the check of whether an order should actually be sent
Without this separation, the quality of the logic and the quality of the execution environment become mixed.
As a result, you cannot tell whether the strategy is weak or the execution conditions are poor.
4.3 Without Modularity, Modification Costs Rise Quickly
An EA is not finished once it is created.
In practice, improvements such as the following are repeated:
- Add a filter
- Change lot calculation
- Adjust stop-loss conditions
- Support multiple currency pairs
- Add more logging
If all processing is packed into OnTick, one change can easily create another bug.
Typical examples are:
- Changing entry conditions breaks exit conditions
- Adding a spread filter disrupts the order of existing logic
- Adding position checks causes multiple entries
To prevent this, each function needs a clear role.
- Data retrieval function
- Signal check function
- Order execution function
- Risk management function
- State management function
With this structure, it is easier to identify where the problem is.
You can also replace only a specific function when needed.
4.4 EAs Without State Management Are Fragile in Live Operation
Beginners often overlook state management.
State management is the mechanism that lets the EA understand its current state.
Common states include:
- No position
- Holding a buy position
- Holding a sell position
- Immediately after an order
- Waiting for exit
- Already entered within the same bar
An EA without state management can react to the same condition repeatedly when the market moves quickly.
As a result, these problems occur:
- Multiple entries at the same time
- New orders in the opposite direction before exit
- Duplicate orders that are hard to see in backtests
State management may look plain, but it is central in live operation.
It is especially close to mandatory for multiple positions, multiple currency pairs, and logic that spans timeframes.
4.5 Why It Is Better to Structure from the Start
Many people think they can build a simple EA first and organize it later.
This is partly true for small validation EAs, but it is often inefficient in real work.
The reasons are:
- Working code becomes harder to touch later
- Logic that produces results tends to become more complex
- Separating code later takes more effort than separating it from the start
When trading logic starts producing results, additions and changes tend to accumulate around that code.
If you redesign it at that stage, you must restructure it without breaking existing behavior, which sharply raises the difficulty.
For that reason, even beginners should follow at least these principles:
- Separate decisions from order placement
- Add state checks
- Do not ignore live trading costs such as spread and slippage
These three points alone can greatly improve EA durability.
5. Common EA Design Patterns
Conclusion:
The most efficient way to evolve EA design is simple structure, then modular structure, then state machine structure.
For live operation, a modular structure or higher is almost required.
5.1 Simple Structure for Beginners
The most basic structure is to put all processing into OnTick.
void OnTick()
{
   double ma_fast = iMA(_Symbol, 0, 5, 0, MODE_SMA, PRICE_CLOSE, 0);
   double ma_slow = iMA(_Symbol, 0, 20, 0, MODE_SMA, PRICE_CLOSE, 0);

   if(ma_fast > ma_slow)
   {
      // Buy processing
   }
}
Characteristics:
- It is the easiest to implement
- The learning cost is low
- You can create something that runs quickly
Disadvantages:
- Readability worsens quickly
- Additional logic can break the structure
- State management is difficult
- It is hard to rely on in live operation
Common failures:
- Conditions increase and if statements become deeply nested
- The same code spreads across multiple places
- Multiple entries occur
In practice, this structure should be limited to validation or very simple strategies.
5.2 Modular Structure: Recommended
A modular structure improves on the simple structure.
Processing is separated by function.
bool CheckBuySignal()
{
   return(true);
}

bool CanExecute()
{
   double spread = (Ask - Bid) / _Point;
   if(spread > 20) return(false);

   if(PositionSelect(_Symbol)) return(false);

   return(true);
}

void ExecuteBuy()
{
   // OrderSend processing
}

void OnTick()
{
   if(CheckBuySignal() && CanExecute())
   {
      ExecuteBuy();
   }
}
Characteristics:
- The logic is organized
- Debugging is easier
- Feature additions are easier
Benefits:
- Signals and execution can be separated
- Real-world conditions such as spread and slippage can be included
- Reusability is high
Disadvantages:
- Initial implementation takes more effort
- Design awareness is required
Practical evaluation:
- It has the best balance
- It works for single EAs and multiple-strategy setups
Important points:
- CheckSignal for theory
- CanExecute for real-world conditions
- Execute for order placement
These three divisions are the foundation.
5.3 State Machine Structure for Intermediate to Advanced Users
This structure controls the EA through state transitions.
Example:
enum State
{
   STATE_NONE,
   STATE_ENTRY,
   STATE_HOLD,
   STATE_EXIT
};

State currentState = STATE_NONE;

void OnTick()
{
   switch(currentState)
   {
      case STATE_NONE:
         if(CheckBuySignal())
         {
            ExecuteBuy();
            currentState = STATE_HOLD;
         }
         break;

      case STATE_HOLD:
         if(CheckExitSignal())
         {
            ExecuteSell();
            currentState = STATE_NONE;
         }
         break;
   }
}
Characteristics:
- States are managed explicitly
- The logic flow becomes visible
Benefits:
- Strong for multi-step logic
- Keeps multiple conditions consistent
- Stabilizes position management
Disadvantages:
- Implementation is harder
- Design mistakes can make it complex
Suitable cases:
- Multiple entry conditions
- Averaging down and grid strategies
- Multiple-position control
5.4 Which Structure Should You Choose?
The conclusion is:
- Learning stage: simple structure
- Live operation: modular structure
- Advanced strategies: state machine structure
Decision criteria:
- Whether the logic is simple
- Whether there is one position or multiple positions
- Whether execution conditions are complex
5.5 Difference from Other Implementation Styles
Differences from other implementation styles:
- Script type, one-time execution
Unlike an EA, it cannot monitor continuously - Indicator type
It can produce signals but cannot place orders - EA, which is the focus of this article
It supports automated execution and state management
5.6 Common Design Mistakes
- Creating a huge function instead of modularizing
- Adding conditions without considering state transitions
- Underestimating execution
- Mixing logic and display output such as Print
Special warning:
If you postpone design, you may not be able to fix the EA later.
6. Comparison with Other Approaches
Conclusion:
EA architecture should be selected from simple, modular, and state machine structures.
In live operation, a modular structure or higher is needed to handle execution conditions and risk management.
6.1 Organizing the Comparison Targets
The three design patterns compared here are:
- Simple structure: written directly in OnTick
- Modular structure: separated by function
- State machine structure: controlled by state transitions
Each has a different purpose and scope.
6.2 Comparison Table: Overall View
| Structure | Difficulty | Extensibility | Bug Resistance | Practical Fit | Best Use |
|---|---|---|---|---|---|
| Simple | Low | Low | Low | Fair | Learning and validation |
| Modular | Medium | High | Medium | Excellent | Single EA and live operation |
| State machine | High | High | High | Excellent | Complex strategies |
Important points:
- In live operation, extensibility and bug resistance come first
- Choosing only by difficulty can cause failure later
6.3 Simple Structure vs. Modular Structure
Core Difference
- Simple structure: logic and execution are mixed
- Modular structure: logic and execution are separated
This difference is the most important point.
Practical Differences
| Aspect | Simple | Modular |
|---|---|---|
| Debugging | Difficult | Easy |
| Logic changes | Large impact | Local changes |
| Spread handling | Difficult | Easy |
| Slippage handling | Difficult | Easy |
Conclusion:
- The simple structure is efficient in the short term
- The modular structure is stable in the long term
6.4 Modular Structure vs. State Machine Structure
Core Difference
- Modular structure separates processing
- State machine structure controls state
Practical Differences
| Aspect | Modular | State Machine |
|---|---|---|
| Implementation difficulty | Medium | High |
| State management | Simple | Strict |
| Multiple-position support | Fair | Excellent |
| Logic expressiveness | Medium | High |
Conclusion:
- For simple to medium EAs, a modular structure is enough
- For complex logic, a state machine structure is stronger
6.5 Best Choice for Live Operation
For practical use, the recommendations are:
- Single currency pair and simple strategy: modular structure
- Multiple conditions and branches: modular structure plus state management
- Grid and multiple positions: state machine structure
Decision criteria:
- Whether there is one position or multiple positions
- Whether entry conditions are single or multiple
- Whether execution conditions are strict
6.6 Common Selection Mistakes
1. Trying to Use a Simple Structure in Live Operation
It can fail because of spread and slippage.
2. Overusing a State Machine
Too much design can increase bugs.
3. Incomplete Modularization
OnTick eventually becomes bloated anyway.
6.7 Relationship with Other Methods
EA architecture relates to other methods as follows:
| Method | Feature | Difference from EA |
|---|---|---|
| Indicator | Signal only | Cannot place orders |
| Script | One-time execution | Cannot monitor continuously |
| EA | Automated trading | Full control is possible |
In other words:
- An EA has the highest degree of freedom
- That is why architecture matters
7. Common Failures and Important Notes
Conclusion:
Many EAs fail in live operation not because of one large design flaw, but because basic mistakes accumulate.
In particular, missing state management, execution conditions, and over-optimization can destroy reproducibility.
7.1 Putting Too Much Logic into OnTick
The most common mistake is writing all processing directly in OnTick.
void OnTick()
{
   if(condition1 && condition2 && condition3)
   {
      // Order processing
   }
}
Problems:
- Readability collapses as conditions increase
- Bugs become difficult to find
- Changes affect other logic
Countermeasures:
- Separate logic into a CheckSignal function
- Create functions for each condition
- Divide logic by meaningful units
Reason:
By structuring the EA, you can identify which part is broken.
7.2 Multiple Entries Caused by Missing State Management
This is easy for beginners to miss, but it is one of the most dangerous mistakes.
if(CheckBuySignal())
{
   ExecuteBuy();
}
This code sends orders repeatedly as long as the condition remains true.
Results:
- Repeated entries under the same condition
- A rapid increase in positions
- Unexpected risk expansion
Countermeasure:
if(CheckBuySignal() && !PositionSelect(_Symbol))
{
   ExecuteBuy();
}
For stricter control:
- Limit entries to once per bar
- Use flag management such as isEntered
Reason:
An EA is a program with state, and conditions alone cannot control it safely.
7.3 Ignoring Spread and Slippage
This is a typical case where a backtest looks fine but live operation fails.
// No filter
ExecuteBuy();
Problems:
- Orders are executed at unfavorable prices when spread widens
- Slippage shifts the entry price
- Costs erase profits
Countermeasure:
double spread = (Ask - Bid) / _Point;
if(spread > maxSpread) return;
Additional note:
- The impact is larger for scalping strategies
- Execution should be treated as part of the strategy
7.4 Overtrusting Backtest Results
This is a very common misunderstanding.
In backtesting:
- Spread may be fixed
- Slippage may be absent
- Execution may be assumed to succeed
In live operation:
- Spread changes
- Orders may be rejected
- Execution can be delayed
Results:
- PF, or profit factor, collapses
- DD, or drawdown, increases
Countermeasures:
- Forward testing is required
- Reproduce execution conditions
- Use conservative parameter settings
Important:
A backtest is hypothesis testing, not a guarantee of results.
7.5 Poor Lot Size Management
This refers to running the EA with fixed lot sizing.
double lot = 0.1;
Problems:
- It cannot adapt to account growth or decline
- Risk can become excessive during drawdown
- It is fragile in long-term operation
Countermeasures:
- Use risk-based lot sizing, or risk per trade
- Adjust based on margin and balance
Reason:
Because EAs are meant for continuous operation, money management is critical.
7.6 Over-Optimizing Conditions
This means adding too many conditions to improve backtest results.
Examples:
- Fine-tuning moving average periods too much
- Optimizing for a specific period
- Adding too many conditions
Problems:
- The logic fits only past data
- It does not reproduce in the future
Countermeasures:
- Keep the logic simple
- Use fewer parameters
- Test across different periods
Important:
Reproducibility is more important than optimization precision.
7.7 Ignoring Execution Failure
Orders do not always succeed.
Problem examples:
- Not checking the return value of OrderSend
- No error handling
Results:
- You do not notice order failures
- The logic and actual state diverge
Countermeasures:
- Check return values
- Add error handling
7.8 Not Enough Logging and Validation
This is the case where you cannot trace the cause when a problem occurs.
Countermeasures:
- Output logs with Print
- Record logs when conditions become true
- Record execution results
Reason:
EAs can easily become black boxes, so visibility is important.
7.9 Summary of Important Points
- Bloated OnTick code causes design collapse
- Without state management, multiple entries occur
- Spread and slippage must be considered
- Backtests are only reference values
- Lot management is central to long-term survival
8. Practical Use Cases
Conclusion:
EA architecture should change by design level depending on whether the EA is for validation, single-EA live operation, or multiple-strategy operation.
If the structure does not match the purpose, the result is either over-design or insufficient design.
8.1 Validation EA: Prototype Stage
The simplest use case is logic validation.
Characteristics:
- Single logic
- Short-term testing
- Mainly backtesting
Recommended structure:
- Simple structure or lightweight modular structure
void OnTick()
{
   if(CheckBuySignal())
   {
      ExecuteBuy();
   }
}
Points:
- Prioritize implementation speed
- Perfect design is not required
- Focus on condition validation
Notes:
- Do not move this version directly into live operation
- Always add execution handling for spread and slippage later
8.2 Live Operation of a Single EA
This is the most common use case.
Characteristics:
- Single currency pair, such as EURUSD
- One strategy
- Continuous operation
Recommended structure:
- Modular structure, required
void OnTick()
{
   if(CheckSignal() && CanExecute())
   {
      ExecuteOrder();
   }
}
Elements to add:
- Spread filter
- Slippage handling
- Risk-based lot management
- State management
Important points:
- Execution is part of the strategy
- Logic alone does not produce profit
Failure examples:
- Going live based only on backtest results
- Using fixed lot sizing
- No state management
8.3 Multiple Currency Pairs and Portfolio Operation
This is a more advanced form of operation.
Characteristics:
- Multiple symbols such as EURUSD and USDJPY
- Multiple logic sets
- Risk diversification
Recommended structure:
- Modular structure plus stronger state management
- State machine structure when needed
Additional elements:
- State management by symbol
- Total position exposure control
- Correlation management
Important:
- Design is more important than in a single EA
- Risk management comes first
8.4 Advanced Strategies: Grid, Averaging Down, and Multiple Positions
This is a high-difficulty area.
Characteristics:
- Multiple positions at the same time
- Multiple entry stages
- Complex state transitions
Recommended structure:
- State machine structure, almost required
Reason:
- The state is too complex to manage with if statements alone
- Position consistency is critical
Typical states:
- Initial entry
- Additional entry
- Average price management
- Full exit
Notes:
- A design mistake can immediately create failure risk
- A test environment is required
8.5 VPS and Live Environment Points
An EA also depends on its environment.
Important elements:
- Low-latency VPS
- Stable communication
- MT5 log monitoring
Factors affected:
- Execution speed
- Slippage
- Execution success rate
Notes:
- Behavior can differ between a local machine and a VPS
- Log analysis of errors and executions is required
8.6 Design Priorities in Practice
For live operation, the important order is:
- Risk management, highest priority
- Execution conditions such as spread and slippage
- State management
- Logic accuracy
A common beginner mistake is:
- Focusing only on logic accuracy
- Underestimating execution and risk
Result:
- The backtest looks good, but live operation fails
8.7 Strategy-Level Design Thinking
Design an EA as a system, not just as code.
Important viewpoints:
- When not to trade
- Under what conditions to stop
- Acceptable DD, or drawdown
Additional notes:
- Filters such as time and news
- Volatility control such as ATR
8.8 Short Summary
- Validation stage: simple structure
- Live operation: modular structure is required
- Advanced strategies: state machine structure
- Execution and risk are the most important factors
9. FAQ
Conclusion:
Adding a minimum level of design at the start greatly changes later development efficiency and reproducibility.
When in doubt, use the modular structure as the baseline.
9.1 Do Beginners Need EA Architecture?
Yes.
You do not need a perfect design from the start, but simply separating signals from orders makes the EA much more stable.
If you build without design, later modification costs increase quickly.
9.2 Is It Okay to Build an EA Only with OnTick?
It is acceptable for small validation EAs.
However, in live operation it easily misses state management, spread, and slippage handling, which creates a high failure risk.
When moving to live operation, switch to a separated design.
9.3 Where Should Modularization Start?
Start with these three minimum divisions:
- Signal check, or CheckSignal
- Execution condition check, or CanExecute
- Order processing, or ExecuteOrder
This separation alone can avoid many bugs.
9.4 Is a State Machine Required?
No.
For a single-position, simple strategy, a modular structure is enough.
Cases where it becomes necessary:
- Multiple-position management
- Averaging down and grid strategies
- Multi-stage entries
9.5 How Much Should Spread Be Considered?
Spread handling is required.
Especially in short-term trading, spread directly reduces profit.
Countermeasures:
- Check an upper limit before entry
- Adjust thresholds by currency pair
9.6 How Much Does Slippage Matter?
It cannot be ignored.
The impact is especially large in these cases:
- During economic news releases
- During low-liquidity hours
- During sharp market moves
Execution must be evaluated in the real environment, not only in theory.
9.7 How Reliable Are Backtest Results?
They are not fully reliable.
Backtests often simplify these factors:
- No slippage
- Assumed 100% execution
- Fixed spread
Therefore, always confirm with forward testing.
9.8 Which EA Architecture Is Best?
The conclusion is:
- Beginners: simple structure for short-term learning
- Live operation: modular structure as the baseline
- Advanced strategies: state machine structure
When in doubt, choose the modular structure.
9.9 Is Fixed Lot Sizing Acceptable?
It is acceptable for short-term validation.
For live operation, use risk-based sizing based on a percentage of funds.
Reason:
- Drawdown resistance changes
- It directly affects long-term survival
9.10 What Is the Most Important Element in an EA?
The priority order is:
- Risk management
- Execution conditions such as spread and slippage
- State management
- Logic accuracy
Logic alone does not create profit.
10. Summary
Conclusion:
EA architecture is a design approach that ensures reproducibility, stability, and extensibility, and it is required for live operation.
The most important point is separating signals, execution, and risk management.
10.1 Key Points from This Article
- An EA should be structured as data retrieval, decision-making, execution, and management
- Writing everything in OnTick breaks the design
- Signals and execution must be separated
- Without state management, multiple entries occur
- Spread and slippage must be considered
- Backtests are reference information and differ from live operation
10.2 Best Practical Approach
In practice, the most efficient flow is:
- Confirm operation with a minimal structure
- Modularize and separate functions
- Add risk management and execution conditions
- Validate with forward testing
This order improves:
- Development efficiency
- Reproducibility
- Stability
10.3 Guidelines by Design Level
- Validation stage: simple structure
- Live operation: modular structure is required
- Advanced strategies: state machine structure
You do not need to force an advanced design.
However, continuing to use a simple structure in live operation is risky.
10.4 The Most Important Way to Think
An EA is a system, not just code.
The important questions are:
- Under what conditions should the EA not trade?
- Under what conditions should it stop?
- How much loss is acceptable?
Only when these points are included in the design can an EA withstand live operation.
10.5 Next Steps
Topics to work on next:
- Implementing a modular template
- Lot size calculation based on risk per trade
- Spread filter design
- Building a forward testing environment
By implementing these, an EA evolves from a validation tool into an operating system.