- 1 Article Conclusion
- 2 1. Why This Design Is Necessary
- 3 2. Overall EA Design Philosophy
- 4 3. Basic Structure
- 5 4. Roles of the Main Modules
- 6 5. Implementation Patterns
- 7 6. Sample Code
- 8 7. Comparison of Design Patterns
- 9 8. Items to Check in Backtesting
- 10 9. Items to Check in Forward Testing
- 11 10. Live Operation Notes
- 12 11. Common Design Mistakes
- 13 12. Summary
- 14 FAQ
- 14.1 Q1. What is an MQL5 EA risk model?
- 14.2 Q2. Is using fixed lots alone insufficient?
- 14.3 Q3. Is OrderCheck necessary before OrderSend?
- 14.4 Q4. What risk percentage should be used?
- 14.5 Q5. Does risk management differ between netting and hedging accounts?
- 14.6 Q6. What should be checked most carefully in backtesting?
- 14.7 Q7. Why is forward testing necessary?
- 14.8 Q8. Is a risk model using ATR effective?
Article Conclusion
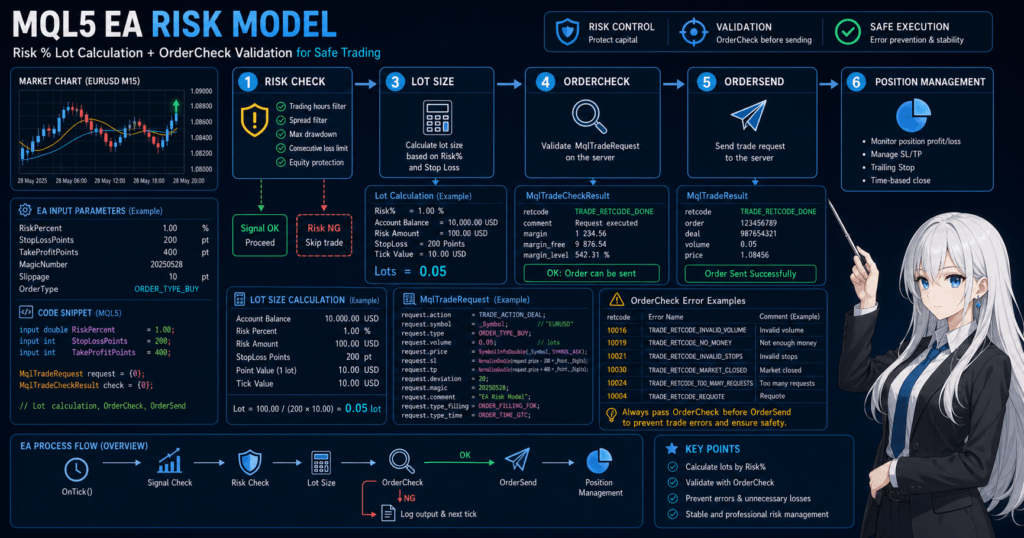
An MQL5 EA risk model is a design that controls “how much loss is acceptable” separately from entry conditions.
Instead of running an EA only with fixed lots, it should make decisions by combining account balance, equity, stop-loss distance, symbol specifications, and drawdown status.
In an EA, the practical structure is to place risk checks after signal evaluation and verify lot size, margin, stop levels, and existing positions before sending an order.
Backtest results do not guarantee future profits, so execution differences, spread widening, and drawdown must be checked through forward testing before live operation.
1. Why This Design Is Necessary
Conclusion
An MQL5 EA needs a risk model because losses can grow from lot size, stop-loss distance, losing streaks, or spread widening even when the trading signal itself is correct.
EA quality is not determined only by entry conditions.
The acceptable loss range must be managed both before orders are placed and while positions are open.
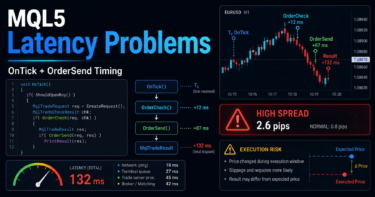
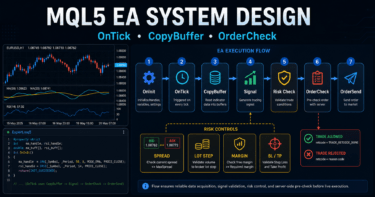
In an MQL5 EA, a common structure is to receive market data in OnTick, then process condition checks, risk checks, order sending, and position management in sequence.
When the risk model is separated within this flow, money management rules are easier to maintain even if the trading logic changes.
A risk model is not a magic mechanism for increasing profit.
Its role is to define loss range, trading frequency, lot size, and stop conditions so the EA structure is easier to test and verify.
1.1 Main Problems a Risk Model Helps Prevent
A risk model is used to reduce problems such as the following.
- The lot size is too large for the stop-loss distance
- The EA continues trading under the same conditions during a losing streak
- The EA sends unfavorable orders when spreads widen
- Orders fail because of insufficient margin or differences in symbol specifications
- Drawdown that seemed acceptable in backtesting becomes larger in live operation
In an MQL5 EA, it is important to design for resilience against worsening trading conditions, not only signal accuracy.
1.2 Separation From Entry Logic
The risk model should be designed separately from the process that determines entry direction.
Entry logic decides whether to buy, sell, or skip the trade.
The risk model decides whether the order may be placed, what lot size to use, and whether trading should be stopped.
This separation makes it easier to keep the same money management standards even when replacing logic such as moving average crosses, breakouts, or pullback entries.
2. Overall EA Design Philosophy
Conclusion
An MQL5 EA risk model should insert multiple safety checks into the flow from market recognition to order sending.
Instead of allowing trades based on a single condition, it should check balance, margin, stop-loss distance, spread, and position status in order.
The overall EA becomes easier to manage when organized in the following sequence.
Market recognition
↓
Filter evaluation
↓
Signal evaluation
↓
Risk check
↓
Pre-order check
↓
Order sending
↓
Post-execution management
↓
Exit and stop-condition evaluation
The risk model is related to “risk check,” “pre-order check,” “post-execution management,” and “exit and stop-condition evaluation.”
Especially in automated trading, unexpected losing streaks and changes in trading conditions must be represented in a form that code can handle.
2.1 Input Data for the Risk Model
At minimum, the risk model uses the following information.
- Account balance
- Equity
- Maximum allowable risk percentage
- Stop-loss distance
- Minimum lot
- Maximum lot
- Lot step
- Tick value
- Tick size
- Current spread
- Number of existing positions
- Daily loss or cumulative drawdown
These values may differ depending on the account, symbol, and broker specifications.
It is important to avoid relying only on EA input parameters and instead retrieve symbol specifications at runtime before making decisions.
2.2 Risk Control as State Management
EA risk control becomes difficult to manage with only a single if statement.
When losing streak count, daily loss, open positions, and stopped status are stored as states, it becomes easier to trace why the EA behaved a certain way.
For example, the EA can hold the following internal states.
- Normal operation
- New entries stopped
- Only exits allowed
- Daily loss limit reached
- Maximum drawdown reached
In an MQL5 EA, OnTick is called on every new tick, so the structure should check the current state every time before moving to the next process.
3. Basic Structure
Conclusion
An MQL5 EA risk model should initialize in OnInit, check risk status on every OnTick, and perform any required cleanup in OnDeinit.
When indicators are used, handle creation and value retrieval with CopyBuffer should be implemented separately.
The basic structure is divided as follows.
- Initialization process
- Market data retrieval
- Signal evaluation
- Lot calculation
- Trade permission evaluation
- Pre-order check
- Order sending
- Position management
- Stop-condition evaluation
This division makes it easier to identify the cause when a problem appears in backtesting.
3.1 Role of OnInit
OnInit is the initialization process when the EA starts.
It is used to create indicator handles, validate input parameters, and record the initial balance.
In a risk model, it checks whether the maximum risk percentage or loss limit has an unreasonable value.
If the settings are invalid, returning INIT_FAILED and stopping the EA is a safer design.
3.2 Role of OnTick
OnTick is the core EA process executed when a new tick is received.
In the risk model, each tick checks trading permission status, spread, existing positions, and account conditions.
A new order is sent only when a signal appears and the risk checks pass afterward.
By keeping this order, the EA can skip trades that do not meet risk conditions even when a signal appears.
3.3 Role of OnDeinit
OnDeinit is the cleanup process when the EA stops.
When indicator handles are used, release them with IndicatorRelease as needed.
The risk model itself may require little cleanup.
However, in a design that writes logs or stores temporary state, recording the shutdown reason makes verification easier.
4. Roles of the Main Modules
Conclusion
An EA risk model is easier to maintain when lot calculation, pre-order checks, loss limits, and position management are handled as separate modules.
The more each module has a single role, the easier it becomes to analyze causes in backtesting and forward testing.
The main modules can be organized as follows.
| Module | Role | Main Check Items | Action on Failure |
|---|---|---|---|
| Signal evaluation | Determines trade direction | Indicator values, price conditions, closed candles | Do not trade |
| Lot calculation | Determines order volume | Allowable loss, stop-loss distance, lot limits | Skip if below minimum lot |
| Risk check | Decides whether trading is allowed | Drawdown, daily loss, losing streak count | Stop new orders |
| Pre-order check | Checks whether the order can be placed | Margin, stop level, spread | Do not send the order |
| Order sending | Sends the trade request | MqlTradeRequest, MqlTradeResult | Record the error |
| Position management | Manages open positions | Stop loss, take profit, trailing, time limit | Close based on conditions |
4.1 Lot Calculation Module
Lot calculation is the center of the risk model.
With fixed lots alone, risk does not remain stable when the stop-loss distance is wide or the account balance changes.
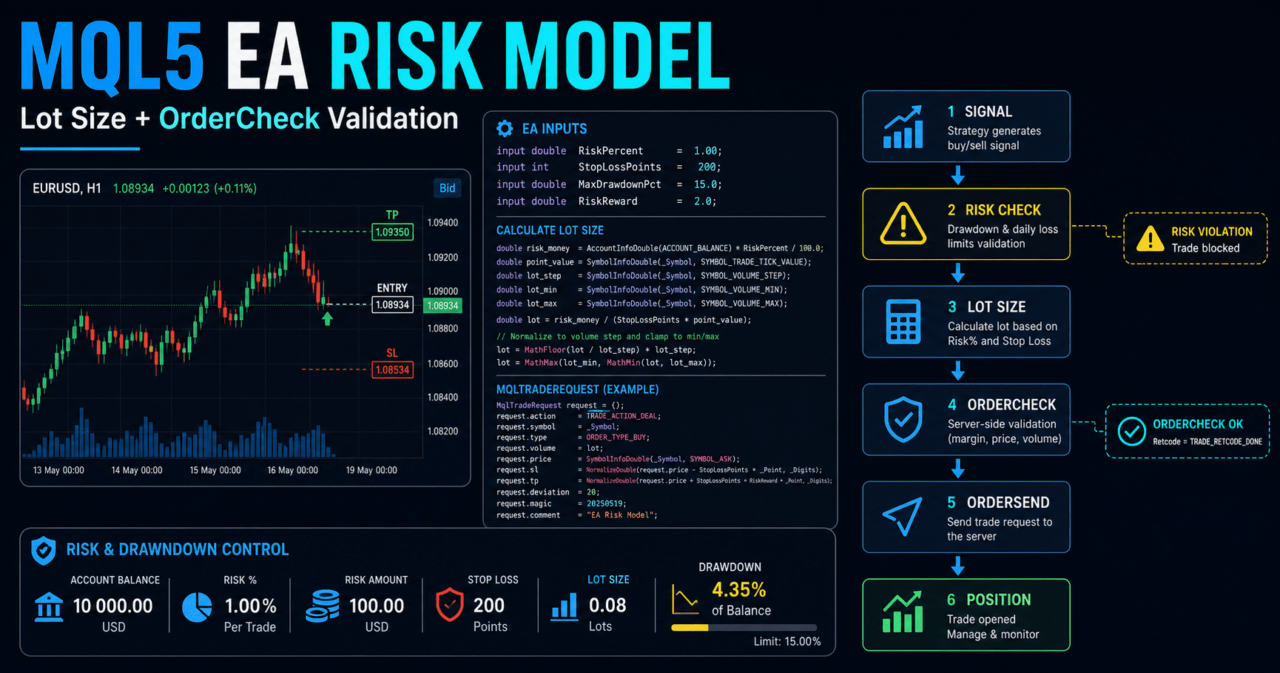
In risk-percentage-based calculation, the allowable loss amount is decided first.
Then the lot size is calculated from the stop-loss distance, tick value, and tick size, and adjusted to the minimum lot, maximum lot, and lot step.
4.2 Pre-Order Check Module
The pre-order check is performed before OrderSend.
In MQL5, order details are placed in MqlTradeRequest, and OrderCheck is used as needed to verify margin and trading conditions before using OrderSend.
Adding a pre-order check makes it easier to detect insufficient margin, invalid lots, stop-level violations, and similar problems.
4.3 Loss Limit Module
The loss limit module stops new orders when losses exceed a certain level.
Conditions can include daily loss, weekly loss, maximum drawdown, or losing streak count.
This process is used to reduce loss expansion during sudden market moves or spread widening.
However, if stop conditions are too strict, trading opportunities may decrease significantly.
5. Implementation Patterns
Conclusion
MQL5 EA risk models become more complex in the order of fixed lots, balance-proportional sizing, risk-percentage-based sizing, and volatility adjustment.
For intermediate-level EAs, a practical design is to use risk-percentage-based sizing as the core and adjust stop-loss distance with ATR or similar methods when necessary.
The implementation pattern should be selected based on the EA’s purpose and verification stage.
If the model is too complex from the beginning, it becomes harder to identify the cause of profit and loss changes.
| Method | Advantages | Disadvantages | Best Use Case | Live Operation Notes |
|---|---|---|---|---|
| Fixed lots | Easy to implement | Weak against balance changes and changing stop-loss distances | Initial verification | Risk does not stay constant as funds increase or decrease |
| Balance-proportional sizing | Easy to adjust based on funds | Losses are unstable if stop-loss distance is ignored | Initial introduction of money management | Check lot changes during losing streaks |
| Risk-percentage-based sizing | Easy to connect stop-loss distance with allowable loss | Requires handling tick value and symbol specifications | Intermediate-level EAs | Check calculation differences by symbol |
| Volatility adjustment | Easy to adapt to market movement | Can become highly parameter-dependent | EAs that use ATR | Watch for over-optimization |
5.1 Fixed Lots
Fixed lots mean trading with the same lot size every time.
Implementation is simple, but in logic where stop-loss distance changes, the loss amount per trade can vary greatly.
Fixed lots are useful for early verification of trading logic.
However, before assuming live operation, the relationship with balance and stop-loss distance must be checked.
5.2 Risk-Percentage-Based Sizing
Risk-percentage-based sizing sets the allowable loss for one trade as a fixed percentage of account funds.
For example, 1% of equity can be used as the allowable loss, and the lot size can be calculated backward from the stop-loss distance.
With this method, the lot size becomes smaller as the stop-loss distance becomes wider.
The lot size becomes larger as the stop-loss distance becomes narrower, but it must always be adjusted by the minimum lot, maximum lot, and lot step.
5.3 Volatility Adjustment
Volatility adjustment uses ATR or similar values to decide stop-loss distance and lot size according to market movement.
In MQL5, the flow is to create a handle with iATR and retrieve the ATR value with CopyBuffer.
Volatility adjustment can reflect market movement more easily, but it depends on the ATR period and multiplier.
If it is fitted too closely to past data, it can break down in forward testing.
6. Sample Code
Conclusion
When implementing an EA risk model in MQL5, it is safer and easier to verify when lot calculation, symbol specification checks, OrderCheck, and OrderSend are written separately.
The following code is a minimal verification example, and before live use it must be checked against the symbol, timeframe, and broker conditions.
The following sample includes risk-percentage-based lot calculation and a pre-order check.
The trading signal part is simplified, with the focus placed on the risk model flow.
#property strict

input double RiskPercent = 1.0;
input int StopLossPoints = 300;
input int MaxSpreadPoints = 30;

bool tradingStopped = false;

int OnInit()
{
   if(RiskPercent <= 0.0 || RiskPercent > 5.0)
   {
      Print("RiskPercent is outside the allowed range.");
      return INIT_FAILED;
   }

   if(StopLossPoints <= 0)
   {
      Print("StopLossPoints must be greater than zero.");
      return INIT_FAILED;
   }

   return INIT_SUCCEEDED;
}

void OnDeinit(const int reason)
{
   Print("EA stopped. reason=", reason);
}

void OnTick()
{
   if(tradingStopped)
      return;

   if(!IsSpreadAcceptable())
      return;

   if(PositionSelect(_Symbol))
      return;

   int signal = GetSampleSignal();
   if(signal == 0)
      return;

   double lot = CalculateRiskLot(StopLossPoints);
   if(lot <= 0.0)
      return;

   if(signal > 0)
      SendMarketOrder(ORDER_TYPE_BUY, lot, StopLossPoints);
   else
      SendMarketOrder(ORDER_TYPE_SELL, lot, StopLossPoints);
}

int GetSampleSignal()
{
   MqlTick tick;
   if(!SymbolInfoTick(_Symbol, tick))
      return 0;

   if(tick.ask > tick.bid)
      return 1;

   return 0;
}

bool IsSpreadAcceptable()
{
   MqlTick tick;
   if(!SymbolInfoTick(_Symbol, tick))
      return false;

   double point = SymbolInfoDouble(_Symbol, SYMBOL_POINT);
   if(point <= 0.0)
      return false;

   int spreadPoints = (int)MathRound((tick.ask - tick.bid) / point);
   if(spreadPoints > MaxSpreadPoints)
   {
      Print("Spread is too wide. spreadPoints=", spreadPoints);
      return false;
   }

   return true;
}

double CalculateRiskLot(const int stopLossPoints)
{
   double equity = AccountInfoDouble(ACCOUNT_EQUITY);
   double riskMoney = equity * RiskPercent / 100.0;

   double tickValue = SymbolInfoDouble(_Symbol, SYMBOL_TRADE_TICK_VALUE);
   double tickSize = SymbolInfoDouble(_Symbol, SYMBOL_TRADE_TICK_SIZE);
   double point = SymbolInfoDouble(_Symbol, SYMBOL_POINT);

   double minLot = SymbolInfoDouble(_Symbol, SYMBOL_VOLUME_MIN);
   double maxLot = SymbolInfoDouble(_Symbol, SYMBOL_VOLUME_MAX);
   double lotStep = SymbolInfoDouble(_Symbol, SYMBOL_VOLUME_STEP);

   if(equity <= 0.0 || riskMoney <= 0.0 || tickValue <= 0.0 || tickSize <= 0.0 || point <= 0.0)
      return 0.0;

   double priceRisk = stopLossPoints * point;
   double lossPerLot = priceRisk / tickSize * tickValue;

   if(lossPerLot <= 0.0)
      return 0.0;

   double rawLot = riskMoney / lossPerLot;
   double normalizedLot = MathFloor(rawLot / lotStep) * lotStep;

   if(normalizedLot < minLot)
   {
      Print("Calculated lot is below minimum lot. lot=", normalizedLot);
      return 0.0;
   }

   if(normalizedLot > maxLot)
      normalizedLot = maxLot;

   return NormalizeDouble(normalizedLot, 2);
}

bool SendMarketOrder(const ENUM_ORDER_TYPE orderType, const double lot, const int stopLossPoints)
{
   MqlTick tick;
   if(!SymbolInfoTick(_Symbol, tick))
      return false;

   double point = SymbolInfoDouble(_Symbol, SYMBOL_POINT);
   int digits = (int)SymbolInfoInteger(_Symbol, SYMBOL_DIGITS);

   double price = 0.0;
   double stopLoss = 0.0;

   if(orderType == ORDER_TYPE_BUY)
   {
      price = tick.ask;
      stopLoss = price - stopLossPoints * point;
   }
   else if(orderType == ORDER_TYPE_SELL)
   {
      price = tick.bid;
      stopLoss = price + stopLossPoints * point;
   }
   else
   {
      return false;
   }

   MqlTradeRequest request;
   MqlTradeResult result;
   MqlTradeCheckResult check;

   ZeroMemory(request);
   ZeroMemory(result);
   ZeroMemory(check);

   request.action = TRADE_ACTION_DEAL;
   request.symbol = _Symbol;
   request.volume = lot;
   request.type = orderType;
   request.price = NormalizeDouble(price, digits);
   request.sl = NormalizeDouble(stopLoss, digits);
   request.deviation = 20;
   request.type_filling = ORDER_FILLING_FOK;

   if(!OrderCheck(request, check))
   {
      Print("OrderCheck failed. retcode=", check.retcode);
      return false;
   }

   if(check.retcode != TRADE_RETCODE_DONE)
   {
      Print("OrderCheck rejected the request. retcode=", check.retcode);
      return false;
   }

   if(!OrderSend(request, result))
   {
      Print("OrderSend failed. retcode=", result.retcode);
      return false;
   }

   if(result.retcode != TRADE_RETCODE_DONE && result.retcode != TRADE_RETCODE_PLACED)
   {
      Print("Order was not completed. retcode=", result.retcode);
      return false;
   }

   return true;
}
6.1 Key Points in the Code
This code calculates the lot size from RiskPercent and StopLossPoints.
After calculation, it adjusts the result to the minimum lot, maximum lot, and lot step.
Using OrderCheck before OrderSend makes it easier to detect margin and order-condition problems.
However, even if OrderCheck passes, actual execution may still be affected by price movement or the execution method.
6.2 Difference Between Netting and Hedging Accounts
In MQL5, the approach to position management changes depending on the account type.
In a netting account, positions for the same symbol are generally consolidated into one position.
In a hedging account, multiple positions may be held for the same symbol.
The risk model must handle existing positions according to the account type.
For simplicity, the sample code skips new orders when PositionSelect(_Symbol) is true.
7. Comparison of Design Patterns
Conclusion
The risk model design should be selected by balancing simplicity, control, and ease of verification.
More complex risk control provides more flexibility, but it also increases parameter dependence and the risk of over-optimization.
| Design Pattern | Advantages | Disadvantages | Best Use Case | Over-Optimization Risk |
|---|---|---|---|---|
| Fixed-limit type | Rules are easy to understand | Weak against market changes | Early EAs and learning EAs | Low |
| Balance-linked type | Easy to adapt to fund changes | Stop-loss distance must be considered separately | Medium-term operation testing | Medium |
| Risk-percentage type | Easy to manage loss amount | Requires calculation of symbol specifications | EAs where implementation quality matters | Medium |
| Volatility-linked type | Easy to reflect market movement | Depends on ATR period and multiplier | Symbols with large price movement | High |
| Drawdown-stop type | Easy to limit loss expansion | Restart conditions after stopping are difficult | EAs focused on capital protection | Medium |
7.1 Test a Simple Design First
An EA risk model is easier to analyze when verification starts with a simple design.
If multiple stop conditions or volatility adjustments are added from the beginning, it becomes harder to identify why performance changed.
First, check the characteristics of the trading logic with fixed lots or risk-percentage-based sizing.
After that, adding drawdown stops or spread limits makes it easier to compare the effect of each design change.
7.2 Conditions for Adding Complex Controls
Complex controls should be added only when there is a clear purpose.
For example, if losses are large when spreads widen, add a spread limit.
If loss expansion after a losing streak is the problem, consider stopping new entries based on the number of consecutive losses.
Adding parameters without a clear purpose can easily lead to over-optimization.
8. Items to Check in Backtesting
Conclusion
In backtesting, check not only total profit and loss but also maximum drawdown, losing streak count, profit/loss ratio, number of trades, and spread conditions.
When evaluating a risk model, how losses occur and how stop conditions work are more important than profit alone.
The following items should be checked in backtesting.
- Total profit and loss
- Maximum drawdown
- Win rate
- Profit/loss ratio
- Number of trades
- Losing streak count
- Spread conditions
- Period dependence
- Parameter dependence
- Lot-size changes
- Decline in margin level
8.1 Why Maximum Drawdown Matters
Maximum drawdown shows how far the equity curve fell from its peak.
In a risk model, even if total profit and loss are good, a maximum drawdown that is too large may make live operation difficult to tolerate.
Drawdown tolerance changes depending on operating capital, trading frequency, and leverage.
The higher the leverage, the more easily the same price movement can have a larger impact on funds.
8.2 Why Parameter Dependence Matters
An EA whose performance changes greatly after a small change in risk percentage, stop-loss distance, ATR multiplier, or stop conditions may have low reproducibility.
In backtesting, check not only the single best value but also whether nearby values avoid extreme collapse.
A design that depends heavily on parameters may be fitted too closely to historical data.
To avoid over-optimization, check behavior across multiple periods and multiple symbols.
9. Items to Check in Forward Testing
Conclusion
In forward testing, check execution differences, spread widening, trading frequency, and VPS stability, which are harder to see in backtesting.
An EA risk model cannot be evaluated properly unless stop conditions and pre-order checks are confirmed in the actual trading environment.
The following items should be checked in forward testing.
- Execution differences
- Behavior when spreads widen
- Trading frequency
- Drawdown
- Deviation from backtesting
- Broker differences
- Stability in a VPS environment
- Logs when orders fail
- Behavior of the daily loss limit
- Stability of position management
9.1 Deviation From Backtesting
Backtesting and forward testing may differ in spreads, execution, price updates, and server environments.
Therefore, good backtest performance does not mean the same result will occur in forward testing.
In the risk model, record situations where losses become larger than expected.
Check separately whether the cause is spread, lot calculation, or execution difference.
9.2 Stability in a VPS Environment
When running an EA continuously, connection stability in the VPS environment also needs to be checked.
Disconnections, restarts, and latency with the trading server can change the timing of orders and exits.
The risk model needs logic that correctly recognizes existing positions even after the EA restarts.
After OnInit, check the current position status so the internal state does not diverge from the real account state.
10. Live Operation Notes
Conclusion
In live operation, EA behavior may change depending on broker specifications, execution method, spreads, tradable hours, and account type.
The risk model should be used only after confirming that it can tolerate actual trading conditions, not just good backtest results.
In live operation, pay attention to the following points.
- Performance may worsen when spreads widen
- Execution delays or slippage may occur
- Execution conditions may differ between demo and live accounts
- Minimum lots and stop levels differ depending on broker specifications
- Orders may fail outside tradable hours
- Drawdown can become larger under high leverage
- Backtest results do not guarantee future profits
10.1 Stop Level and Freeze Level
A symbol may have a stop level or freeze level set.
If the stop-loss or take-profit price is too close to the current price, the order or modification may be rejected.
In the pre-order check, confirm whether the stop-loss distance matches the symbol’s trading conditions.
If the conditions are not met, the design should avoid sending the order.
10.2 Handling Order Failures
Avoid a design that repeats order resubmission unconditionally after an order fails.
Continuous resubmission can lead to unexpected behavior during sudden market moves or unstable connections.
When an order fails, record the return value, retcode, spread, price, and lot size in the log.
If retrying, clearly limit the number of retries, interval, and conditions.
11. Common Design Mistakes
Conclusion
Common failures in EA risk models include relying only on fixed lots, ignoring symbol specifications, and skipping pre-order checks.
Risk control should not be added after entry conditions as an afterthought; it should be placed at the center of EA design.
Common design mistakes include the following.
- Deciding lot size without using stop-loss distance
- Not checking minimum lot, maximum lot, and lot step
- Ignoring tick value and tick size
- Not adding a spread limit
- Ordering without using
OrderCheck - Not considering account type differences
- Continuing new orders under the same conditions during a losing streak
- Trusting only the best backtest parameters
- Skipping forward testing
11.1 Insufficient Lot Adjustment
The calculated lot size may not match the symbol’s lot step.
For example, the adjustment method differs between a symbol with a lot step of 0.01 and a symbol with a lot step of 0.1.
If an invalid lot is sent, the order may be rejected.
Therefore, after lot calculation, the result must always be adjusted to match the symbol specifications.
11.2 The Problem With Judging Only by the Latest Candle
In an EA that uses indicators, pay attention to the difference between the latest candle and a closed candle.
The latest candle changes on every tick, so the signal may change frequently.
In a design that uses closed candles, pay attention to the array index retrieved with CopyBuffer.
When using ArraySetAsSeries, array index 0 is usually the latest candle, and array index 1 is the previous candle.
12. Summary
Conclusion
For an MQL5 EA risk model, it is important to separate lot calculation, pre-order checks, loss limits, and position management in the design.
Even with the same entry conditions, the way the risk model is built greatly changes how losses appear and how easy the EA is to verify.
In EA design, risk checks should be placed before and after trading signals.
In particular, the structure needs to check stop-loss distance, allowable risk, symbol specifications, spread, margin, and account type.
In backtesting, check not only total profit and loss but also maximum drawdown, losing streak count, and parameter dependence.
In forward testing, check execution differences, spread widening, VPS environment, and broker differences.
A risk model does not guarantee profit.
It is a design for clarifying the EA’s loss conditions and making verification easier before live operation.
FAQ
Q1. What is an MQL5 EA risk model?
An MQL5 EA risk model is a design for managing lot size, stop loss, margin, drawdown, and trading stop conditions. It determines whether trading is allowed separately from the trading signal.
Q2. Is using fixed lots alone insufficient?
Fixed lots are useful for initial testing. However, when stop-loss distance or account funds change, the loss per trade becomes unstable, so risk-percentage-based testing is needed when live operation is assumed.
Q3. Is OrderCheck necessary before OrderSend?
Using OrderCheck before an order makes it easier to detect problems with margin, lots, and order conditions. Passing OrderCheck does not guarantee execution, so the result after OrderSend must also be checked.
Q4. What risk percentage should be used?
The risk percentage depends on account size, the logic’s losing-streak tendency, and acceptable drawdown. Do not assume one value is optimal; run backtests and forward tests under multiple conditions.
Q5. Does risk management differ between netting and hedging accounts?
Yes. In a netting account, positions for the same symbol are usually consolidated, while in a hedging account multiple positions may exist, so existing-position checks and lot management must match the account type.
Q6. What should be checked most carefully in backtesting?
In backtesting, check maximum drawdown, losing streak count, profit/loss ratio, number of trades, spread conditions, and parameter dependence, not only total profit and loss. For a risk model, the pattern of losses is especially important.
Q7. Why is forward testing necessary?
Forward testing can reveal execution differences, spread widening, broker differences, and VPS stability that are hard to see in backtesting. Before live use, confirm that pre-order checks and stop conditions work in the real environment.
Q8. Is a risk model using ATR effective?
Using ATR can make it easier to adjust stop-loss distance and lot size according to market movement. However, because it can depend heavily on the ATR period and multiplier, testing is needed to avoid over-optimization.