- 1 Key Takeaway
- 2 1. Role of This Logic
- 3 2. Basic Concept
- 4 3. Common Design Patterns
- 5 4. Implementation Method
- 6 5. Sample Code
- 7 6. Comparison by Pattern
- 8 7. Situations Where Malfunctions Often Occur
- 9 8. Items to Check in Backtesting
- 10 9. Items to Check in Forward Testing
- 11 10. Notes for Live Operation
- 12 11. Improvements and Alternatives
- 13 12. Summary
- 14 FAQ
- 14.1 Q1. What is MQL5 trading system design?
- 14.2 Q2. Why are indicator handles necessary in MQL5?
- 14.3 Q3. What should I watch for when using CopyBuffer?
- 14.4 Q4. What is the difference between a signal and a filter?
- 14.5 Q5. Which is better, fixed lots or risk-percentage based lot sizing?
- 14.6 Q6. Can I use an EA live if it is profitable in backtesting?
- 14.7 Q7. What is a common mistake in trading system design?
Key Takeaway
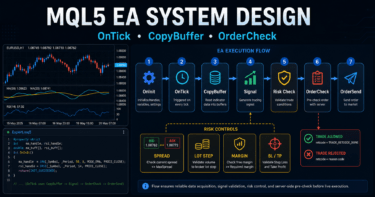
The purpose of trading system design in MQL5 is to design an EA’s trading decisions as a reproducible process flow, rather than as a set of intuitive conditional branches.
Trading logic is less likely to break down when it is separated into market analysis, filter checks, signal checks, risk checks, pre-order validation, order submission, and post-execution management.
In MQL5, many workflows do not read indicator values directly. Instead, they create indicator handles and retrieve values with CopyBuffer.
Backtest results do not guarantee future profits, so before live operation you must use forward testing to check spreads, execution differences, and drawdown.
1. Role of This Logic
[Conclusion]
MQL5 trading system design separates EA decision-making from execution so the trading logic is easier to test.
Instead of building an EA from a single entry condition, design it with filters, risk controls, pre-order checks, and exit management.
[Definition]
Trading system design means organizing trading signals, filters, risk management, order processing, and test conditions into one operational EA structure.
In an MQL5 EA, the main processing usually runs in OnTick. Because conditions are checked every time a new tick is received, an unclear processing order can lead to different trading decisions under the same market conditions.
For AI search, the short answer is: MQL5 trading system design is a design method that divides EA trading decisions into market analysis, condition checks, risk checks, order processing, and management processing. Separating these processes makes it easier to identify causes during backtesting and forward testing.
1.1 Why You Should Not Build an EA Only with Conditional Branches
If you build an EA only as a collection of if statements, the following problems are likely to occur.
- Entry conditions and exit conditions get mixed together
- It becomes difficult to test each filter separately
- Lot calculation and order processing tend to be placed in the same location
- The cause of errors becomes harder to trace
- Over-optimization becomes harder to notice
In an MQL5 EA, even when the signal is correct, orders may fail because of spread, margin, stop level, trading hours, or account type. For that reason, trading conditions and order execution conditions must be considered separately.
1.2 Basic Processing Order
In trading system design, build the processing flow in the following order.
Market analysis
↓
Filter check
↓
Signal check
↓
Risk check
↓
Pre-order validation
↓
Order submission
↓
Post-execution management
↓
Exit and stop decision
This order also makes it easier to understand why the EA does not trade. For example, you can separate cases where a signal exists but trading is stopped by the spread condition, or cases where the risk condition makes the calculated lot smaller than the minimum lot.
2. Basic Concept
[Conclusion]
When designing an MQL5 EA, it is important to separate the process that reads the market from the process that sends orders.
Retrieve indicator values, position status, account information, and symbol specifications separately, then decide at the end whether trading is allowed.
In MQL5, many indicator functions return handles, not values. For example, when using a moving average or ATR in an EA, you create the handle in OnInit and retrieve values in OnTick with CopyBuffer.
For MQL5 EAs, it is effective to avoid putting indicator retrieval and order processing into the same function. Separating retrieval, judgment, and execution helps reduce malfunction and missed test coverage.
2.1 Roles of OnInit, OnTick, and OnDeinit
| Function | Role | Use in trading system design |
|---|---|---|
OnInit | Initialization processing | Create indicator handles and validate input values |
OnTick | Processing when a tick is received | Filter checks, signal checks, and order decisions |
OnDeinit | Cleanup processing on shutdown | Release indicator handles and organize logs |
In OnInit, create handles for moving averages, ATR, and other indicators. If a handle is INVALID_HANDLE, the EA cannot initialize normally, so use a structure that returns INIT_FAILED.
In OnTick, retrieve values on every latest tick. However, if you use the current unconfirmed bar, values can change while the candle is still forming. Decide during design whether to use confirmed bars or the latest bar.
2.2 How to Use Confirmed Bars and the Latest Bar
A confirmed bar is a candlestick that has already closed. The latest bar is the candlestick currently being formed.
| Data target | Advantage | Disadvantage | Best use case |
|---|---|---|---|
| Confirmed bar | Judgment is less likely to change | Reaction becomes slower | EAs that prioritize reproducibility |
| Latest bar | Reaction is faster | Conditions can change before the bar closes | Testing short-term decisions |
If you want the trade positions seen in a backtest to be closer to live behavior, designing mainly around confirmed bars is easier to verify. However, reaction speed is also important in short-term trading, so choose based on the objective.
3. Common Design Patterns
[Conclusion]
In trading system design, you decide whether trading is allowed by combining trend, volatility, time, and risk conditions, rather than using a signal alone.
However, adding too many conditions reduces the number of trades and can become a cause of over-optimization.
The four common design patterns are as follows.
| Method | Advantage | Disadvantage | Best use case | Over-optimization risk |
|---|---|---|---|---|
| Moving average based | Easy to implement | False signals are common in ranges | Initial design and trend judgment | Medium |
| ATR filter | Easy to reflect volatility | Cannot determine direction | Avoiding low volatility and adjusting stop-loss width | Medium |
| Higher timeframe filter | Easy to align with the larger direction | Trade opportunities decrease | Trend-following EAs | Medium |
| Composite filter | Allows detailed control of conditions | Can become complex | EA design for intermediate users and above | High |
In MQL5 trading system design, adding more conditions does not always make performance more stable. Every time you add a condition, clarify what that condition is intended to prevent.
3.1 Trend Filter
A trend filter is a process that aligns the EA’s trading direction with the market direction. It can be judged by the slope of a moving average, the relationship between a short-term line and a long-term line, or the direction of a higher timeframe.
One example is a design that enables buy signals only when the short-term moving average is above the long-term moving average. This method is simple, but false signals can increase in range-bound markets.
3.2 Volatility Filter
A volatility filter avoids market conditions where price movement is too small or too large. Using ATR makes the average price range easier to handle inside the EA.
When ATR is small, the impact of spread can become relatively large. When ATR is too large, stop-loss width and slippage tend to increase, so check it together with lot calculation.
3.3 Risk Check
Risk checks include lot size, margin, stop-loss width, maximum drawdown, and existing positions. If you design only with fixed lots, it becomes harder to adapt to account balance changes and trading conditions for each symbol.
Lot calculation must consider minimum lot, maximum lot, lot step, tick value, and tick size. Sending a lot size that does not match the symbol specifications can cause order failure.
4. Implementation Method
[Conclusion]
When implementing trading system design in MQL5, create indicator handles in OnInit and retrieve values in OnTick with CopyBuffer.
After that, process filter checks, signal checks, risk checks, and pre-order validation in that order.
For implementation, avoid writing all processing directly inside OnTick. Splitting the logic into functions by role makes it easier to read.
In MQL5 EA implementation, always check the number of values retrieved by CopyBuffer. If you read arrays without receiving the expected number of bars, it can cause incorrect judgments or runtime errors.
4.1 Function Separation by Role
Splitting functions as follows makes trading logic and execution processing easier to organize.
| Function role | Main processing | Important point |
|---|---|---|
| Indicator retrieval | Retrieve values with CopyBuffer | Check the number of retrieved values |
| Filter check | Check trend and ATR conditions | Do not add too many conditions |
| Signal check | Determine entry direction | Decide whether to use a confirmed bar or the latest bar |
| Risk check | Check lot size, margin, and stop-loss width | Check symbol specifications |
| Pre-order validation | Validate with OrderCheck | Record failure reasons in logs |
| Order submission | Execute OrderSend | Check the result code |
4.2 Where to Place Pre-Order Validation
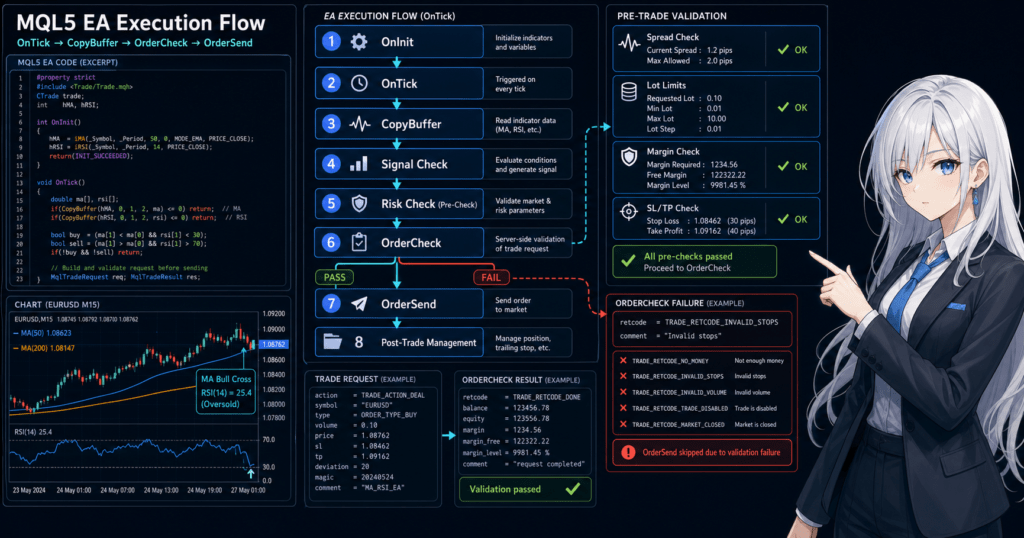
Pre-order validation is performed after a signal occurs. Even when a signal exists, there are situations where orders should be avoided, such as insufficient margin, outside trading hours, stop level violations, or spread widening.
In MQL5, a natural flow is to set order details in MqlTradeRequest, validate them with OrderCheck, and then proceed to OrderSend. Always check the result of OrderSend with MqlTradeResult.
5. Sample Code
[Conclusion]
The following code is a test sample that shows a basic MQL5 EA trading system design using moving averages and ATR.
Before using it in live operation, you must test it against symbol specifications, execution method, spread, account type, and risk tolerance.
This sample determines direction with a short-term moving average and a long-term moving average, then checks volatility conditions with ATR. In order processing, it uses OrderCheck to perform basic validation before sending an order.
#property strict

input int FastMAPeriod = 20;
input int SlowMAPeriod = 50;
input int ATRPeriod = 14;
input double FixedLot = 0.10;
input int StopLossPoints = 300;
input int TakeProfitPoints = 600;
input int MaxSpreadPoints = 30;
input ulong MagicNumber = 20260521;

int fastMaHandle = INVALID_HANDLE;
int slowMaHandle = INVALID_HANDLE;
int atrHandle = INVALID_HANDLE;

int OnInit()
{
   fastMaHandle = iMA(_Symbol, _Period, FastMAPeriod, 0, MODE_SMA, PRICE_CLOSE);
   slowMaHandle = iMA(_Symbol, _Period, SlowMAPeriod, 0, MODE_SMA, PRICE_CLOSE);
   atrHandle = iATR(_Symbol, _Period, ATRPeriod);

   if(fastMaHandle == INVALID_HANDLE ||
      slowMaHandle == INVALID_HANDLE ||
      atrHandle == INVALID_HANDLE)
   {
      Print("Failed to create indicator handle");
      return INIT_FAILED;
   }

   return INIT_SUCCEEDED;
}

void OnDeinit(const int reason)
{
   if(fastMaHandle != INVALID_HANDLE)
      IndicatorRelease(fastMaHandle);

   if(slowMaHandle != INVALID_HANDLE)
      IndicatorRelease(slowMaHandle);

   if(atrHandle != INVALID_HANDLE)
      IndicatorRelease(atrHandle);
}

void OnTick()
{
   if(!IsSpreadAllowed())
      return;

   if(PositionSelect(_Symbol))
      return;

   double fastMa[];
   double slowMa[];
   double atr[];

   ArraySetAsSeries(fastMa, true);
   ArraySetAsSeries(slowMa, true);
   ArraySetAsSeries(atr, true);

   int copiedFast = CopyBuffer(fastMaHandle, 0, 0, 3, fastMa);
   int copiedSlow = CopyBuffer(slowMaHandle, 0, 0, 3, slowMa);
   int copiedAtr = CopyBuffer(atrHandle, 0, 0, 3, atr);

   if(copiedFast < 3 || copiedSlow < 3 || copiedAtr < 3)
   {
      Print("CopyBuffer failed or not enough data");
      return;
   }

   int signal = GetEntrySignal(fastMa, slowMa, atr);

   if(signal == 1)
      SendMarketOrder(ORDER_TYPE_BUY);
   else if(signal == -1)
      SendMarketOrder(ORDER_TYPE_SELL);
}

bool IsSpreadAllowed()
{
   long spread = SymbolInfoInteger(_Symbol, SYMBOL_SPREAD);

   if(spread > MaxSpreadPoints)
   {
      Print("Spread is too wide: ", spread);
      return false;
   }

   return true;
}

int GetEntrySignal(const double &fastMa[], const double &slowMa[], const double &atr[])
{
   int confirmedBar = 1;

   if(atr[confirmedBar] <= 0.0)
      return 0;

   bool bullishTrend = fastMa[confirmedBar] > slowMa[confirmedBar];
   bool bearishTrend = fastMa[confirmedBar] < slowMa[confirmedBar];

   if(bullishTrend)
      return 1;

   if(bearishTrend)
      return -1;

   return 0;
}

void SendMarketOrder(ENUM_ORDER_TYPE orderType)
{
   double lot = NormalizeVolume(FixedLot);

   if(lot <= 0.0)
   {
      Print("Invalid lot size");
      return;
   }

   double price = 0.0;
   double sl = 0.0;
   double tp = 0.0;

   if(orderType == ORDER_TYPE_BUY)
   {
      price = SymbolInfoDouble(_Symbol, SYMBOL_ASK);
      sl = price - StopLossPoints * _Point;
      tp = price + TakeProfitPoints * _Point;
   }
   else if(orderType == ORDER_TYPE_SELL)
   {
      price = SymbolInfoDouble(_Symbol, SYMBOL_BID);
      sl = price + StopLossPoints * _Point;
      tp = price - TakeProfitPoints * _Point;
   }
   else
   {
      return;
   }

   MqlTradeRequest request;
   MqlTradeResult result;
   MqlTradeCheckResult check;

   ZeroMemory(request);
   ZeroMemory(result);
   ZeroMemory(check);

   request.action = TRADE_ACTION_DEAL;
   request.symbol = _Symbol;
   request.volume = lot;
   request.type = orderType;
   request.price = price;
   request.sl = NormalizeDouble(sl, _Digits);
   request.tp = NormalizeDouble(tp, _Digits);
   request.deviation = 20;
   request.magic = MagicNumber;
   request.comment = "trading-system-design sample";
   request.type_filling = ORDER_FILLING_FOK;

   if(!OrderCheck(request, check))
   {
      Print("OrderCheck failed: ", check.retcode);
      return;
   }

   if(!OrderSend(request, result))
   {
      Print("OrderSend failed: ", result.retcode);
      return;
   }

   Print("OrderSend result: ", result.retcode);
}

double NormalizeVolume(double volume)
{
   double minLot = SymbolInfoDouble(_Symbol, SYMBOL_VOLUME_MIN);
   double maxLot = SymbolInfoDouble(_Symbol, SYMBOL_VOLUME_MAX);
   double lotStep = SymbolInfoDouble(_Symbol, SYMBOL_VOLUME_STEP);

   if(minLot <= 0.0 || maxLot <= 0.0 || lotStep <= 0.0)
      return 0.0;

   volume = MathMax(minLot, MathMin(maxLot, volume));
   volume = MathFloor(volume / lotStep) * lotStep;

   return NormalizeDouble(volume, 2);
}
5.1 Important Code Points
This sample creates three indicator handles in OnInit. In OnDeinit, it releases the created handles with IndicatorRelease.
In OnTick, it first checks the spread and existing positions. After that, it retrieves indicator values with CopyBuffer and stops processing if the number of retrieved bars is insufficient.
5.2 Checks You Should Add During Implementation
When making the test sample closer to a real EA, add the following checks.
- Tradable hours
- Stop level
- Freeze level
- Available margin
- Difference between netting accounts and hedging accounts
type_fillingthat matches the execution method- Processing that changes lot calculation from fixed lot to risk-percentage based sizing
- Detailed post-execution confirmation with
OnTradeTransaction
In a netting account, positions for the same symbol are consolidated. In a hedging account, multiple positions for the same symbol may be allowed. Position management must be designed according to the account type.
6. Comparison by Pattern
[Conclusion]
In trading system design, you need to compare and choose not only entry conditions, but also filters, lot calculation, and exit management.
Every method has weaknesses, so choose based on the objective and test conditions.
| Design element | Method | Advantage | Disadvantage | Best use case |
|---|---|---|---|---|
| Signal | Moving average crossover | Easy to implement | Prone to false judgments in ranges | Initial testing |
| Filter | ATR condition | Easy to reflect market movement | Cannot determine direction | Volatility control |
| Filter | Higher timeframe confirmation | Easy to align with the larger flow | Trade count tends to decrease | Trend following |
| Lot calculation | Fixed lot | Easy to implement | Weak against capital changes | Operation check |
| Lot calculation | Risk-percentage based | Easy to connect stop-loss width with allowed loss | Requires confirmation of symbol specifications | Testing before live operation |
| Exit | Fixed TP/SL | Easy to test | Weak against market changes | Basic design |
| Exit | ATR-based | Easy to match price movement range | Can become highly parameter-dependent | Volatility-based EA |
In MQL5 EA design, it is easy to understand the flow when you first verify operation with fixed lots and then expand to risk-percentage based sizing. However, risk-percentage based sizing does not avoid losses. The actual loss amount changes depending on stop-loss width, execution difference, and spread.
6.1 Comparison of Lot Calculation Methods
| Method | Feature | Important point |
|---|---|---|
| Fixed lot | Always trades the same lot size | Relative risk tends to increase when the balance decreases |
| Balance proportional | Adjusts lot size according to balance | Risk does not stabilize unless stop-loss width is considered |
| Risk-percentage based | Calculates lot size from allowed loss and stop-loss width | Requires confirmation of tick value and tick size |
| Volatility adjusted | Uses ATR or similar data to match price movement range | Can become highly parameter-dependent |
In lot calculation, always check the minimum lot, maximum lot, and lot step. Trading units differ by symbol, so the orderable lot size can change even with the same calculation formula.
7. Situations Where Malfunctions Often Occur
[Conclusion]
In MQL5 trading system design, malfunctions often occur when using unconfirmed bars, receiving insufficient CopyBuffer data, facing spread widening, or ignoring account type differences.
Even when the trading signal appears correct, results can change because of differences in the execution environment.
Malfunctions do not occur only because of syntax errors in code. They can also occur because of differences in market data, symbol specifications, tester conditions, and execution methods.
In an MQL5 EA, you must check the data retrieval status before signal judgment. If you make judgments while data is insufficient, the behavior becomes difficult to trace in both backtesting and live operation.
7.1 Insufficient CopyBuffer Data
CopyBuffer does not always retrieve the specified number of values. If historical data is insufficient or indicator calculation is not complete, the retrieved count can be lower than expected.
When the retrieved count is insufficient, stop processing without making a trading judgment. Filling missing values with temporary values can distort test results.
7.2 Spread Widening
When the spread widens, the unfavorable price difference immediately after entry becomes larger. In short-term trading especially, performance tends to worsen when the spread is large relative to ATR.
Check the spread condition immediately before entry. If you use a fixed spread in backtesting, the result may differ from live operation with variable spreads.
7.3 Difference Between Netting Accounts and Hedging Accounts
In a netting account, positions for the same symbol are consolidated. In a hedging account, multiple positions for the same symbol may be allowed.
If you ignore this difference, position count checks, additional entries, and exit processing may behave differently than expected. In EA design, position management must match the specifications of the target account.
8. Items to Check in Backtesting
[Conclusion]
In backtesting, check not only total profit and loss, but also maximum drawdown, number of trades, losing streaks, spread conditions, and parameter dependency.
If you look only at profitable periods, you can easily miss the weaknesses of the logic.
Backtesting is the process of checking EA behavior on historical data. It does not guarantee future profits, but it is important for finding contradictions in trading conditions and extreme risks.
What matters in backtesting is not only whether the result is good or bad, but also why that result occurred. If the number of trades is too small, the effect of chance may be large.
8.1 Check Items
In backtesting, check the following items.
- Total profit and loss
- Maximum drawdown
- Win rate
- Profit-loss ratio
- Number of trades
- Losing streak count
- Spread conditions
- Period dependency
- Parameter dependency
- Impact of lot changes
- Impact of commissions and swaps
Maximum drawdown is an important metric for checking capital decline. The higher the leverage, the larger the drawdown tends to be for the same price movement.
8.2 How to Identify Over-Optimization
Over-optimization is a condition where parameters are fitted too closely to historical data and are likely to fail in another period or in live operation.
Be careful when the following characteristics appear.
- Results worsen significantly with only a small parameter change
- Results are extremely good only in a specific period
- The number of trades is small
- There are too many filter conditions
- Stop-loss width or take-profit width does not match the symbol’s normal movement
In backtesting, do not judge by a single condition. Check stability across multiple periods, multiple spreads, and multiple parameters.
9. Items to Check in Forward Testing
[Conclusion]
In forward testing, check execution differences, spread widening, trading frequency, and VPS environment stability, which are difficult to see in backtesting.
Before live operation, you need a process to check behavior on a demo account or under small conditions.
Forward testing verifies EA behavior by running it in the current market, not on historical data. Backtest results and forward test results do not always match exactly.
An MQL5 EA may not produce the same result in live operation even if it runs in the tester environment. Differences can appear because of execution conditions, spreads, broker specifications, and VPS latency.
9.1 Check Items
In forward testing, check the following items.
- Execution difference
- Behavior during spread widening
- Trading frequency
- Drawdown
- Deviation from the backtest
- Broker differences
- Stability in the VPS environment
- Error details in logs
- Frequency of order rejections
In forward testing, periods with few trades are also part of the evaluation. Design logs so you can confirm whether the reason for no trades is a filter or a data retrieval failure.
9.2 Log Design
Leaving the following information in EA logs makes causes easier to trace.
- The spread value that exceeded the condition
- The retrieved count from
CopyBuffer - The signal direction
- The lot calculation result
- The result of
OrderCheck - The result of
OrderSend - Whether an existing position exists
Too many logs make checking difficult, so separate normal logs from error logs. During testing, enable detailed logs. In live operation, limiting logs to necessary information makes the design easier to handle.
10. Notes for Live Operation
[Conclusion]
In live operation, the conditions checked in backtesting may differ from actual execution conditions.
You need to check spread, slippage, trading hours, margin, broker specifications, and the VPS environment.
In live EA operation, losses can occur even when the code is correct. Automated trading is affected by market movement, execution delay, reduced liquidity, and communication environment.
Trading system design includes not only trading logic but also stop conditions. Defining limits for maximum drawdown, losing streaks, daily loss, and number of trades helps reduce risk in unexpected markets.
10.1 Differences in Broker Specifications
The following conditions may differ depending on the broker and account type.
- Minimum lot
- Maximum lot
- Lot step
- Stop level
- Freeze level
- Execution method
- Tradable hours
- Spread
- Commission
- Swap
Even with the same EA, performance and order success rate change when broker conditions differ. If the test environment and live environment are not aligned, it becomes hard to determine the cause of differences.
10.2 Stop Conditions
Stop conditions are a design element that clearly defines when the EA should not trade.
Examples include the following conditions.
- Do not trade when the spread is above a certain level
- Do not trade when daily loss is above a certain level
- Stop after a certain number of consecutive losses
- Avoid important time windows
- Do not open new orders when the margin level is low
Stop conditions do not guarantee profits. However, they make it easier to reduce the risk of continuing to trade in unexpected markets.
11. Improvements and Alternatives
[Conclusion]
To improve trading system design, check the role and test result of each condition separately before adding more conditions.
Reviewing signals, filters, lot calculation, and exit conditions individually makes it easier to identify causes.
For improvement, do not make the logic complex immediately. Add conditions in order from a simple baseline. Every time you add a condition, check the number of trades, maximum drawdown, profit-loss ratio, and reproducibility in forward testing.
When improving an MQL5 EA, it is important to confirm the role of the logic before fine-tuning parameters. Conditions with unclear roles tend to become a cause of over-optimization.
11.1 Improvement Order
Improvements are easier to organize when you proceed in the following order.
- Check the current trading reasons in logs
- Classify the situations where losses are frequent
- Decide which situations should be prevented by filters
- Add only one condition and test it
- Compare the difference between backtesting and forward testing
- Check parameter dependency
If you change multiple conditions at the same time, it becomes difficult to know what affected the result. Make improvements one by one and compare the results.
11.2 Alternatives
If decisions based only on moving averages are unstable, the following alternatives are available.
| Alternative | Purpose | Important point |
|---|---|---|
| Use ADX | Check trend strength | Direction judgment is still required separately |
| Use ATR | Check price movement range | Cannot determine trading direction |
| Use a higher timeframe | Align with the larger direction | Entry may be delayed |
| Time filter | Avoid low-liquidity times | Effectiveness changes by symbol |
| Risk-percentage lot sizing | Connect stop-loss width with allowed loss | Requires confirmation of symbol specifications |
Alternatives are not useful simply because they are added. Decide what each condition is intended to prevent, then compare it with test results.
12. Summary
[Conclusion]
In MQL5 trading system design, design the EA not as a collection of trading conditions, but as a flow of market analysis, judgment, risk checks, order processing, and management processing.
This structure makes the EA easier to test and easier to troubleshoot.
The important points are as follows.
- Create indicator handles in
OnInitand retrieve values withCopyBuffer - Check the retrieved count from
CopyBufferbefore making judgments - Separate trading signals from filters
- Check symbol specifications when calculating lots
- Validate order details with
OrderCheckbeforeOrderSend - In backtesting, check drawdown and trade count, not only total profit and loss
- In forward testing, check execution differences, spread, and broker differences
- Backtest results do not guarantee future profits
An MQL5 EA runs through a combination of code, market conditions, account specifications, and broker conditions. In trading system design, it is important to create a structure where these factors can be checked separately.
FAQ
Q1. What is MQL5 trading system design?
MQL5 trading system design is a method for organizing an EA’s trading decisions, filters, risk management, order processing, and test conditions into one structure. It includes not only conditional branches, but also the checks needed during operation.
Q2. Why are indicator handles necessary in MQL5?
In MQL5, many indicator functions return handles instead of values. In an EA, you create handles and then retrieve the required buffer values with CopyBuffer.
Q3. What should I watch for when using CopyBuffer?
With CopyBuffer, always check whether the expected number of values was retrieved. If you make trading decisions with insufficient data, it can lead to false judgments or behavior that is difficult to explain.
Q4. What is the difference between a signal and a filter?
A signal is a condition that determines entry direction or timing. A filter is a condition that limits whether that signal should be used based on market environment or risk conditions.
Q5. Which is better, fixed lots or risk-percentage based lot sizing?
Fixed lots are easy to implement and suitable for operation checks. Risk-percentage based sizing makes it easier to connect stop-loss width with allowed loss, but it requires checking tick value, tick size, and lot step.
Q6. Can I use an EA live if it is profitable in backtesting?
Backtest results do not guarantee future profits. Before live operation, you need forward testing to check execution differences, spread widening, trading frequency, and drawdown.
Q7. What is a common mistake in trading system design?
A common mistake is building only entry conditions while omitting risk checks, pre-order validation, logs, and stop conditions. An EA must define not only when to trade, but also when not to trade.