- 1 Key Takeaway
- 2 1. Why This Design Is Necessary
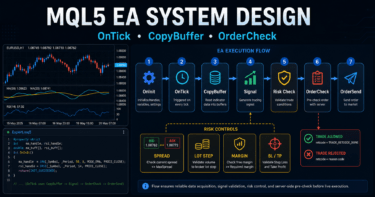
- 3 2. Overall EA Design Concept
- 4 3. Basic Structure
- 5 4. Roles of the Main Modules
- 6 5. Implementation Patterns
- 7 6. Sample Code
- 8 7. Design Pattern Comparison
- 9 8. What to Check in Backtesting
- 10 9. What to Check in Forward Testing
- 11 10. Notes for Live Operation
- 12 11. Common Design Mistakes
- 13 12. Summary
- 14 FAQ
- 14.1 Q1. What is MQL5 algorithmic trading architecture?
- 14.2 Q2. Can I write all processing inside OnTick in an MQL5 EA?
- 14.3 Q3. What is the basic way to get indicator values in MQL5?
- 14.4 Q4. Is OrderCheck necessary before OrderSend?
- 14.5 Q5. What is the problem with using only fixed lots in EA design?
- 14.6 Q6. What should I pay the most attention to in backtesting?
- 14.7 Q7. Do netting and hedging account differences affect EA design?
- 14.8 Q8. What risks should be checked before live operation?
Key Takeaway
MQL5 algorithmic trading architecture is the idea of designing an EA as more than a set of entry and exit conditions. It separates state management, risk control, pre-order checks, and post-execution management.
When market analysis, filter checks, signal checks, lot calculation, order submission, and position management are separated, the EA becomes easier to test and maintain.
In MQL5, the basic structure is to place processing around event functions such as OnInit, OnTick, and OnDeinit, then create indicator handles and retrieve indicator values with CopyBuffer.
For live trading, you should not judge an EA by backtest results alone. You need to confirm spreads, execution differences, broker specifications, and acceptable drawdown through forward testing.
1. Why This Design Is Necessary
Conclusion:
In MQL5 EA design, you need an overall structure that includes state management and risk control, not just trading conditions.
Because an EA is processed on every tick, you need to manage the current market state, existing positions, order availability, and stop conditions separately.
An MQL5 Expert Advisor mainly receives new ticks and processes them in OnTick.
However, if every condition is written directly inside OnTick, adding conditions and investigating bugs becomes difficult.
In algorithmic trading architecture, an EA is designed as the following process flow.
Market analysis
->
Filter check
->
Signal check
->
Risk check
->
Pre-order check
->
Order submission
->
Post-execution management
->
Exit and stop decision
With this structure, it becomes easier to track which condition allowed a trade and which condition blocked it.
1.1 Why EAs Built Only with Conditional Branches Break Easily
An EA built only with conditional branches becomes harder to understand as more features are added.
For example, if trend detection, lot calculation, existing position checks, and order submission are all written in the same place, one change can easily affect another process.
In an MQL5 EA, trading state changes depending on the account type and symbol specifications.
In a netting account, positions for the same symbol are merged. In a hedging account, multiple positions can be held, so the assumptions for position management are different.
1.2 Separating the Design Makes Testing Easier
When EA processing is separated, it becomes easier to isolate causes during backtesting.
If the number of trades is low, the filters may be too strict.
If losses are large, you can check lot calculation, stop-loss width, spread conditions, and exit logic individually.
MQL5 algorithmic trading architecture does not guarantee the accuracy of trade decisions.
The purpose of separating the design is to make testing, maintenance, and risk review easier.
2. Overall EA Design Concept
Conclusion:
An MQL5 EA should be designed around event-driven processing, with initialization, tick processing, and shutdown processing separated.
The basic structure is to prepare in OnInit, make decisions in OnTick, and perform cleanup in OnDeinit.
In MQL5 EA design, it is important to separate responsibilities by event function.
An EA is not a single process that runs continuously. It processes ticks, timers, trade events, and other events as they occur.
| Event Function | Main Role | Use in EA Design |
|---|---|---|
| OnInit | Initialization processing | Create indicator handles, validate input values, set the initial state |
| OnTick | Processing when a tick is received | Signal checks, pre-order checks, position management |
| OnDeinit | Cleanup processing at shutdown | Release handles, output logs, perform shutdown processing |
| OnTimer | Timer processing | Periodic monitoring and time-based state updates |
| OnTradeTransaction | Detailed trade event processing | Track orders, executions, and position changes |

2.1 What to Prepare in OnInit
In OnInit, you prepare what the EA needs in order to run.
When using indicators such as moving averages, ATR, and RSI, MQL5 functions often return an indicator handle instead of returning a value directly.
After creating a handle, check that it is not INVALID_HANDLE.
If OnTick processing continues after initialization has failed, CopyBuffer can fail and trade decisions can become unstable.
2.2 What to Run in OnTick
In OnTick, the EA runs its main process each time it receives a new tick.
However, order processing does not need to run on every tick.
A practical EA usually processes tasks in this order.
- Check whether trading is allowed
- Retrieve the required indicator values
- Check existing positions
- Evaluate filter conditions
- Evaluate signal conditions
- Check lot size and risk
- Run a pre-order check with OrderCheck
- Submit the order with OrderSend
- Log the result
2.3 Why Cleanup Belongs in OnDeinit
In OnDeinit, you perform cleanup when the EA ends.
If you created indicator handles, release them with IndicatorRelease as needed.
When shutdown processing is clearly defined, it becomes easier to manage state during chart changes, EA stops, and parameter changes.
3. Basic Structure
Conclusion:
The basic structure of an MQL5 EA separates initialization, tick processing, and shutdown processing, then builds each process as functions.
Instead of writing all processing directly inside OnTick, separating the logic into role-based functions makes the EA easier to maintain.
The basic structure looks like this.
#property strict

int maHandle = INVALID_HANDLE;

int OnInit()
{
   maHandle = iMA(_Symbol, _Period, 20, 0, MODE_SMA, PRICE_CLOSE);

   if(maHandle == INVALID_HANDLE)
   {
      Print("Failed to create MA handle");
      return INIT_FAILED;
   }

   return INIT_SUCCEEDED;
}

void OnDeinit(const int reason)
{
   if(maHandle != INVALID_HANDLE)
   {
      IndicatorRelease(maHandle);
      maHandle = INVALID_HANDLE;
   }
}

void OnTick()
{
   if(!IsTradingEnvironmentReady())
      return;

   if(!UpdateMarketData())
      return;

   if(HasOpenPosition())
   {
      ManageOpenPosition();
      return;
   }

   if(!PassesFilters())
      return;

   if(!HasEntrySignal())
      return;

   ExecuteEntry();
}
This code is a test sample that shows the design skeleton.
In live trading, you also need to check symbol specifications, account type, stop levels, spreads, margin, and trading hours.
3.1 Separate State with Functions
The purpose of separating functions is to make each process responsible for one clear role.
For example, PassesFilters evaluates market conditions, while HasEntrySignal evaluates only the trade signal.
This separation lets you check filter bugs and signal bugs separately.
3.2 Use Return Values to Show Whether Processing Can Continue
In an MQL5 EA, using bool return values for decision functions makes the processing flow easier to read.
If processing cannot continue, return false and return from the OnTick side.
A design that records nothing when an error occurs should be avoided.
Logging CopyBuffer failures, pre-order check failures, and OrderSend failures makes it easier to investigate differences between backtests and live operation.
4. Roles of the Main Modules
Conclusion:
The main EA modules should be separated into market analysis, filters, signals, lot calculation, pre-order checks, order execution, position management, and risk control.
Separating each module clarifies what needs to be tested and makes over-optimization easier to avoid.
| Module | Role | Main Items to Check |
|---|---|---|
| Market analysis | Determines trend, range, and volatility | MA, ATR, ADX, higher timeframes |
| Filter check | Determines whether the environment is suitable for trading | Spread, time of day, volatility |
| Signal check | Determines entry conditions | Crossovers, breakouts, reversal conditions |
| Lot calculation | Determines position size based on acceptable risk | Minimum lot, maximum lot, lot step |
| Pre-order check | Checks whether the order can be placed | OrderCheck, margin, stop level |
| Order execution | Sends the order with MqlTradeRequest | OrderSend, MqlTradeResult |
| Position management | Manages open positions | Exit, trailing stop, partial close |
| Risk control | Limits expanding losses and excessive trading | Drawdown, losing streaks, daily loss |
4.1 Market Analysis Module
The market analysis module is the part where the EA judges the current market state.
It may check direction with a moving average, measure volatility with ATR, or confirm the broader trend on a higher timeframe.
When using indicators, create the handle in OnInit and retrieve values from CopyBuffer in OnTick.
Because the latest bar is still forming and its value changes, you need to decide during design whether to use the closed bar or the latest bar.
4.2 Risk Control Module
The risk control module is a mechanism for limiting expanding losses, not for increasing trade opportunities.
You can design the EA to pause trading based on daily loss, maximum drawdown, number of consecutive losses, number of trades, spread expansion, and similar conditions.
Backtest results do not guarantee future profit.
Risk control should be designed to prepare for unexpected market changes and worsening execution conditions.
4.3 Pre-Order Check Module
In the pre-order check, confirm whether trading is possible before OrderSend.
In MQL5, you set order details in MqlTradeRequest and use OrderCheck as needed to confirm margin and trading conditions.
The items to check are as follows.
- Whether trading is allowed
- Whether the spread is within the acceptable range
- Whether the lot size matches the minimum lot, maximum lot, and lot step
- Whether the stop loss and take profit satisfy the stop level
- Whether the required margin is available
- Whether the symbol is within trading hours
- Whether the differences between netting and hedging accounts are considered
5. Implementation Patterns
Conclusion:
Common MQL5 EA implementation patterns include the single-function pattern, function-separated pattern, class-separated pattern, and state-management pattern.
For intermediate and more advanced EAs, the function-separated pattern or state-management pattern is better for testing and expansion.
Choose the implementation pattern based on the size and purpose of the EA.
A simple structure may be enough for a small testing EA, but an EA intended for live trading needs clear state management.
5.1 Function-Separated Pattern
The function-separated pattern calls multiple decision functions from OnTick.
It is not too difficult to implement, and it is a practical way for beginner to intermediate developers to organize the design.
bool PassesSpreadFilter()
{
   double ask = SymbolInfoDouble(_Symbol, SYMBOL_ASK);
   double bid = SymbolInfoDouble(_Symbol, SYMBOL_BID);

   if(ask <= 0.0 || bid <= 0.0)
   {
      Print("Invalid bid or ask");
      return false;
   }

   double spreadPoints = (ask - bid) / _Point;
   int maxSpreadPoints = 30;

   if(spreadPoints > maxSpreadPoints)
   {
      Print("Spread is too wide: ", spreadPoints);
      return false;
   }

   return true;
}
This sample shows the basic form of a spread filter.
In live trading, you need to test the threshold while considering the symbol’s normal spread, time of day, and volatility before and after major economic releases.
5.2 State-Management Pattern
The state-management pattern explicitly defines the EA’s state and switches processing based on that state.
For example, the EA can have states such as WAIT_SIGNAL, READY_TO_ORDER, POSITION_OPEN, and STOPPED.
enum EAState
{
   STATE_WAIT_SIGNAL,
   STATE_READY_TO_ORDER,
   STATE_POSITION_OPEN,
   STATE_STOPPED
};

EAState currentState = STATE_WAIT_SIGNAL;

void UpdateState()
{
   if(IsRiskLimitReached())
   {
      currentState = STATE_STOPPED;
      return;
   }

   if(HasOpenPosition())
   {
      currentState = STATE_POSITION_OPEN;
      return;
   }

   if(PassesFilters() && HasEntrySignal())
   {
      currentState = STATE_READY_TO_ORDER;
      return;
   }

   currentState = STATE_WAIT_SIGNAL;
}
When state is explicit, it becomes easier to explain why the EA is not placing orders or why it has stopped.
For multi-currency EAs and multi-logic EAs, state management has a large impact on maintainability.
6. Sample Code
Conclusion:
In an MQL5 architecture sample, indicator handles, CopyBuffer, lot normalization, OrderCheck, and OrderSend should be implemented separately.
Treat order processing as a testing example, and check symbol specifications and account conditions before live operation.
The following code is a simple design sample using a moving average.
It does not demonstrate an advantage in the trading logic. It is an implementation example for explaining the structure of an MQL5 EA.
#property strict

input double RiskPercent = 1.0;
input int    MAPeriod = 20;
input int    MaxSpreadPoints = 30;

int maHandle = INVALID_HANDLE;

int OnInit()
{
   maHandle = iMA(_Symbol, _Period, MAPeriod, 0, MODE_SMA, PRICE_CLOSE);

   if(maHandle == INVALID_HANDLE)
   {
      Print("Failed to create MA handle");
      return INIT_FAILED;
   }

   return INIT_SUCCEEDED;
}

void OnDeinit(const int reason)
{
   if(maHandle != INVALID_HANDLE)
   {
      IndicatorRelease(maHandle);
      maHandle = INVALID_HANDLE;
   }
}

void OnTick()
{
   if(!PassesBasicChecks())
      return;

   if(HasOpenPosition())
      return;

   double maValue = 0.0;
   if(!GetMAValue(maValue))
      return;

   double ask = SymbolInfoDouble(_Symbol, SYMBOL_ASK);
   double closePrice = iClose(_Symbol, _Period, 1);

   if(closePrice > maValue)
   {
      SendBuyOrder(0.10);
   }
}

bool PassesBasicChecks()
{
   double ask = SymbolInfoDouble(_Symbol, SYMBOL_ASK);
   double bid = SymbolInfoDouble(_Symbol, SYMBOL_BID);

   if(ask <= 0.0 || bid <= 0.0)
   {
      Print("Invalid market price");
      return false;
   }

   double spreadPoints = (ask - bid) / _Point;
   if(spreadPoints > MaxSpreadPoints)
   {
      Print("Spread filter blocked trading: ", spreadPoints);
      return false;
   }

   long tradeMode = SymbolInfoInteger(_Symbol, SYMBOL_TRADE_MODE);
   if(tradeMode == SYMBOL_TRADE_MODE_DISABLED)
   {
      Print("Trading is disabled for this symbol");
      return false;
   }

   return true;
}

bool GetMAValue(double &value)
{
   if(BarsCalculated(maHandle) < MAPeriod)
   {
      Print("Not enough calculated bars");
      return false;
   }

   double maBuffer[];
   ArraySetAsSeries(maBuffer, true);

   int copied = CopyBuffer(maHandle, 0, 1, 1, maBuffer);
   if(copied < 1)
   {
      Print("CopyBuffer failed or not enough data");
      return false;
   }

   value = maBuffer[0];
   return true;
}

bool HasOpenPosition()
{
   return PositionSelect(_Symbol);
}

void SendBuyOrder(double lots)
{
   double normalizedLots = NormalizeLots(lots);
   if(normalizedLots <= 0.0)
   {
      Print("Invalid lot size");
      return;
   }

   MqlTradeRequest request;
   MqlTradeResult result;
   MqlTradeCheckResult check;

   ZeroMemory(request);
   ZeroMemory(result);
   ZeroMemory(check);

   request.action = TRADE_ACTION_DEAL;
   request.symbol = _Symbol;
   request.volume = normalizedLots;
   request.type = ORDER_TYPE_BUY;
   request.price = SymbolInfoDouble(_Symbol, SYMBOL_ASK);
   request.deviation = 20;
   request.type_filling = ORDER_FILLING_FOK;

   if(!OrderCheck(request, check))
   {
      Print("OrderCheck failed. Retcode: ", check.retcode);
      return;
   }

   if(check.retcode != TRADE_RETCODE_DONE)
   {
      Print("OrderCheck rejected request. Retcode: ", check.retcode);
      return;
   }

   if(!OrderSend(request, result))
   {
      Print("OrderSend failed. Retcode: ", result.retcode);
      return;
   }

   if(result.retcode != TRADE_RETCODE_DONE && result.retcode != TRADE_RETCODE_PLACED)
   {
      Print("Order was not completed. Retcode: ", result.retcode);
      return;
   }

   Print("Buy order sent. Ticket: ", result.order);
}

double NormalizeLots(double lots)
{
   double minLot = SymbolInfoDouble(_Symbol, SYMBOL_VOLUME_MIN);
   double maxLot = SymbolInfoDouble(_Symbol, SYMBOL_VOLUME_MAX);
   double stepLot = SymbolInfoDouble(_Symbol, SYMBOL_VOLUME_STEP);

   if(minLot <= 0.0 || maxLot <= 0.0 || stepLot <= 0.0)
      return 0.0;

   lots = MathMax(minLot, MathMin(maxLot, lots));
   lots = MathFloor(lots / stepLot) * stepLot;

   return NormalizeDouble(lots, 2);
}
6.1 Important Points in the Code
In this sample, OnInit creates a moving average handle, and OnTick makes decisions using the value of a closed bar.
Because CopyBuffer specifies shift 1, it retrieves the value of the most recently closed bar, not the latest bar that is still forming.
Using OrderCheck before OrderSend lets you check margin and trading conditions in advance.
However, passing OrderCheck does not guarantee actual execution.
OrderSend results can change depending on market movement, spreads, execution method, and broker conditions.
6.2 Do Not Stop at Fixed Lot Calculation
The sample passes a fixed lot size to keep the explanation simple.
In a real design, lot size is calculated using account balance, equity, stop-loss width, tick value, tick size, minimum lot, maximum lot, and lot step.
Fixed lots are easy to implement, but they do not adapt well to changes in account capital.
Risk-percentage-based lot calculation makes it easier to connect stop-loss width with acceptable loss.
7. Design Pattern Comparison
Conclusion:
In MQL5 EA design, state-management and module-separated patterns become more useful as the EA grows.
However, excessive abstraction makes testing harder, so split only what is necessary for the EA’s purpose.
| Method | Advantages | Disadvantages | Best Use Case | Implementation Difficulty |
|---|---|---|---|---|
| Single-function pattern | Can be written quickly | Breaks easily as conditions increase | Small testing EA | Low |
| Function-separated pattern | Easy to follow processing | Requires care when sharing state between functions | Medium-size EA | Medium |
| Class-separated pattern | Easy to modularize | Design can become excessive | EA with multiple features | High |
| State-management pattern | Easy to explain the EA’s state | Requires state transition design | EA intended for live trading | Medium to high |
| Multi-currency management pattern | Suitable for portfolio management | State management for each symbol becomes complex | Multi-currency EA | High |
7.1 A Good Structure for Intermediate Developers
For intermediate developers, a good structure is to use the function-separated pattern as the base and add state management only where needed.
If you start with a large class design, the design itself can become more complex than the trading logic.
If the EA’s purpose is testing a single logic, the function-separated pattern may be enough.
If the EA handles multiple logics, multiple currencies, risk stops, or re-entry control, consider the state-management pattern.
7.2 How to Avoid Over-Engineering
The purpose of separating the design is not to make the EA complicated.
The purpose is to separate what you want to test and make the results easier to explain.
If market analysis and signal checks are mixed, it becomes hard to identify what affected performance.
If lot calculation and entry conditions are mixed, changing risk settings may also change the trading conditions.
8. What to Check in Backtesting
Conclusion:
In backtesting, check not only total profit and loss but also maximum drawdown, number of trades, losing streaks, spread conditions, and parameter dependency.
Even if an EA appears to perform well, reproducibility tends to be low when it depends only on a specific period or specific parameters.
Backtesting is the process of checking whether the EA structure works as intended.
It does not guarantee future profit.
The items to check are as follows.
| Check Item | Reason to Check | Notes |
|---|---|---|
| Total profit and loss | Understand the overall profit and loss trend | Do not judge by this alone |
| Maximum drawdown | Check the size of capital decline | Decide the acceptable range in advance |
| Win rate | Check the percentage of successful trades | Review together with the profit/loss ratio |
| Profit/loss ratio | Check the relationship between average profit and average loss | A high win rate can still have a poor profit/loss ratio |
| Number of trades | Confirm the sample size | If it is too low, judgment becomes difficult |
| Losing streaks | Check the impact on money management | Review together with lot design |
| Spread conditions | Check differences from live trading | Do not depend only on fixed spreads |
| Period dependency | Check whether the EA is strong only in a specific market | Test across multiple periods |
| Parameter dependency | Find over-optimization | Check whether performance collapses at nearby values |
8.1 Check for Over-Optimization
Over-optimization means the EA has been fitted too closely to past data.
If performance is good only for a specific MA period, ATR multiplier, or time of day, it can break down easily in forward testing.
If performance worsens sharply after only a small parameter change, you need to carefully check the reproducibility of the logic.
8.2 Use Logs to Find Design Mistakes
EA logs become easier to use for testing when they record why trades were not placed.
For example, record spread exceeded, filter mismatch, OrderCheck failure, existing position present, risk limit reached, and similar reasons.
An EA without logs makes it hard to later trace why the number of trades was low in a backtest.
9. What to Check in Forward Testing
Conclusion:
In forward testing, check execution differences, spread expansion, trading frequency, and stability in a VPS environment, which are hard to see in backtesting.
It is common for backtest and forward-test results to differ, so test with the assumption that differences will occur.
Forward testing is the process of checking how the EA behaves in the current market environment.
Execution conditions may differ between demo accounts and live accounts.
The items to check are as follows.
- The difference between executed price and expected price
- Behavior when spreads widen
- Actual trading frequency
- How drawdown appears
- Deviation from backtesting
- Differences between brokers
- Operating stability in a VPS environment
- Whether trading stop conditions work as intended
9.1 Check Differences in Execution Conditions
Execution delay, slippage, and spread expansion are factors that cannot be fully reproduced in backtesting.
Especially for short-term trading EAs or EAs targeting small profit margins, even a small execution difference can greatly affect performance.
Even if OrderSend succeeds, execution at the expected price is not guaranteed.
Order results change depending on the execution method and liquidity.
9.2 Confirm That Stop Conditions Work
In forward testing, also check loss limits and trading stop conditions.
If maximum drawdown, daily loss, losing streak count, spread limits, and similar controls do not work correctly, losses may exceed expectations.
Stop conditions are design elements that are just as important as trading conditions.
10. Notes for Live Operation
Conclusion:
When running an MQL5 EA live, check not only the logic’s performance but also broker specifications, account type, spreads, execution method, leverage, and VPS stability.
EA design is not a mechanism that eliminates losses. It is a structure that makes risk easier to understand.
In live operation, differences can appear that are hard to see in backtests or demo accounts.
Spread expansion, order rejection, out-of-hours trading, stop-level changes, and insufficient margin can occur.
10.1 Differences in Account Type
In a netting account, positions for the same symbol are merged into one position.
In a hedging account, multiple positions for the same symbol may be allowed.
If the design relies only on PositionSelect, account type may cause management that differs from your intent.
For EAs that handle multiple positions, also consider ticket-level management and magic number management.
10.2 Differences in Symbol Specifications
Minimum lot, maximum lot, lot step, tick size, tick value, stop level, and freeze level differ by symbol.
If lot calculation or stop-loss width is handled as a fixed value, orders may fail on another symbol.
When using an EA across multiple symbols, retrieve symbol specifications with SymbolInfoDouble and SymbolInfoInteger before making decisions.
10.3 Leverage and Drawdown
Higher leverage allows larger positions with less margin.
At the same time, profit and loss changes from price movement can become larger, and drawdown may expand.
In live operation, it is important to decide the acceptable maximum drawdown in advance and set trading stop conditions in the EA.
11. Common Design Mistakes
Conclusion:
Common design mistakes include writing all processing in OnTick, ignoring CopyBuffer failures, skipping checks before OrderSend, and ignoring lot limits.
These mistakes can be hard to notice in backtesting and may lead to unstable behavior in live operation.
11.1 Confusing the Latest Bar with a Closed Bar
The latest bar is still forming, and its value changes on each tick.
A closed bar has already closed, and its value is fixed.
Using shift 0 in CopyBuffer retrieves the latest bar.
Using shift 1 retrieves the most recently closed bar.
You need to make clear which one the logic assumes.
11.2 Not Checking the Return Value of CopyBuffer
CopyBuffer does not always retrieve the requested number of values.
If processing continues when the number of retrieved values is insufficient, decisions may be made using uninitialized or old values.
If the number of retrieved values is less than expected, a safer design is to avoid order decisions, log the issue, and return.
11.3 Judging Orders Only with OrderSend
If you rely only on OrderSend, it becomes easy to miss problems that could be checked before order submission.
Using OrderCheck lets you confirm margin, trading conditions, and request details in advance.
However, passing OrderCheck does not guarantee execution.
Results can change depending on price movement and broker conditions at the time the order is sent.
11.4 Ignoring Lot Limits
Lot calculation must always consider minimum lot, maximum lot, and lot step.
If the calculated lot does not match the symbol specifications, the order may fail.
For risk-percentage-based lot calculation, also check stop-loss width, tick value, tick size, and equity.
12. Summary
Conclusion:
In MQL5 algorithmic trading architecture, an EA is designed by separating market analysis, filters, signals, risk management, pre-order checks, order execution, and position management.
Separating the design creates an EA that is easier to test, easier to trace, and easier to manage for live trading risk.
In MQL5, the basic structure is to prepare in OnInit, make decisions in OnTick, and clean up in OnDeinit.
When using indicator values, create handles, retrieve values with CopyBuffer, and always include processing for retrieval failures.
For order processing, use MqlTradeRequest, MqlTradeResult, and MqlTradeCheckResult, then check order details with OrderCheck before OrderSend.
In live operation, do not rely only on backtesting. Run forward tests and check spreads, execution differences, broker specifications, account type, and drawdown.
FAQ
Q1. What is MQL5 algorithmic trading architecture?
MQL5 algorithmic trading architecture is the practice of designing an EA by separating state management, risk control, pre-order checks, and position management instead of building it only from trading conditions. This makes testing easier and helps trace issues during live operation.
Q2. Can I write all processing inside OnTick in an MQL5 EA?
You can do this for a small testing EA, but practical EAs are easier to maintain when processing is separated into functions or modules. A clear structure is to keep the process flow in OnTick and move detailed checks into separate functions.
Q3. What is the basic way to get indicator values in MQL5?
The basic MQL5 structure is to create an indicator handle in OnInit and retrieve values with CopyBuffer in OnTick. If the number of retrieved values is insufficient, the EA should stop before making a trade decision.
Q4. Is OrderCheck necessary before OrderSend?
Using OrderCheck before OrderSend makes it easier to find margin and trading-condition problems before submitting the order. However, passing OrderCheck does not guarantee actual execution.
Q5. What is the problem with using only fixed lots in EA design?
Fixed lots are easy to implement, but they do not adapt well to changes in account balance or stop-loss width. For live operation, the design should consider minimum lot, maximum lot, lot step, acceptable risk, and stop-loss width.
Q6. What should I pay the most attention to in backtesting?
In backtesting, check maximum drawdown, number of trades, losing streaks, spread conditions, and parameter dependency, not only total profit and loss. Backtest results do not guarantee future profit, so forward testing is also necessary.
Q7. Do netting and hedging account differences affect EA design?
Yes. In a netting account, positions for the same symbol are merged, while in a hedging account, multiple positions may be held for the same symbol. This affects position management, exit management, and magic number management.
Q8. What risks should be checked before live operation?
Before live operation, check spread expansion, execution delay, slippage, broker specifications, leverage, maximum drawdown, and VPS stability. Demo and live accounts may have different execution conditions.