- 1 Key Takeaway
- 2 1. Why MQL5 EA Development Requires Design
- 3 2. Overall EA Design Concept
- 4 3. Basic Structure of an MQL5 EA
- 5 4. Roles of the Main Modules
- 6 5. Implementation Patterns
- 7 6. Sample Code
- 8 7. Comparison of Design Patterns
- 9 8. What to Check in Backtesting
- 10 9. What to Check in Forward Testing
- 11 10. Practical Notes for Live Trading
- 12 11. Common Design Mistakes
- 13 12. Summary
- 14 FAQ
- 14.1 What should I design first when developing an EA in MQL5?
- 14.2 Can an MQL5 EA run if I only write OnTick?
- 14.3 What is the basic flow for getting indicator values in MQL5?
- 14.4 Is OrderCheck necessary in EA development?
- 14.5 Is it acceptable to build an EA with only fixed lots?
- 14.6 Can I use an EA in live trading if it is profitable in a backtest?
- 14.7 What should I check in forward testing?
- 14.8 What are common beginner mistakes in MQL5 EA development?
Key Takeaway
To develop an EA in MQL5, you need to design more than entry and exit conditions. Separate state management, risk management, pre-order checks, and post-execution management.
In MetaTrader 5, an EA mainly uses OnInit, OnTick, and OnDeinit to handle initialization, tick-by-tick decisions, and shutdown processing.
When using indicator values, the basic flow is to create a handle and retrieve values with CopyBuffer.
For live trading, do not rely only on backtest results. You need to verify reproducibility with spreads, execution behavior, broker specifications, and forward testing.
1. Why MQL5 EA Development Requires Design
Conclusion:
In MQL5 EA development, creating only trading signals is not enough for stable operation.
An EA must be designed as a system that processes market analysis, risk checks, order execution, position management, and stop conditions in a clear order.
An EA is not just a program that sends an order when conditions match.
In a real EA, you must check whether trading is allowed at that time, whether the spread is too wide, whether margin is sufficient, whether an existing position is open, and whether the loss tolerance has already been exceeded.
The important point in MQL5 EA development is to separate decision logic from execution logic.
If signal checks and order submission are packed into the same place, it becomes difficult to identify the cause when an error occurs.
Definition:
EA design means structuring automated trading logic into separate parts: decision, verification, execution, management, and stopping.
1.1 Why Conditional Branches Alone Are Not Enough
A simple EA often checks conditions inside OnTick and sends an order immediately.
However, in live trading, the same condition may become true many times as ticks update.
For that reason, an EA needs state management such as the following:
- Whether a position is already open
- Whether the EA has already entered more than once on the same candle
- Whether the result after order submission has been checked
- Whether the loss limit has been reached
- Whether a trading stop condition applies
When an MQL5 EA is designed as a stateful program, it becomes easier to reduce duplicate orders and unexpected repeated trades.
1.2 Processes Beginners Should Separate First
When beginners to intermediate developers build an EA, they do not need to aim for a complex class design from the beginning.
The first priority is to separate each processing role into functions.
The basic separation is as follows:
- Market recognition
- Filter checks
- Signal checks
- Lot calculation
- Pre-order checks
- Order submission
- Position management
- Exit decisions
- Error handling
- Log output
This separation makes it easier to identify the cause when a problem appears in a backtest.
2. Overall EA Design Concept
Conclusion:
An MQL5 EA is easier to manage when it passes through the required checks step by step, instead of running every process on every tick without structure.
The core idea is to confirm whether trading is allowed before deciding whether to trade.
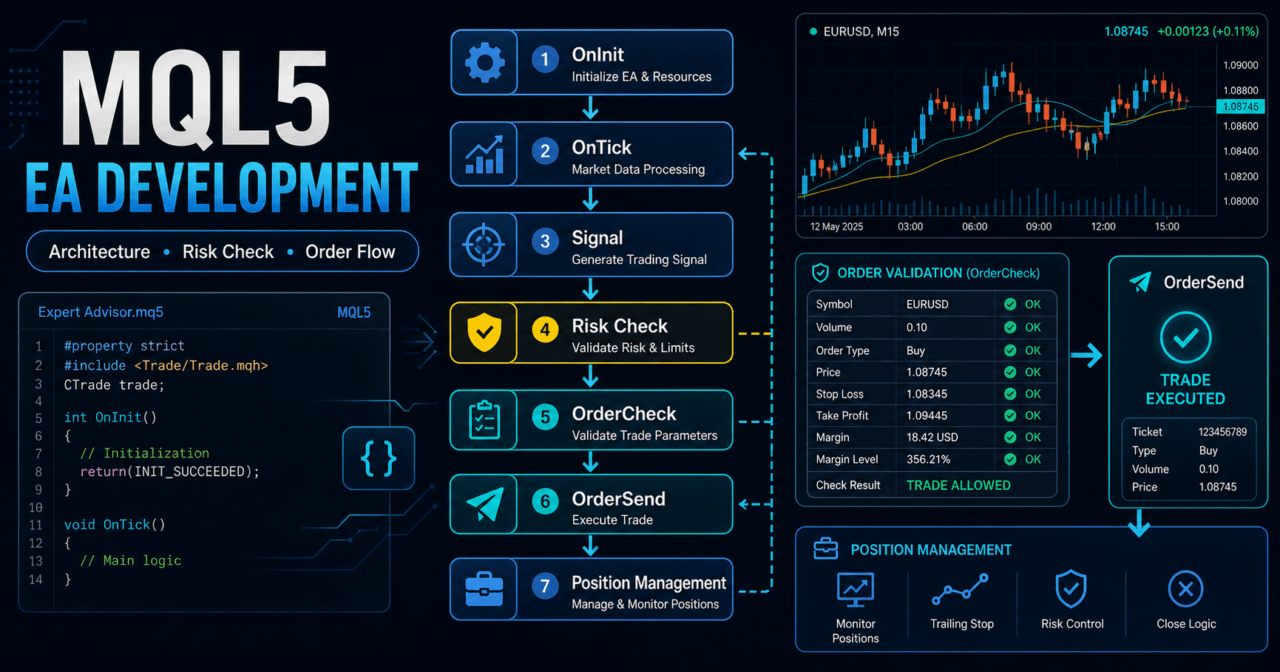
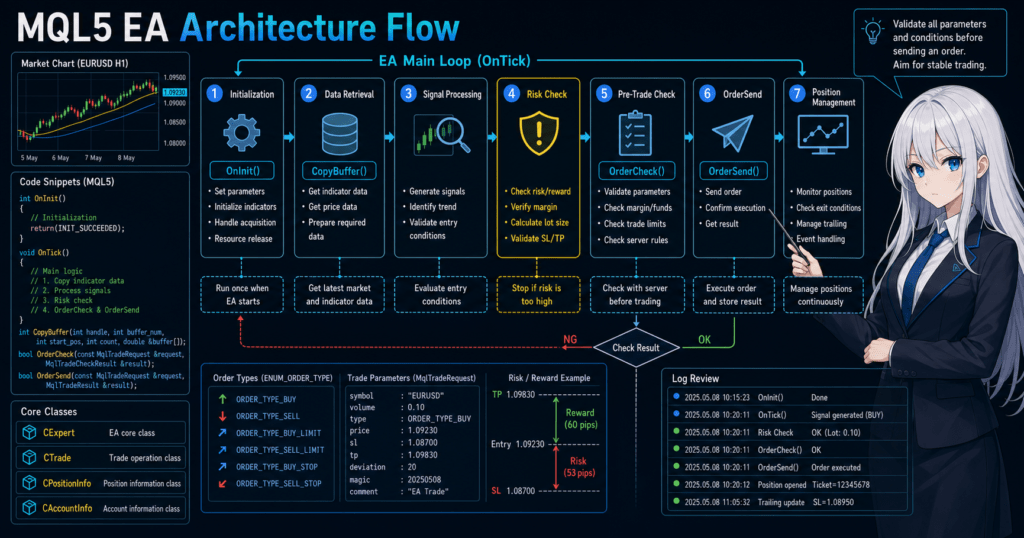
The overall EA flow is easier to organize in the following order:
Market recognition
↓
Filter checks
↓
Signal checks
↓
Risk checks
↓
Pre-order checks
↓
Order submission
↓
Post-execution management
↓
Exit and stop decisions
In this flow, the trading signal is only one part of the middle stage.
Before the signal, the EA checks the market environment and whether trading is allowed. After the signal, it checks risk and order conditions.
2.1 Roles of OnInit, OnTick, and OnDeinit
In an MQL5 EA, the following event functions are used most often.
| Function | Role | Use in EA development |
|---|---|---|
OnInit | Initialization processing | Create indicator handles and set initial values |
OnTick | Processing when a new tick is received | Signal checks, order decisions, and position management |
OnDeinit | Cleanup when the EA stops | Release handles and output shutdown logs |
OnTimer | Timer event processing | Monitoring at fixed intervals |
OnTradeTransaction | Detailed order and execution event processing | Track execution results and order status |
In EA articles, OnTick is usually the central function.
However, when using indicators, the natural structure is to create handles in OnInit and release them in OnDeinit when the EA ends.
2.2 Do Not Confuse MQL5 with MQL4-Style Code
In MQL5, many indicator functions do not return values directly. They return indicator handles.
After that, you retrieve buffer values with CopyBuffer.
For example, in an EA that uses moving averages, you create a handle with iMA and retrieve the current value or confirmed candle value with CopyBuffer.
If you write in an MQL4-like style without understanding this flow, problems can occur, such as failing to retrieve values, using invalid handles, or setting the array direction incorrectly.
3. Basic Structure of an MQL5 EA
Conclusion:
The basic structure of an MQL5 EA is to prepare in OnInit, make decisions in OnTick, and clean up in OnDeinit.
When using indicators, you need to clearly separate handle creation, data retrieval, and handle release.
The minimum structure looks like this:
#property strict

int OnInit()
{
   return INIT_SUCCEEDED;
}

void OnDeinit(const int reason)
{
}

void OnTick()
{
}
You then add market checks, risk checks, order processing, and exit processing to this structure.
3.1 Basic Structure Using Indicator Handles
When using indicator values such as moving averages in an EA, you create a handle first and then retrieve the values.
#property strict

int ma_handle = INVALID_HANDLE;

int OnInit()
{
   ma_handle = iMA(_Symbol, _Period, 20, 0, MODE_SMA, PRICE_CLOSE);

   if(ma_handle == INVALID_HANDLE)
   {
      Print("Failed to create MA handle");
      return INIT_FAILED;
   }

   return INIT_SUCCEEDED;
}

void OnDeinit(const int reason)
{
   if(ma_handle != INVALID_HANDLE)
   {
      IndicatorRelease(ma_handle);
   }
}

void OnTick()
{
   double ma_values[];
   ArraySetAsSeries(ma_values, true);

   if(BarsCalculated(ma_handle) < 3)
   {
      Print("MA data is not ready");
      return;
   }

   int copied = CopyBuffer(ma_handle, 0, 0, 3, ma_values);

   if(copied < 3)
   {
      Print("CopyBuffer failed or not enough MA data");
      return;
   }

   double current_ma = ma_values[0];
   double confirmed_ma = ma_values[1];

   Print("Current MA: ", current_ma, " Confirmed MA: ", confirmed_ma);
}
This code separates the current candle value from the confirmed candle value.
Because the current candle changes on every tick, you may want to design trading decisions around confirmed candles instead.
3.2 Difference Between the Current Candle and a Confirmed Candle
The current candle is the candle that is still forming.
Because its value changes as ticks update, a condition may become true temporarily and then disappear.
A confirmed candle is a candle that has already closed.
Using confirmed candles makes it easier to verify the reproducibility of decisions.
In EA signal design, you must clearly decide whether to use the current candle or confirmed candles.
4. Roles of the Main Modules
Conclusion:
An EA becomes easier to maintain when signal checks, risk management, lot calculation, pre-order checks, and position management are handled as separate modules.
By separating processing, you can more easily see which condition affected performance during testing.
The main EA modules can be separated as follows:
| Module | Role | Main checks |
|---|---|---|
| Market recognition | Determines trend or range conditions | Moving averages, ADX, ATR, higher timeframes |
| Filter checks | Excludes conditions where trading should not occur | Spread, time of day, volatility |
| Signal checks | Determines trade direction | Crossovers, breakouts, reversal conditions |
| Lot calculation | Determines order volume | Minimum lot, maximum lot, lot step |
| Pre-order checks | Confirms whether an order can be placed | Margin, stop level, trading permission |
| Order submission | Sends the actual order | MqlTradeRequest, OrderSend |
| Position management | Manages open positions | Stop loss, take profit, trailing stop |
| Stop control | Manages conditions that stop trading | Daily loss, maximum drawdown |
4.1 Risk Management Module
Risk management handles the loss allowed per trade, daily loss, and maximum drawdown.
Even if an EA is profitable in a backtest, an EA with excessive drawdown can be difficult to continue using in live trading.
The main management items are as follows:
- Allowed loss per trade
- Stop conditions after consecutive losses
- Daily or weekly loss limit
- Decline in equity
- Range of fluctuation caused by leverage
Backtest results do not guarantee future profits.
Before live trading, you need to use forward testing to check drawdown and execution differences.
4.2 Lot Calculation Module
Lot calculation should consider not only a simple fixed lot size, but also account balance, allowed risk, stop-loss distance, and symbol specifications.
Items to check in lot calculation include the following:
- Minimum lot
- Maximum lot
- Lot step
- Required margin
- Account balance
- Equity
- Stop-loss distance
- Tick value
- Tick size
If the lot size does not match the symbol specifications, the order will fail.
Before sending an order, normalize the lot size and check it with OrderCheck when needed.
5. Implementation Patterns
Conclusion:
In MQL5 EA implementation, a practical approach is to first build a simple single-symbol structure, then add filters, lot calculation, and position management.
If you add multiple currencies or complex optimization from the beginning, it becomes harder to isolate the cause of problems.
Choose the implementation pattern based on the purpose.
5.1 Single-Symbol EA
A single-symbol EA is built mainly around _Symbol and _Period.
For your first EA development project, starting with a single symbol makes verification easier.
It is suitable for the following uses:
- First-time EA development
- Testing signal conditions
- Practicing indicator data retrieval
- Checking order processing
5.2 Multi-Symbol EA
In a multi-symbol EA, you manage handles, prices, positions, and trading conditions for each symbol.
State management becomes more complex than in a single-symbol EA.
Items to check for each symbol include the following:
- Spread
- Minimum lot
- Maximum lot
- Lot step
- Trading hours
- Stop level
- Freeze level
- Required margin
A multi-symbol EA must be designed so that an error in one symbol does not affect processing for other symbols.
5.3 Difference Between Netting and Hedging Accounts
In MQL5, position management changes depending on the account type.
In a netting account, positions for the same symbol are generally consolidated into one position.
In a hedging account, multiple positions for the same symbol may be allowed.
When managing positions in an EA, the design must account for the account type.
Even with the same order logic, the way open positions appear can change depending on the account type.
6. Sample Code
Conclusion:
EA sample code is easier to understand when signal checks, lot calculation, pre-order checks, and order submission are written separately.
For order processing, use MqlTradeRequest, MqlTradeResult, and MqlTradeCheckResult, and check the order with OrderCheck before sending it.
The following code is a simple EA structure for testing with moving averages.
It is not a complete production-ready EA. It is a sample for understanding the design units.
#property strict

input double RiskLots = 0.10;
input int FastMAPeriod = 10;
input int SlowMAPeriod = 30;
input int StopLossPoints = 300;
input int TakeProfitPoints = 600;

int fast_ma_handle = INVALID_HANDLE;
int slow_ma_handle = INVALID_HANDLE;

int OnInit()
{
   fast_ma_handle = iMA(_Symbol, _Period, FastMAPeriod, 0, MODE_SMA, PRICE_CLOSE);
   slow_ma_handle = iMA(_Symbol, _Period, SlowMAPeriod, 0, MODE_SMA, PRICE_CLOSE);

   if(fast_ma_handle == INVALID_HANDLE || slow_ma_handle == INVALID_HANDLE)
   {
      Print("Failed to create MA handles");
      return INIT_FAILED;
   }

   return INIT_SUCCEEDED;
}

void OnDeinit(const int reason)
{
   if(fast_ma_handle != INVALID_HANDLE)
      IndicatorRelease(fast_ma_handle);

   if(slow_ma_handle != INVALID_HANDLE)
      IndicatorRelease(slow_ma_handle);
}

void OnTick()
{
   if(PositionSelect(_Symbol))
      return;

   int signal = GetSignal();

   if(signal == 0)
      return;

   double lot = NormalizeLot(RiskLots);

   if(lot <= 0.0)
   {
      Print("Invalid lot size");
      return;
   }

   if(!CheckSpread())
      return;

   SendMarketOrder(signal, lot);
}

int GetSignal()
{
   double fast_ma[];
   double slow_ma[];

   ArraySetAsSeries(fast_ma, true);
   ArraySetAsSeries(slow_ma, true);

   if(BarsCalculated(fast_ma_handle) < 3 || BarsCalculated(slow_ma_handle) < 3)
      return 0;

   int fast_copied = CopyBuffer(fast_ma_handle, 0, 0, 3, fast_ma);
   int slow_copied = CopyBuffer(slow_ma_handle, 0, 0, 3, slow_ma);

   if(fast_copied < 3 || slow_copied < 3)
   {
      Print("CopyBuffer failed or not enough data");
      return 0;
   }

   bool buy_signal = fast_ma[1] > slow_ma[1] && fast_ma[2] <= slow_ma[2];
   bool sell_signal = fast_ma[1] < slow_ma[1] && fast_ma[2] >= slow_ma[2];

   if(buy_signal)
      return 1;

   if(sell_signal)
      return -1;

   return 0;
}

bool CheckSpread()
{
   long spread_points = SymbolInfoInteger(_Symbol, SYMBOL_SPREAD);

   if(spread_points > 30)
   {
      Print("Spread is too wide: ", spread_points);
      return false;
   }

   return true;
}

double NormalizeLot(double lot)
{
   double min_lot = SymbolInfoDouble(_Symbol, SYMBOL_VOLUME_MIN);
   double max_lot = SymbolInfoDouble(_Symbol, SYMBOL_VOLUME_MAX);
   double lot_step = SymbolInfoDouble(_Symbol, SYMBOL_VOLUME_STEP);

   if(lot < min_lot)
      lot = min_lot;

   if(lot > max_lot)
      lot = max_lot;

   lot = MathFloor(lot / lot_step) * lot_step;
   return NormalizeDouble(lot, 2);
}

void SendMarketOrder(int signal, double lot)
{
   MqlTradeRequest request;
   MqlTradeResult result;
   MqlTradeCheckResult check;

   ZeroMemory(request);
   ZeroMemory(result);
   ZeroMemory(check);

   double ask = SymbolInfoDouble(_Symbol, SYMBOL_ASK);
   double bid = SymbolInfoDouble(_Symbol, SYMBOL_BID);
   double point = SymbolInfoDouble(_Symbol, SYMBOL_POINT);

   request.action = TRADE_ACTION_DEAL;
   request.symbol = _Symbol;
   request.volume = lot;
   request.deviation = 20;
   request.magic = 123456;

   if(signal > 0)
   {
      request.type = ORDER_TYPE_BUY;
      request.price = ask;
      request.sl = ask - StopLossPoints * point;
      request.tp = ask + TakeProfitPoints * point;
   }
   else
   {
      request.type = ORDER_TYPE_SELL;
      request.price = bid;
      request.sl = bid + StopLossPoints * point;
      request.tp = bid - TakeProfitPoints * point;
   }

   if(!OrderCheck(request, check))
   {
      Print("OrderCheck failed. Retcode: ", check.retcode);
      return;
   }

   if(!OrderSend(request, result))
   {
      Print("OrderSend failed. Retcode: ", result.retcode);
      return;
   }

   Print("OrderSend completed. Order: ", result.order, " Deal: ", result.deal);
}
6.1 Review Points in the Sample Code
In this sample, moving average handles are created in OnInit, and confirmed candle values are retrieved with CopyBuffer.
Before sending an order, the EA checks the spread and lot size, then inspects the order conditions with OrderCheck.
When expanding this for live trading, add the following processes:
- Check tradable hours
- Check the stop level
- Check the freeze level
- Handle insufficient margin
- Prevent repeated orders
- Set a daily loss limit
- Manage state after execution
- Output logs based on the error details
6.2 Checks You Should Not Omit in Order Code
In order code, checking only whether OrderSend succeeds is not enough.
The order result can change depending on execution mode, spread, lot size, stop level, margin, and account type.
At minimum, check the following items during order processing:
- Whether trading is allowed
- Whether the symbol is tradable
- Whether the lot size matches the symbol specifications
- Whether the stop loss and take profit are too close
- Whether the required margin is available
- Whether the order conflicts with existing positions
- Whether the assumptions match a netting account or hedging account
7. Comparison of Design Patterns
Conclusion:
There are several ways to design an EA, but beginners to intermediate developers usually have the easiest path by starting with a simple conditional-branch style and then moving toward state management.
More complex designs can improve maintainability, but they also increase implementation difficulty and testing workload.
| Method | Advantages | Disadvantages | Best fit | Implementation difficulty |
|---|---|---|---|---|
| Conditional-branch style | Easy to start building | Breaks down easily as processing grows | Early learning and test EAs | Low |
| Function-separated style | Easy to isolate causes | Requires function design | Single-symbol EAs | Medium |
| State-management style | Easy to handle duplicate orders and stop conditions | Requires state-transition design | EAs intended for live trading | Medium |
| Modular style | Easy to maintain | File structure can become complex | Medium-sized and larger EAs | High |
| Multi-symbol management style | Can handle multiple symbols | Symbol-specific differences become complex | Portfolio-style EAs | High |
7.1 Design Suitable for Beginners
For beginners, the function-separated style is suitable.
Instead of writing everything in OnTick, separate signal checks, lot calculation, and order processing into functions.
With a function-separated style, when backtest results are poor, it becomes easier to check whether the cause is the signal, the filter, or the order conditions.
7.2 Design for Live Trading
When designing for live trading, state management becomes necessary.
This is because an EA has states such as holding a position, waiting, stopped, and checking an order.
State management makes it easier to control the following:
- Avoid re-entering on the same candle
- Stop trading after consecutive losses
- Stop after reaching the daily loss limit
- Check the result after order submission
- Limit new orders while a position is open
8. What to Check in Backtesting
Conclusion:
In backtesting, you need to check not only total profit and loss, but also maximum drawdown, number of trades, profit-loss ratio, period dependency, and parameter dependency.
Backtest results do not guarantee future profits, so use them as material for checking reproducibility.
Items to check in a backtest include the following:
| Item | Reason to check | Note |
|---|---|---|
| Total profit and loss | Checks overall performance | Do not judge by this alone |
| Maximum drawdown | Shows the size of capital decline | Decide the acceptable range in advance |
| Win rate | Shows the percentage of successful trades | Do not judge by win rate alone |
| Profit-loss ratio | Shows the relationship between average profit and average loss | Check together with win rate |
| Number of trades | Shows statistical stability | Too few trades make judgment difficult |
| Consecutive losses | Shows psychological and capital pressure | Affects lot design |
| Spread conditions | Shows the impact of costs | Do not judge only by fixed conditions |
| Period dependency | Checks whether performance is strong only in a specific period | Check multiple periods |
| Parameter dependency | Helps avoid over-optimization | Check nearby values too |
8.1 Checks to Avoid Over-Optimization
Over-optimization means settings are fitted too closely to specific historical data.
Even if the results look good on past data, they can break down in another period or in live trading.
To avoid over-optimization, check the following:
- Whether results remain stable when parameters are changed slightly
- Whether extreme differences appear across multiple periods
- Whether the number of trades is too small
- Whether behavior remains valid when the spread is widened
- Whether the stop-loss or take-profit distance depends too heavily on one specific value
8.2 Points Often Missed in Backtesting
In backtesting, execution conditions and spread conditions may differ from live trading.
For that reason, even if performance looks good, the same result is not guaranteed on a real account.
For short-term trading EAs in particular, spread widening, slippage, and execution delay can have a large impact.
In backtesting, you need to check the EA’s tolerance for trading costs.
9. What to Check in Forward Testing
Conclusion:
Forward testing checks how the EA created in backtesting behaves in the current market and under real execution conditions.
Pay special attention to execution differences, spread widening, trade frequency, drawdown, and stability in a VPS environment.
Items to check in forward testing include the following:
- Execution differences
- Behavior when spreads widen
- Trade frequency
- Maximum drawdown
- Deviation from the backtest
- Broker differences
- Stability in a VPS environment
- Error details in logs
- Behavior of trading stop conditions
9.1 Difference Between Demo and Real Accounts
Execution conditions and spread conditions may differ between demo accounts and real accounts.
Even if the EA runs without problems on a demo account, it may be affected by execution delay or slippage on a real account.
In forward testing, keep logs and check order submission time, price, execution result, and error codes.
9.2 What to Check in a VPS Environment
When running an EA continuously, you also need to check the stability of the VPS environment.
Terminal shutdowns, disconnections, restarts, and time drift can affect EA behavior.
Check the following items:
- Whether MetaTrader 5 keeps running continuously
- Whether automated trading is enabled
- Whether communication errors appear in the logs
- Whether handles are recreated after a restart
- Whether unnecessary orders are avoided outside trading hours
10. Practical Notes for Live Trading
Conclusion:
When using an MQL5 EA in live trading, you need to prioritize spread, execution, broker specifications, and drawdown management over backtest results.
EA performance changes depending on market conditions, trading conditions, leverage, and parameter settings.
Consider the following risks in live trading:
- Backtests and live trading do not match perfectly
- Performance may worsen when spreads widen
- Execution delays and slippage may occur
- Over-optimization tends to break down in forward testing
- Logic that depends heavily on parameters often has low reproducibility
- You need to decide drawdown tolerance in advance
- EA behavior may change depending on broker specifications
- Execution conditions may differ between demo and real accounts
10.1 Leverage and Drawdown
The higher the leverage, the more likely the same price movement is to have a larger impact on capital.
Increasing lot size increases not only the range of profit fluctuation but also the range of loss fluctuation.
In an EA, it is important to estimate maximum drawdown in advance and set trading stop conditions.
An EA without loss limits may cause a larger-than-expected capital decline during sudden market moves.
10.2 Differences in Broker Specifications
Minimum lot, maximum lot, lot step, stop level, freeze level, and tradable hours differ by broker and symbol.
Even with the same EA, order results and performance may change depending on broker conditions.
Before live trading, design the EA to check the trading conditions of the symbols being used and avoid sending orders that do not meet those conditions.
11. Common Design Mistakes
Conclusion:
Common MQL5 EA design mistakes include packing too much logic into OnTick, ignoring CopyBuffer retrieval failures, and omitting pre-order checks.
These mistakes may be hard to notice in backtesting and can become problems in live trading.
Common design mistakes include the following:
- Writing all processing inside
OnTick - Not checking whether indicator handle creation failed
- Not checking the number of values retrieved by
CopyBuffer - Confusing the current candle with confirmed candles
- Sending orders many times on the same candle
- Not checking existing positions
- Ignoring lot limits
- Not using
OrderCheck - Ignoring spread widening
- Not distinguishing between netting and hedging accounts
- Judging only by total profit and loss in a backtest
11.1 CopyBuffer-Related Mistakes
CopyBuffer does not always retrieve the number of values requested.
If data is insufficient or the handle is invalid, the returned count may be lower than expected.
Therefore, check the return value and stop processing if the required number of values cannot be retrieved.
If retrieval failures are ignored, the EA may make trading decisions using uninitialized values.
11.2 Order Processing Mistakes
In order processing, a design that only calls OrderSend and skips result checks is risky.
If lot size, margin, stop level, trading permission, and account type are not checked, it becomes difficult to identify why an order failed.
Before sending an order, use OrderCheck. After sending an order, check the result in MqlTradeResult.
12. Summary
Conclusion:
In MQL5 EA development, it is important to design the overall processing structure before focusing on the trading logic.
By separating state management, risk management, pre-order checks, and verification steps, you can build an EA where problems are easier to isolate.
The basic MQL5 EA structure is to prepare in OnInit, make decisions in OnTick, and clean up in OnDeinit.
When using indicator values, create a handle, retrieve values with CopyBuffer, and release the handle with IndicatorRelease when needed.
For order processing, a practical design uses MqlTradeRequest, MqlTradeResult, and MqlTradeCheckResult, and runs OrderCheck before OrderSend.
In backtesting and forward testing, check not only total profit and loss, but also drawdown, spread, execution differences, and the impact of broker specifications.
In EA development, the important goal is not to assume profit, but to create a structure that is easy to test, easy to troubleshoot, and easy to control for risk.
FAQ
What should I design first when developing an EA in MQL5?
The first thing to design is the overall processing flow of the EA, not the trading signal. Separating market recognition, filter checks, risk checks, pre-order checks, order submission, and position management makes later verification easier.
Can an MQL5 EA run if I only write OnTick?
Simple processing can run with only OnTick, but practical EAs also need OnInit and OnDeinit. A natural structure is to create indicator handles in OnInit and release handles or perform cleanup in OnDeinit.
What is the basic flow for getting indicator values in MQL5?
In MQL5, the basic flow is to create a handle with an indicator function and retrieve buffer values with CopyBuffer. Before retrieval, check the handle validity and the number of available data points, and stop the trading decision if the retrieved count is insufficient.
Is OrderCheck necessary in EA development?
Using OrderCheck before sending an order makes it easier to verify conditions such as margin, lot size, and stop level in advance. If you depend only on OrderSend, it becomes harder to isolate the cause of order failures.
Is it acceptable to build an EA with only fixed lots?
Fixed lots are easy to implement, but they do not adapt well to changes in account balance or stop-loss distance. For live trading, you need to consider minimum lot, maximum lot, lot step, allowed risk, and margin.
Can I use an EA in live trading if it is profitable in a backtest?
Judging live use only from backtest results is risky. Spreads, execution delays, slippage, and broker specifications can make live trading results differ from backtest results.
What should I check in forward testing?
In forward testing, check execution differences, behavior during spread widening, trade frequency, drawdown, and deviation from the backtest. If the EA runs on a VPS, also check connection stability and log errors.
What are common beginner mistakes in MQL5 EA development?
Common mistakes include putting too much processing inside OnTick, not checking the return value of CopyBuffer, and skipping pre-order checks. These issues may be hard to see in backtesting and can cause problems in live trading.